
© Catharine Ellis, as posted to the blog: Natural Dye: Experiments and Results
Set up a small notebook/logbook for each vat that you make. Record the ingredients included, their amounts, procedure, and dates. Use this book to retain samples of your initial testing to determine when the vat reduces. Record any additions that you might make over time. Over time, this book is the “story” of your vat and will be a very valuable tool. I have books that I have maintained for months or even years.

- Stir the vat daily, (see note below *)
- Measure and record the temperature and pH on a regular basis. Add this information to your log/notebook
- Record the results of dye tests regularly: once a week or so. Add this information and the samples to your log/notebook
- Once a week, add a small amount of lime (calcium hydroxide) to the vat: 0.1 g/liter (that’s 1/10th of a gram/per liter). Document this in your vat log/notebook.
- Once a month, add a small amount of dry wheat bran that has been freshly cooked wheat bran to the vat. 0.5 gram dry bran per liter. Document.
- Use a paper calendar, or any other method you find useful, to keep track of regular additions of lime and bran.
- If the dyed color suddenly becomes very pale, check the pH. If the pH is within range (9.5-11), the vat may need additional organic material to boost fermentation. Cook a small amount of bran (about 1-2 grams/liter) and add it to the vat. Stir, wait until the next day, and then dye another test.
- If possible or practical, keep a running record of the quantity of textiles that are dyed in the vat, either by weigh, yardage, etc. This will give you a sense of how much indigo you are using/depleting over time if that is important to you. This may not be important to all dyers but a production dyer will benefit from this information.
- If the pH of the vat drops below 9.5 add additional lime (calcium hydroxide) to boost the alkalinity.
- Measure and record the temperature of the vat. NOTE: once the vat has reached full fermentation, it can be maintained without supplemental heat. Do prevent it from freezing, as that can destroy the bacteria in the vat.
- If the volume of solution in the vat decreases, (due to evaporation or dyeing) add warm water into which you have dissolved 25 grams of soda ash or potash per liter OR add wood ash lye. If you are continuing to make small test vats, then they can also be added to the vat to supplement the volume in the vat.
- At some point the indigo in the vat will be diminished. These older vats are valuable for obtaining pale blue colors. You can begin a new vat for darker colors.
* You do not need to be a “slave” to your vat! I have gone away from home for as long as 3 weeks without tending the vats. On returning the vats were just fine, although they did need pH adjustment and an addition of cooked bran to revitalize them.
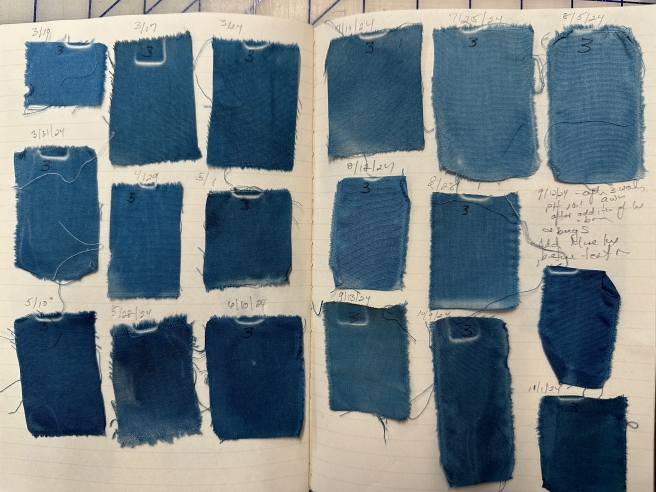
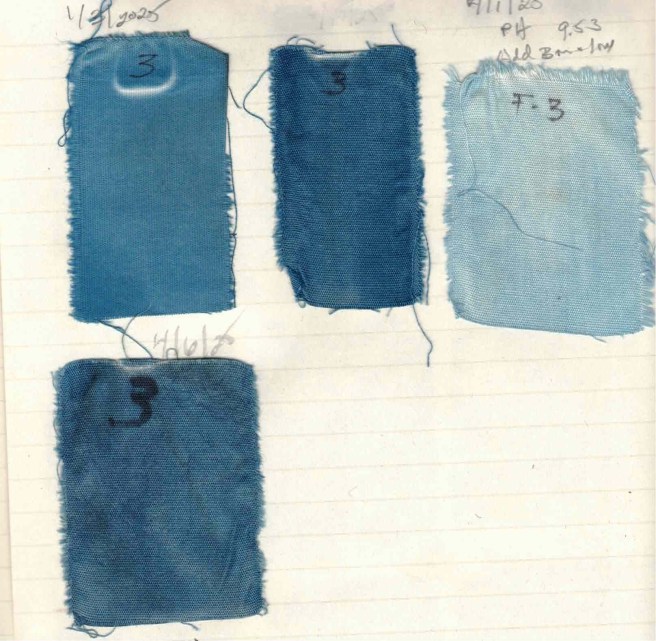
A sampling of pages from my dye log:
It’s always instructive to see how the vat becomes livelier after additions of bran.

Thanks so much for this series. It’s very generous of you. This reminds me of sour dough – it takes a whi
and a lot of patience!
Thank you for the information Catherine, it is so valuable. I have a small test vat that was going along well. Day6 the colour disappeared so I put in some lime but now the pH is 12.3 and still mo colour. I added 20g each spent madder and wheat bran, still no colour. Have I ruined it with too high pH? Will it correct itself in time?
Please could you provide some thoughts or should I start again?
Thank you again,
Sincerely,
Jane
Give it time! The pH did get higher than recommended but with the additional madder and wheat bran, it may take a few days for the bacteria to liven up again. Additions of lime to test vats are done VERY sparingly!
Hello Catherine,
Thank you for your advice. Next time I’ll go a lot more sparingly as you suggested.
All the best.
Jane
Hello Catherine!
Thank you sooo much for sharing your research and expertise on fermented indigo vats.
I have a question for you: can I use foraged curly dock roots instead of the indigo/henna? And if so, should it be boiled?
Again, thank you so much!
Evelyn
I have not used foraged dock root – only dried finely ground roots – so I cannot speak from experience. I would grind/grate it to release the cellulose and sugars in the roots. My weights are based on dry root ingredients so you will have to do some guessing here. The other thing I do not know is whether the drying of the roots first might be important – as it is for madder root – but I doublt it. I always used my dock root first for dyeing, then cooked it up a bit for the indigo vat. Let us know how this works for you!
Thank you so much for this series! I am currently practicing my skills with Watanabes Sukumo Kits from Japan and learning to keep records. My least favorite subject in school was chemistry haha… All of the things you have described in this series have vaguely wandered through my thoughts as I have practiced indigo dyeing for 6 years starting with a fructose vat, however you have made it clear, organized and accessible. I will be sharing this with my students and anyone who wants to understand indigo. Thank you again 🙂
I greatly appreciate the time and effort youve put into getting a good fermentation vat. I’m using your madder vat with Persicaria leaves now. I have a question about the maintenance. The vat recipe uses soda ash (Sodium carbonate) so I was surprised that you’re adding lime (Calcium hydroxide) to the vat for maintenance. I didnt think the two were compatible.
It’s not that they aren’t compatible – the soda ash is used as the primary alkaline to create an environment with the correct pH and get the vat going. Wood ash lye also works. The lime is a much more concentrated alkaline and used only for boosting the pH, as needed – in very small amounts. Even sukumo vats use lime to maintain the correct pH. BUT, over time, the calcium does build up in the bottom, although very slowly.
Many thanks for the clarification. Anne Brooke
Catharine,
This note is a continuation of a thread from your post #6, but I was unable to comment there: it is regarding my 4 one-liter trial vats where I am comparing different madders. Today is Day #11 of the trials. So far, the lowest pH in any jar has been 10, so I have not added lime at all……is this in keeping with your recommendations? Thank, SallyB
Absolutely! Have you been doing dye samples? The samples themselves will tell you when the pH dips a bit, as the color will get bit lighter.
Yes, I have daily notes and dye samples from the 4 jars. I thought I might report in to you after Day 14, but unsure how to upload photos to the comments section……
I have no polygonum balls for comparison with dried leaves, but could make some from this season’s plants……test results would be a while……
Thanks, SallyB
Catharine,
More questions!
Why do you use ‘polygonum’ rather than ‘persicaria’ in referring to Japanese indigo?
Is there an advantage to making polygonum balls rather than using crumbled dried leaves as an addition to the vat?
Thanks, SallyB
Both names are currently used in the plant science community. And I also like this name because it describes the plant. This is a link to the current names used in the plant scientific field. https://www.worldfloraonline.org/taxon/wfo-0000489052
Regarding the polygonum leaf balls – I found that a woad ball (given to me by Gasali) significantly speeded up the bacterial fermentation. So, it’s something I started and continued. But I have not done a comparison of the dried, crumbled leaves vs. the balls. If you test that, please let us know!
Thank you very much for this insight into a fermentation vat. This is a real eye opener (also to understanding other vats better). I was so happy to start my first henna vat, thinking this was already better than fructose, and I believe an iron vater is even better again. A sukomo vat is not an option for me because I don’t have the space to grow so much Japanese indigo, but this fermentation vat seems to be the best option of all. I will be sure to try it once my present vat is finished.
I appreciate your liberty with such information. Thank you again!!!
Andrea (Germany)
oh my! I was getting ready to do my first feeding of my 19 litre fermentation vat when I discovered that the bran I have is oat bran, not wheat bran. I’m going to go ahead and give it a try. Fingers crossed. I will report back.
Oh, yes, please do report back. I have never tried using oat bran…. but who knows?