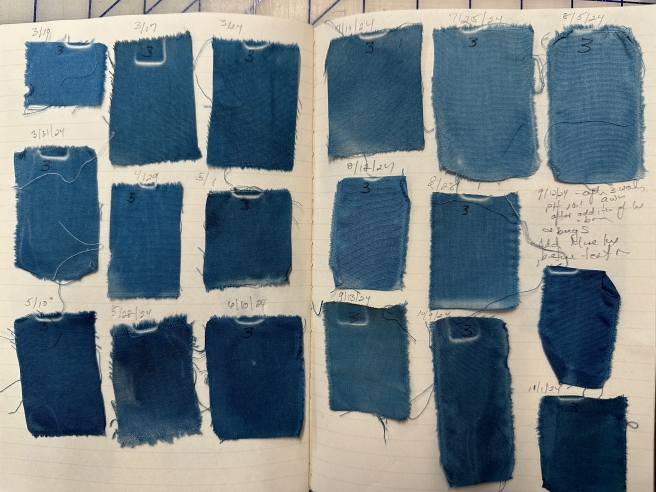
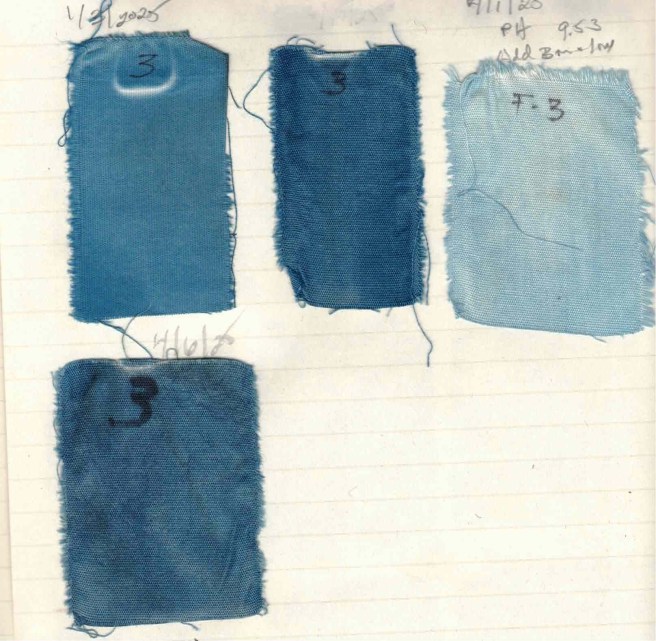
Set up a small notebook/logbook for each vat that you make. Record the ingredients included, their amounts, procedure, and dates. Use this book to retain samples of your initial testing to determine when the vat reduces. Record any additions that you might make over time. Over time, this book is the “story” of your vat and will be a very valuable tool. I have books that I have maintained for months or even years.
These simple notebooks are invaluable in helping me to care for my vat and predict the dye colors I can achieve.
Stir the vat daily, (see note below *)
Measure and record the temperature and pH on a regular basis. Add this information to your log/notebook
Record the results of dye tests regularly: once a week or so. Add this information and the samples to your log/notebook
Once a week, add a small amount of lime (calcium hydroxide) to the vat: 0.1 g/liter (that’s 1/10th of a gram/per liter). Document this in your vat log/notebook.
Once a month, add a small amount of dry wheat bran that has been freshly cooked wheat bran to the vat. 0.5 gram dry bran per liter. Document.
Use a paper calendar, or any other method you find useful, to keep track of regular additions of lime and bran.
If the dyed color suddenly becomes very pale, check the pH. If the pH is within range (9.5-11), the vat may need additional organic material to boost fermentation. Cook a small amount of bran (about 1-2 grams/liter) and add it to the vat. Stir, wait until the next day, and then dye another test.
If possible or practical, keep a running record of the quantity of textiles that are dyed in the vat, either by weigh, yardage, etc. This will give you a sense of how much indigo you are using/depleting over time if that is important to you. This may not be important to all dyers but a production dyer will benefit from this information.
If the pH of the vat drops below 9.5 add additional lime (calcium hydroxide) to boost the alkalinity.
Measure and record the temperature of the vat. NOTE: once the vat has reached full fermentation, it can be maintained without supplemental heat. Do prevent it from freezing, as that can destroy the bacteria in the vat.
If the volume of solution in the vat decreases, (due to evaporation or dyeing) add warm water into which you have dissolved 25 grams of soda ash or potash per liter OR add wood ash lye. If you are continuing to make small test vats, then they can also be added to the vat to supplement the volume in the vat.
At some point the indigo in the vat will be diminished. These older vats are valuable for obtaining pale blue colors. You can begin a new vat for darker colors.
* You do not need to be a “slave” to your vat! I have gone away from home for as long as 3 weeks without tending the vats. On returning the vats were just fine, although they did need pH adjustment and an addition of cooked bran to revitalize them.
A sampling of pages from my dye log:
It’s always instructive to see how the vat becomes livelier after additions of bran.
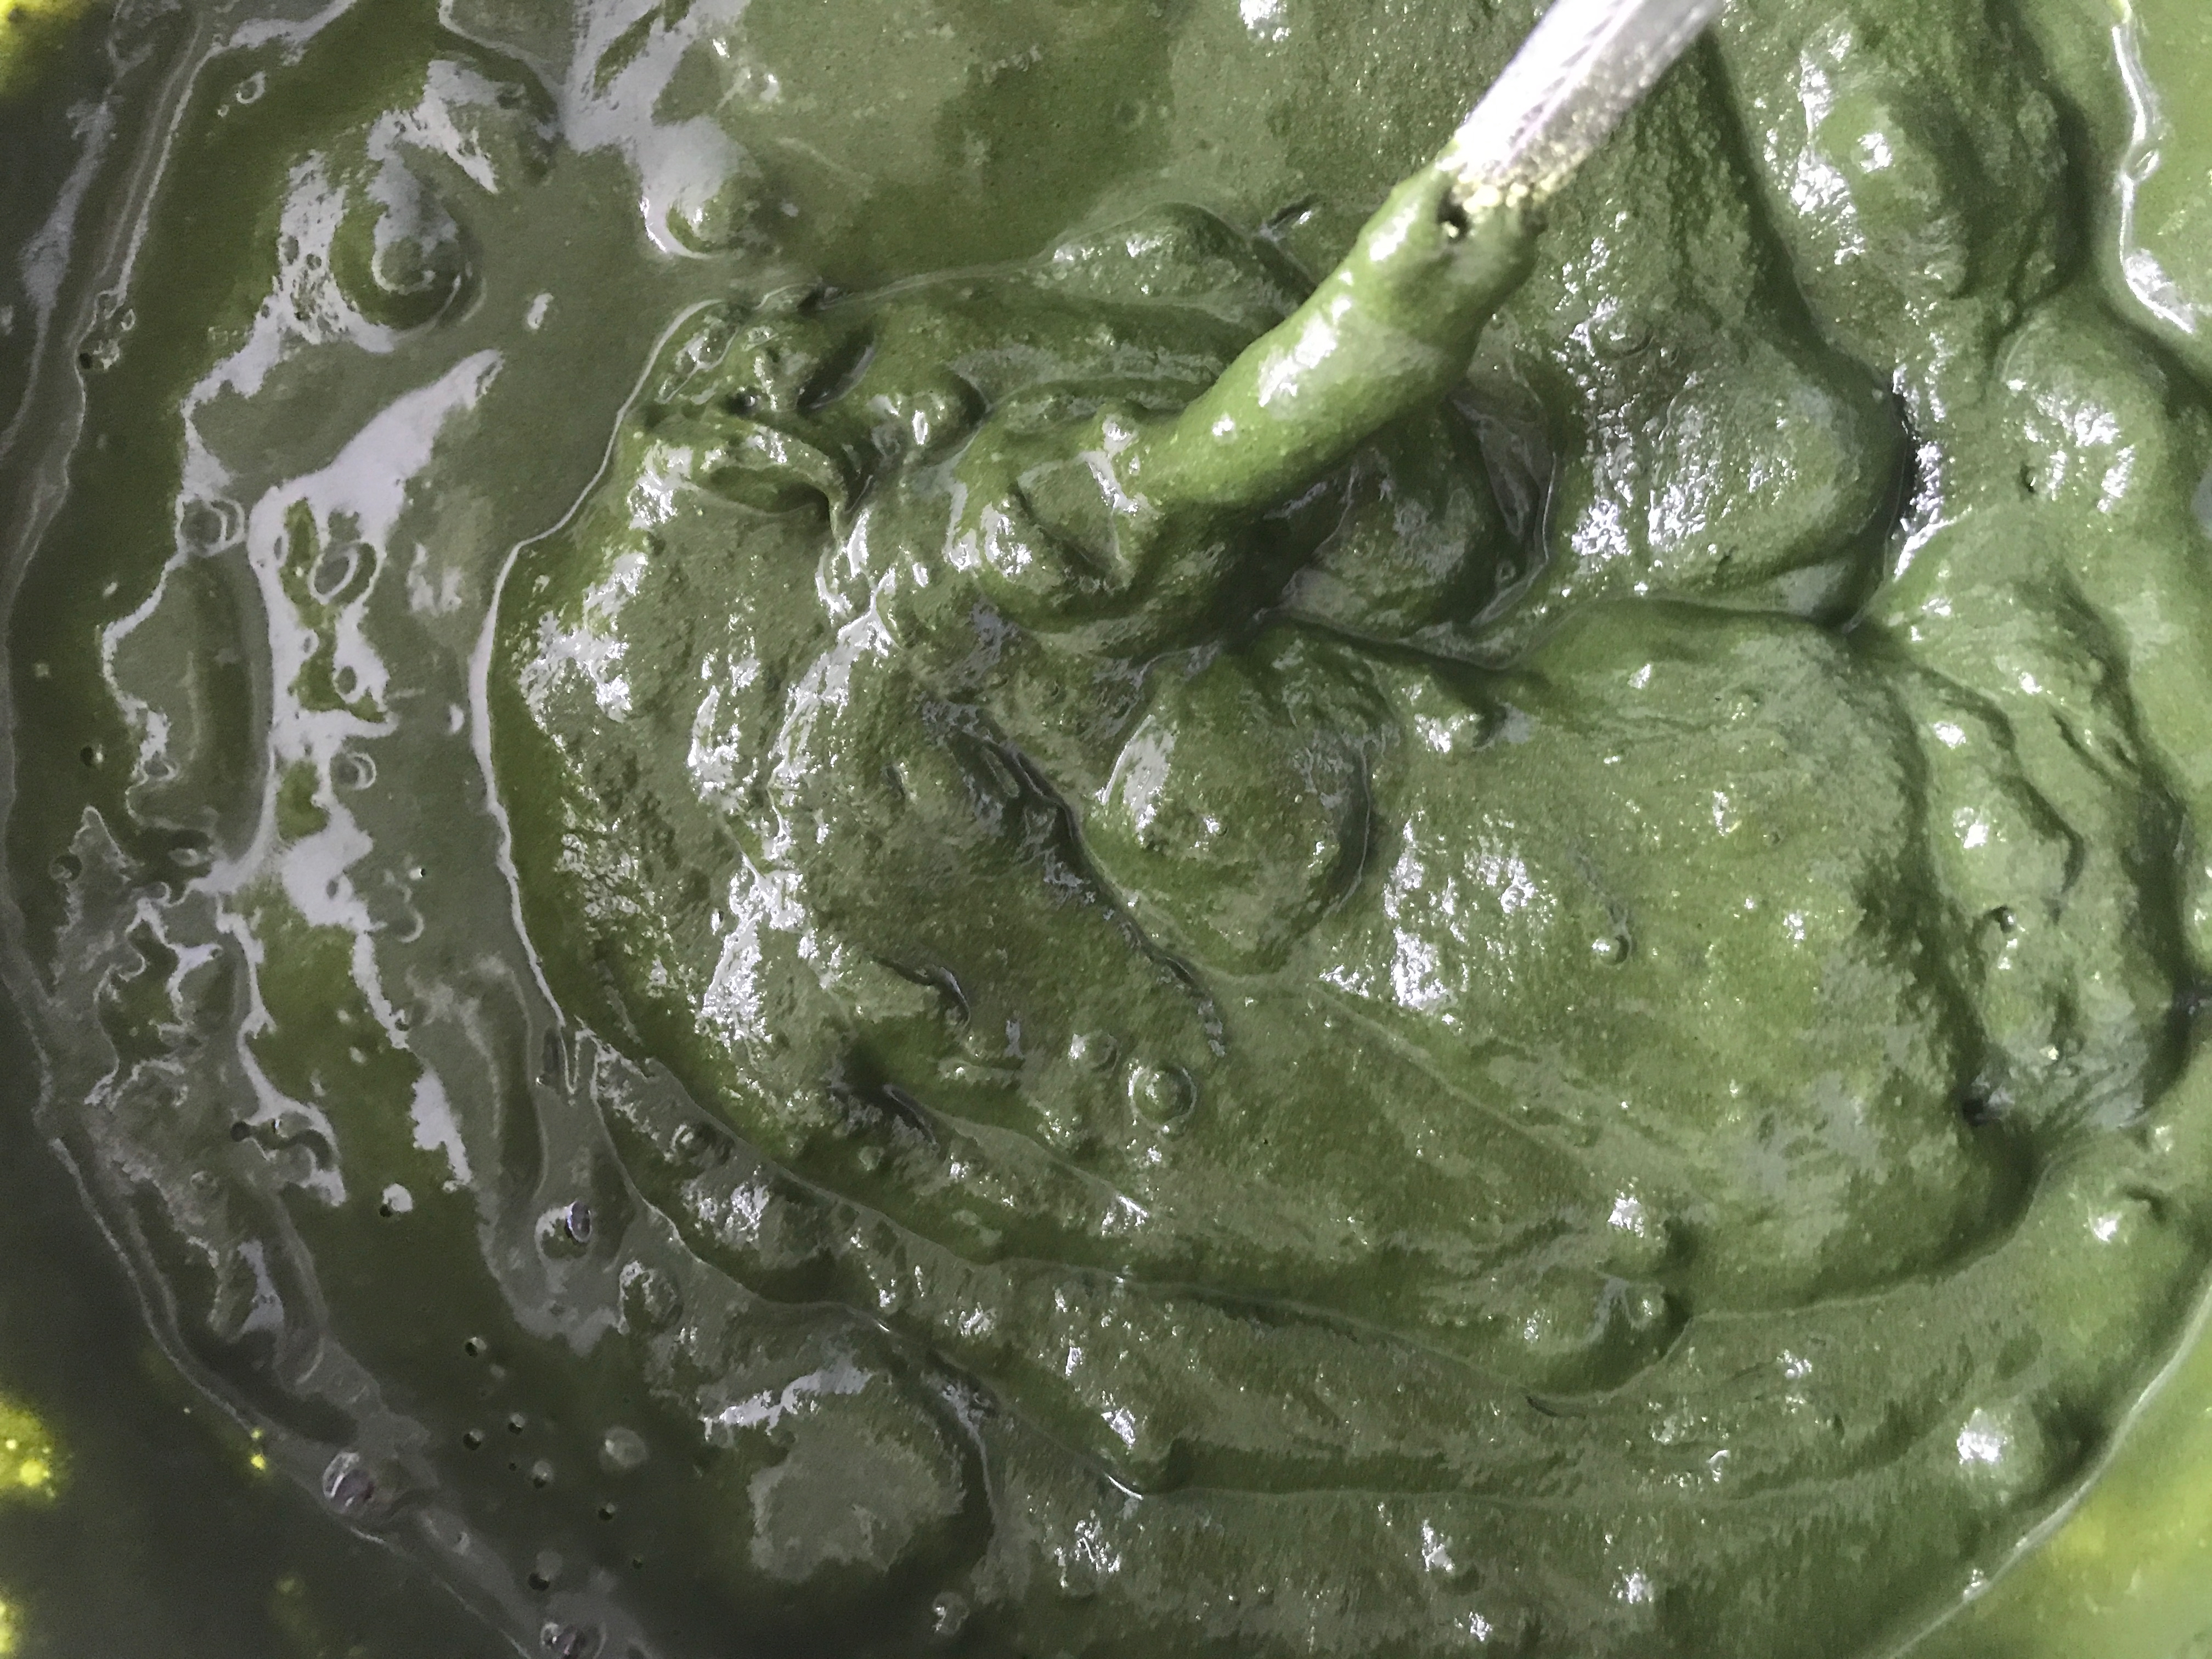
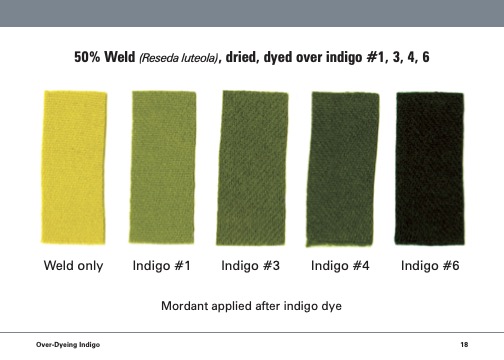
The leuco color of the fermentation vat will be green – not the yellow color that the quick reduction vats produce, as referred to this in blog post #3.
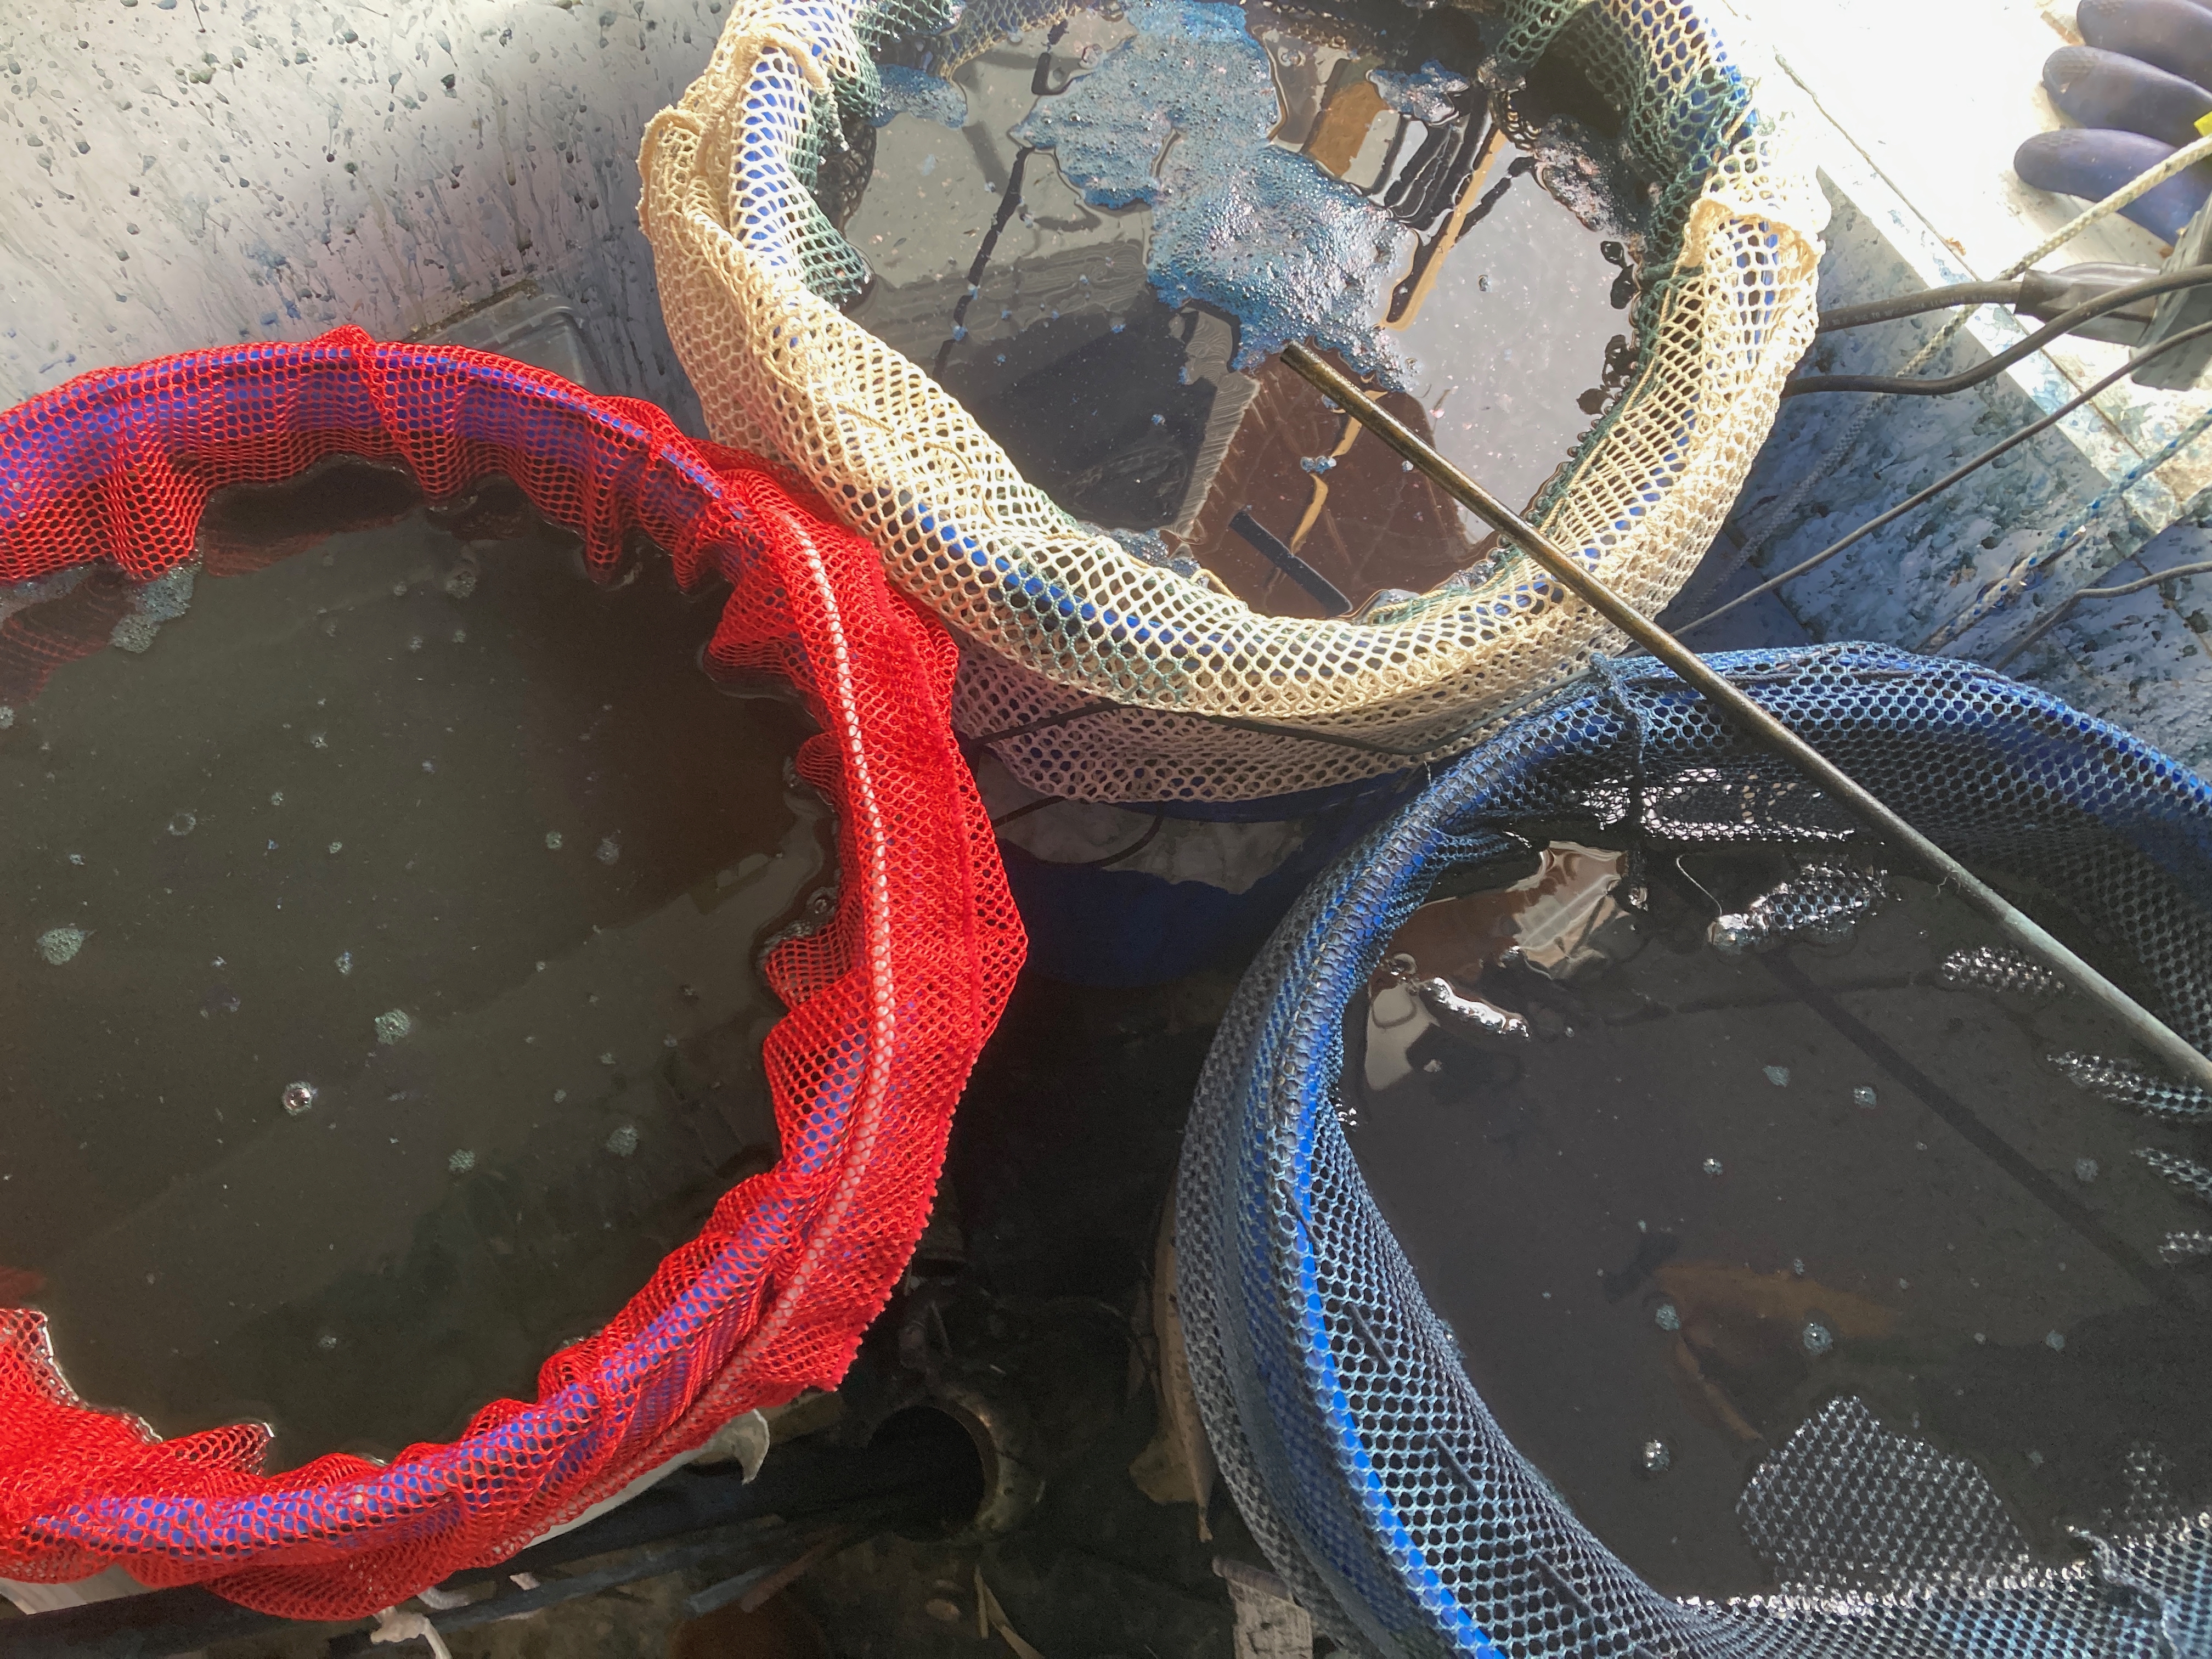
When dyeing, keep all textiles in the upper portion of the vat, so that they do not come into contact with the plant material and lime that have settled to the bottom. The quantity of these settled materials will increase over time. A net bag, such as a mesh laundry bag, suspended in the top of the vat is very flexible yet will contain the textiles and prevent them from getting “lost in the bottom”. It is easy to adjust how deep the bag sinks into the vat. Exposure to excess material at the bottom of the vat will result in uneven dyeing.
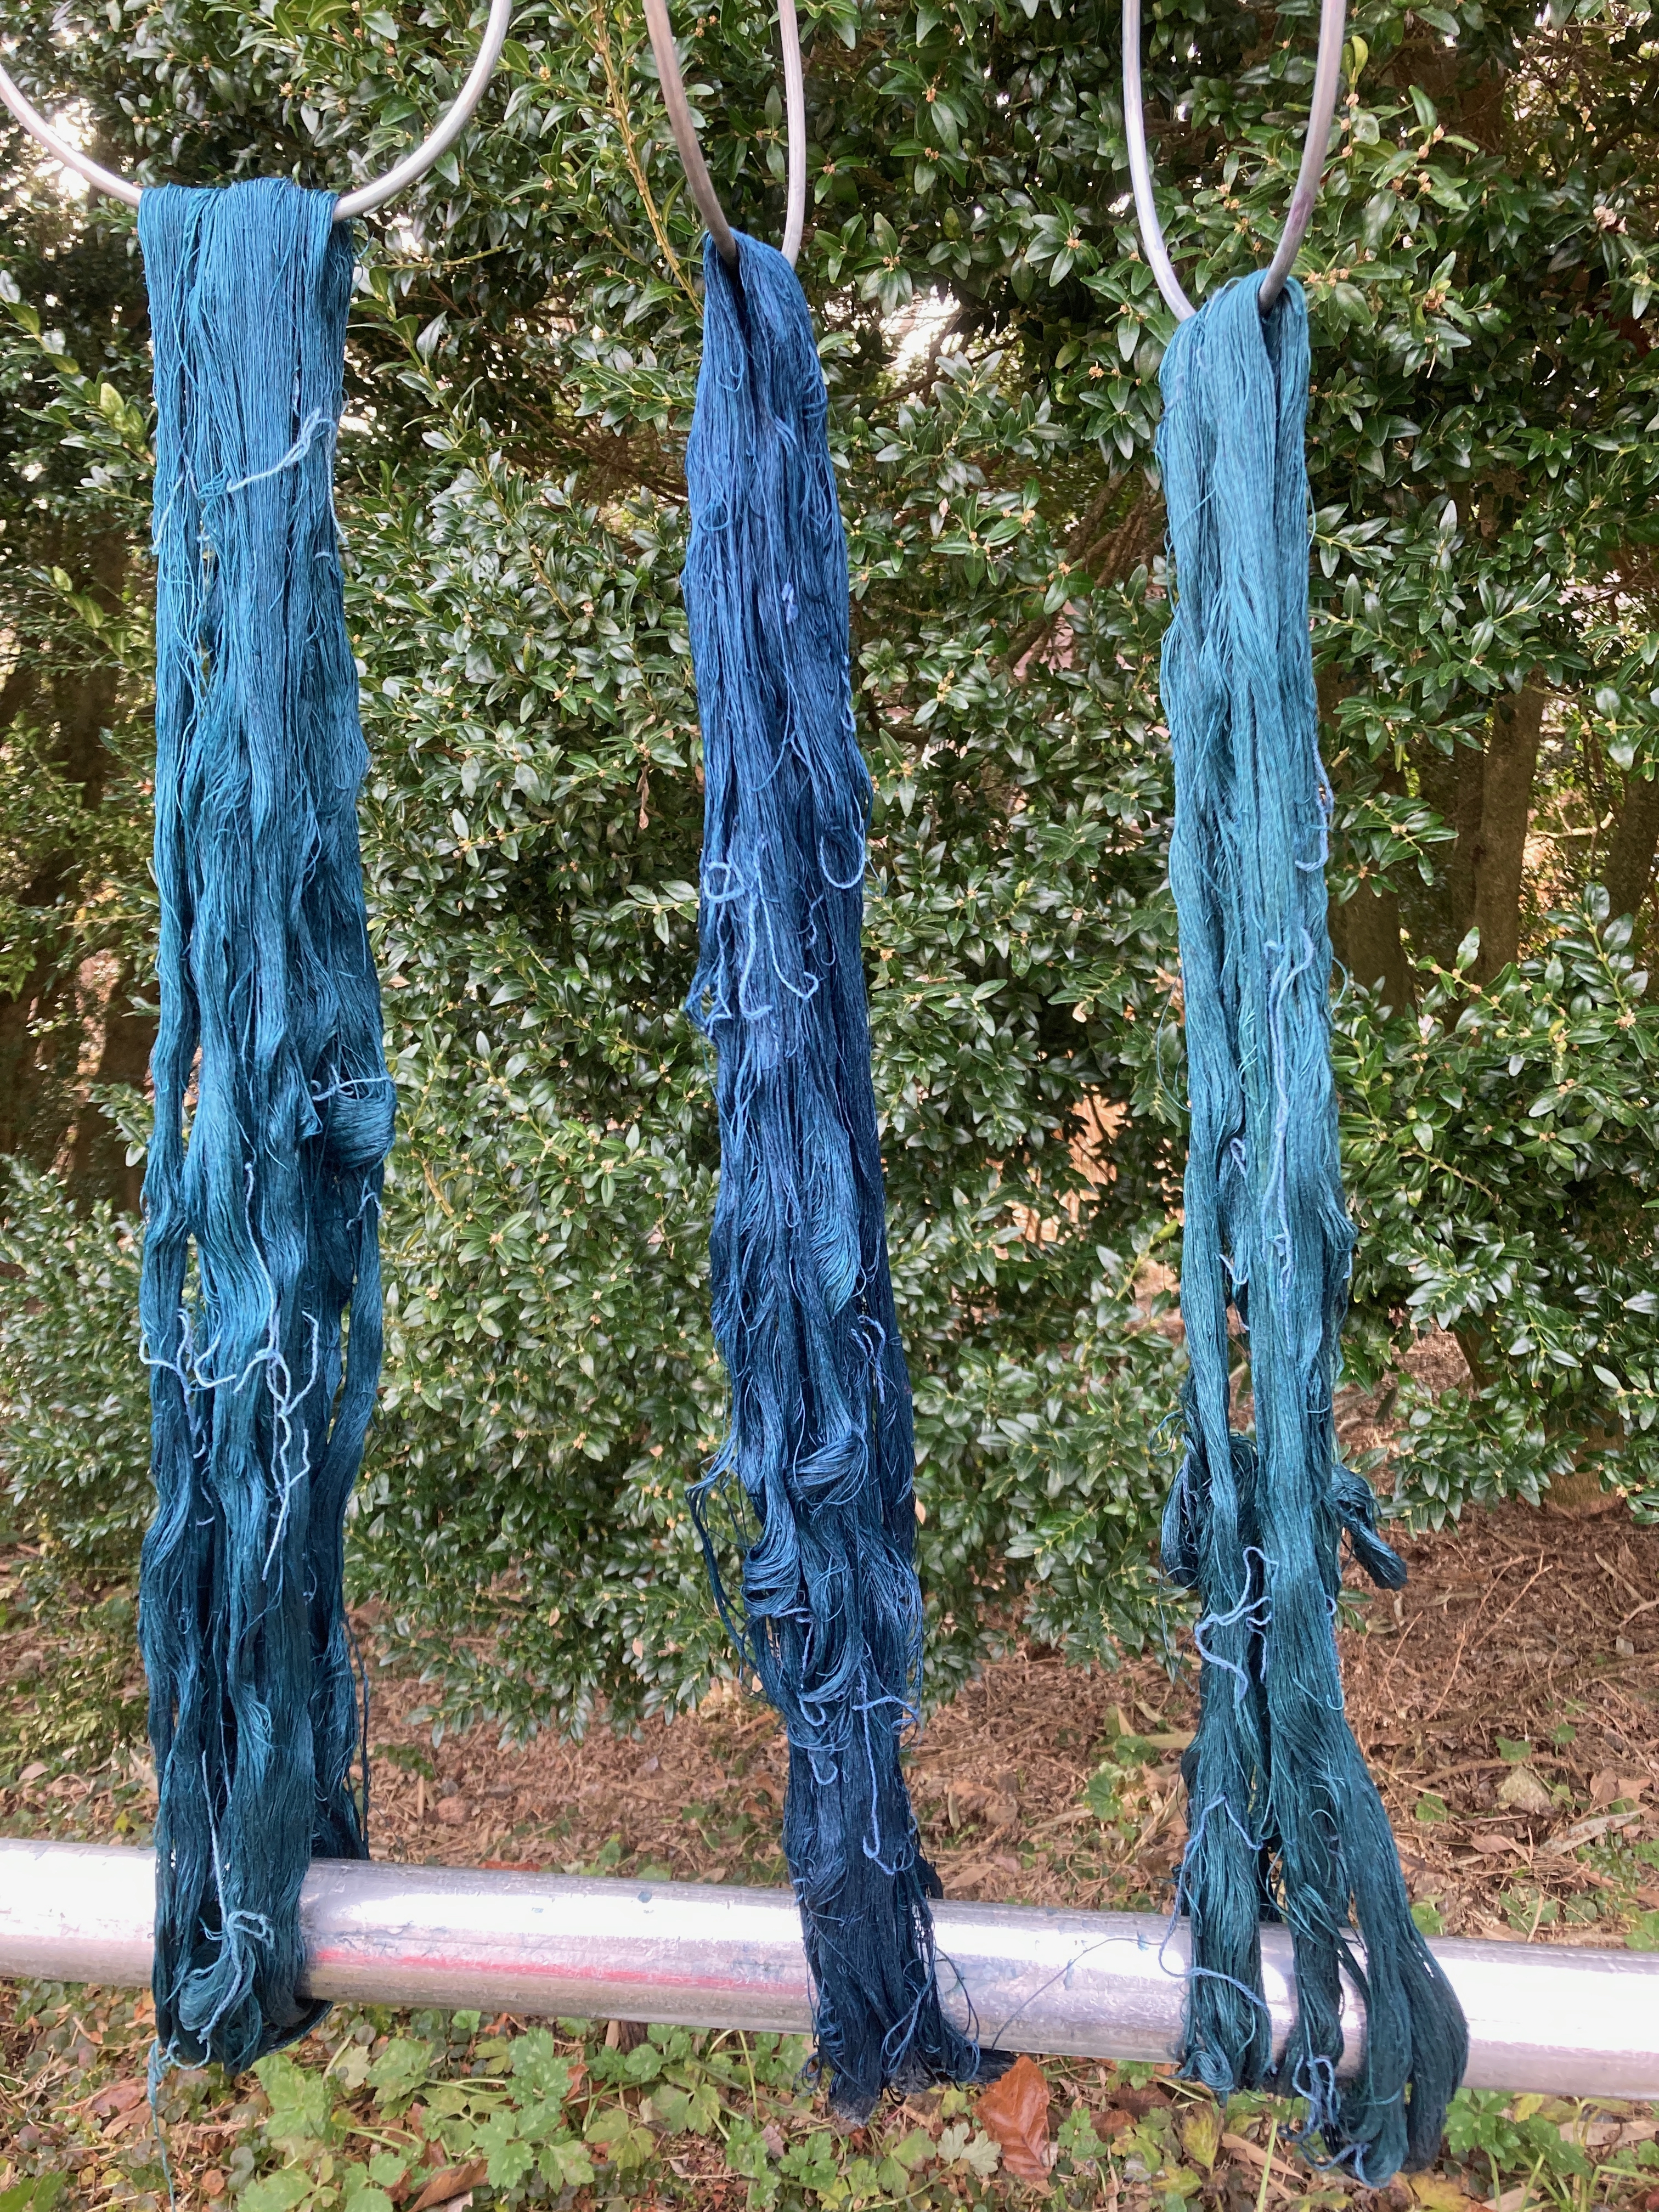
50 liter vats with laundry bags inserted. Bags are removed after dyeing.
Important: Always oxidize the textile thoroughly before additional dips into the vat. Unless oxidation is complete, indigo that has not been oxidized on the textiles will revert to leuco indigo when returned to the vat.
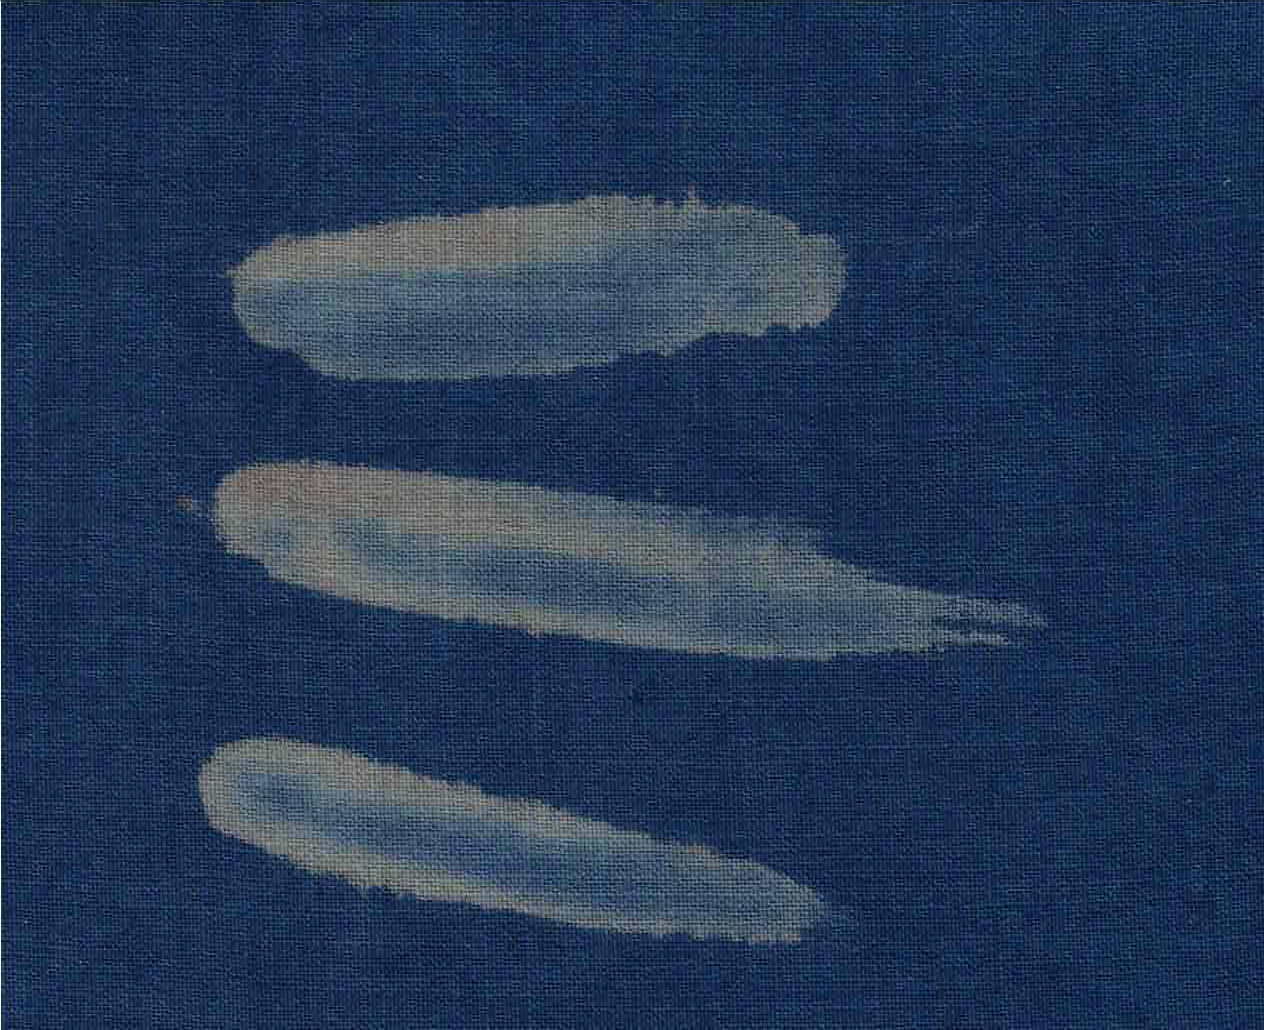
Leuco color of the vat After oxidizing, 3 slightly different blues from the 3 vats
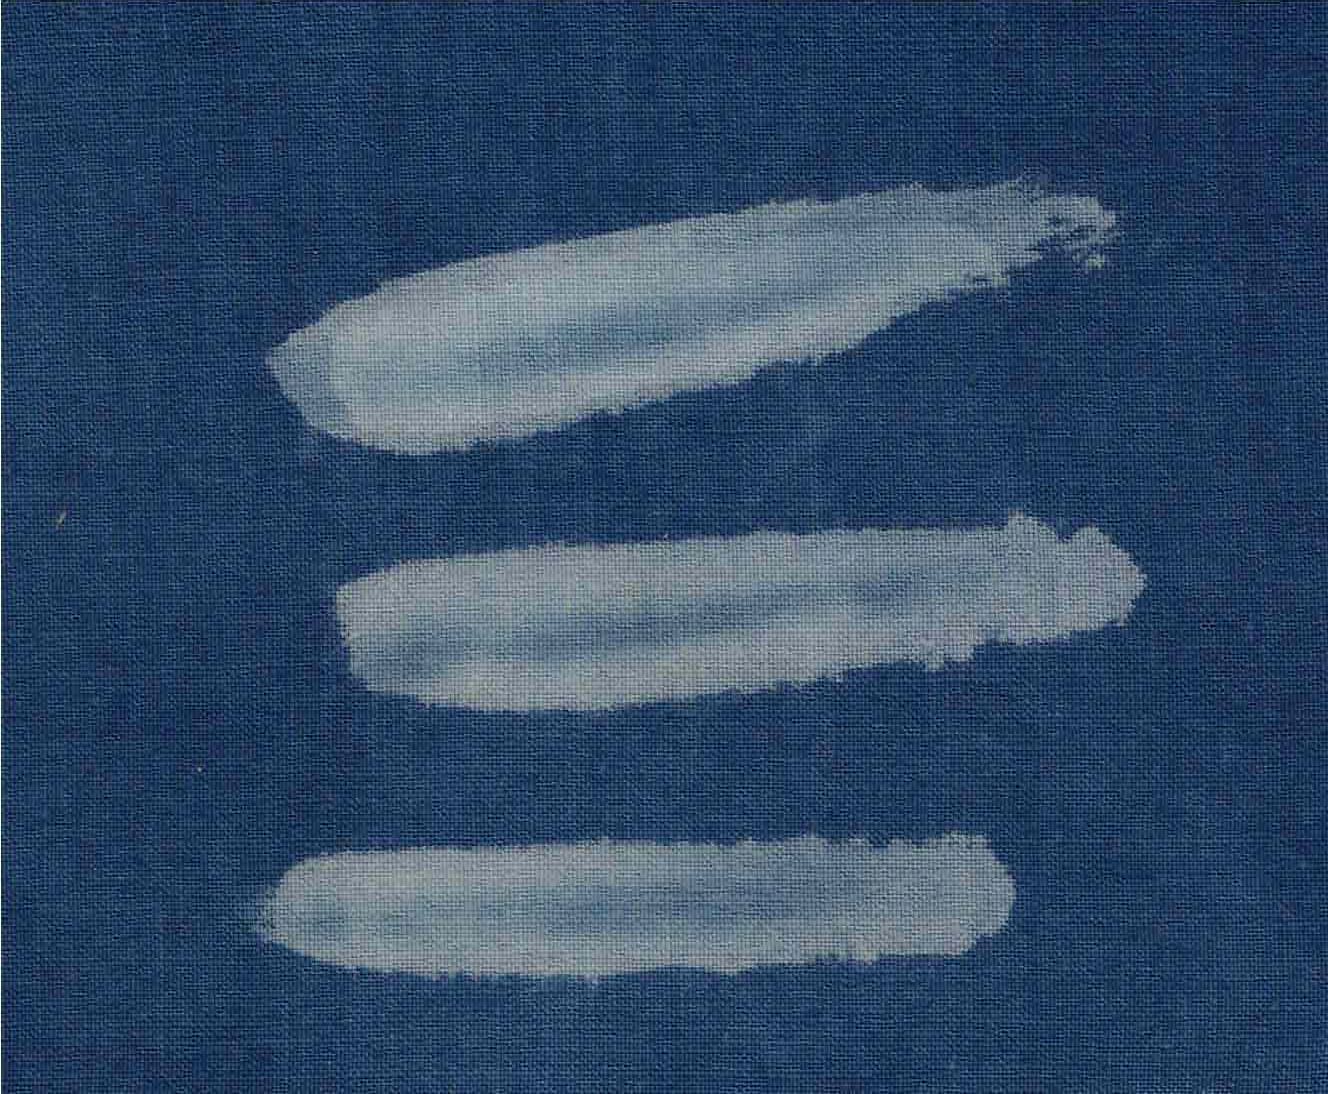
Long dips vs. short dips in the vat – how many dips?
The ability to control shades of indigo, from light to dark, is one of the greatest challenges for the dyer. Some level of control is necessary to achieve a full range of blues, which also makes a palette of mixed colors such as greens and violets possible.
Preparing the various shades of indigo for The Art and Science of Natural Dyes Studio Formulas Set was challenging. I used two different fermented vats: a weak vat and a strong vat. I had waited many months for the “weak” vat to become “weak”. I wanted to achieve the most evenly dyed textile possible.
The palest of colors was dyed three times, for one minute each dip, in the weak vat. The darkest shade was immersed 6 times, 20 minutes each dip, in the strongest vat.
Long immersions in the vat will result in colors that penetrate the textile the most. Additional dips will always result in more even dyeing. Darker shades will always be more lightfast than pale ones.
Finishing the indigo dyed textile
Once the dyeing is complete:
Allow the textile to dry completely before rinsing and finishing.
Rinse in water – any temperature. The rinse water will be much browner than the rinse water from other vats. This is likely due to the organic materials (bran, etc.) suspended in the dye solution.
Rinse several more times until the water is no longer brown.
Soak in cold water overnight, then rinse.
Soak for an hour in water to which you have added vinegar to make a weak solution: (approx. 15 ml white vinegar to a liter of water)
Photo of rinse water, sent to me by a dyer, with the following comment: “The four tea towels and three napkins were dyed with six ten-minute dips. They were dried. I then soaked them in water for several hours. Dumped the brown water soaked again and dumped brown water. Soaked overnight and the water was clear.”
This recipe can used to make a 1-liter vat or can be scaled up to a larger vat. I typically make a vat that is 50 liters in volume. The recipe is intended as a starting point for the dyer who wishes to explore fermentation.
Observe carefully. Be flexible. Experiment. Keep records!
As stated earlier, pleasestart with a small vat of 1-4 liters. Get comfortable with it and wait for reduction. Any successful test vat can be added to a larger vat, speeding up the fermentation/reduction time for the new vat. So, small vats are useful.
Ingredients:
Indigo pigment: 2-10 grams per liter (see note #1 below)
Dried and ground Indigofera tinctoria leaves: 5 grams per liter (see note #2 below)
OR
Ground, “spent” madder root: 5 grams per liter. (see note #3 below)
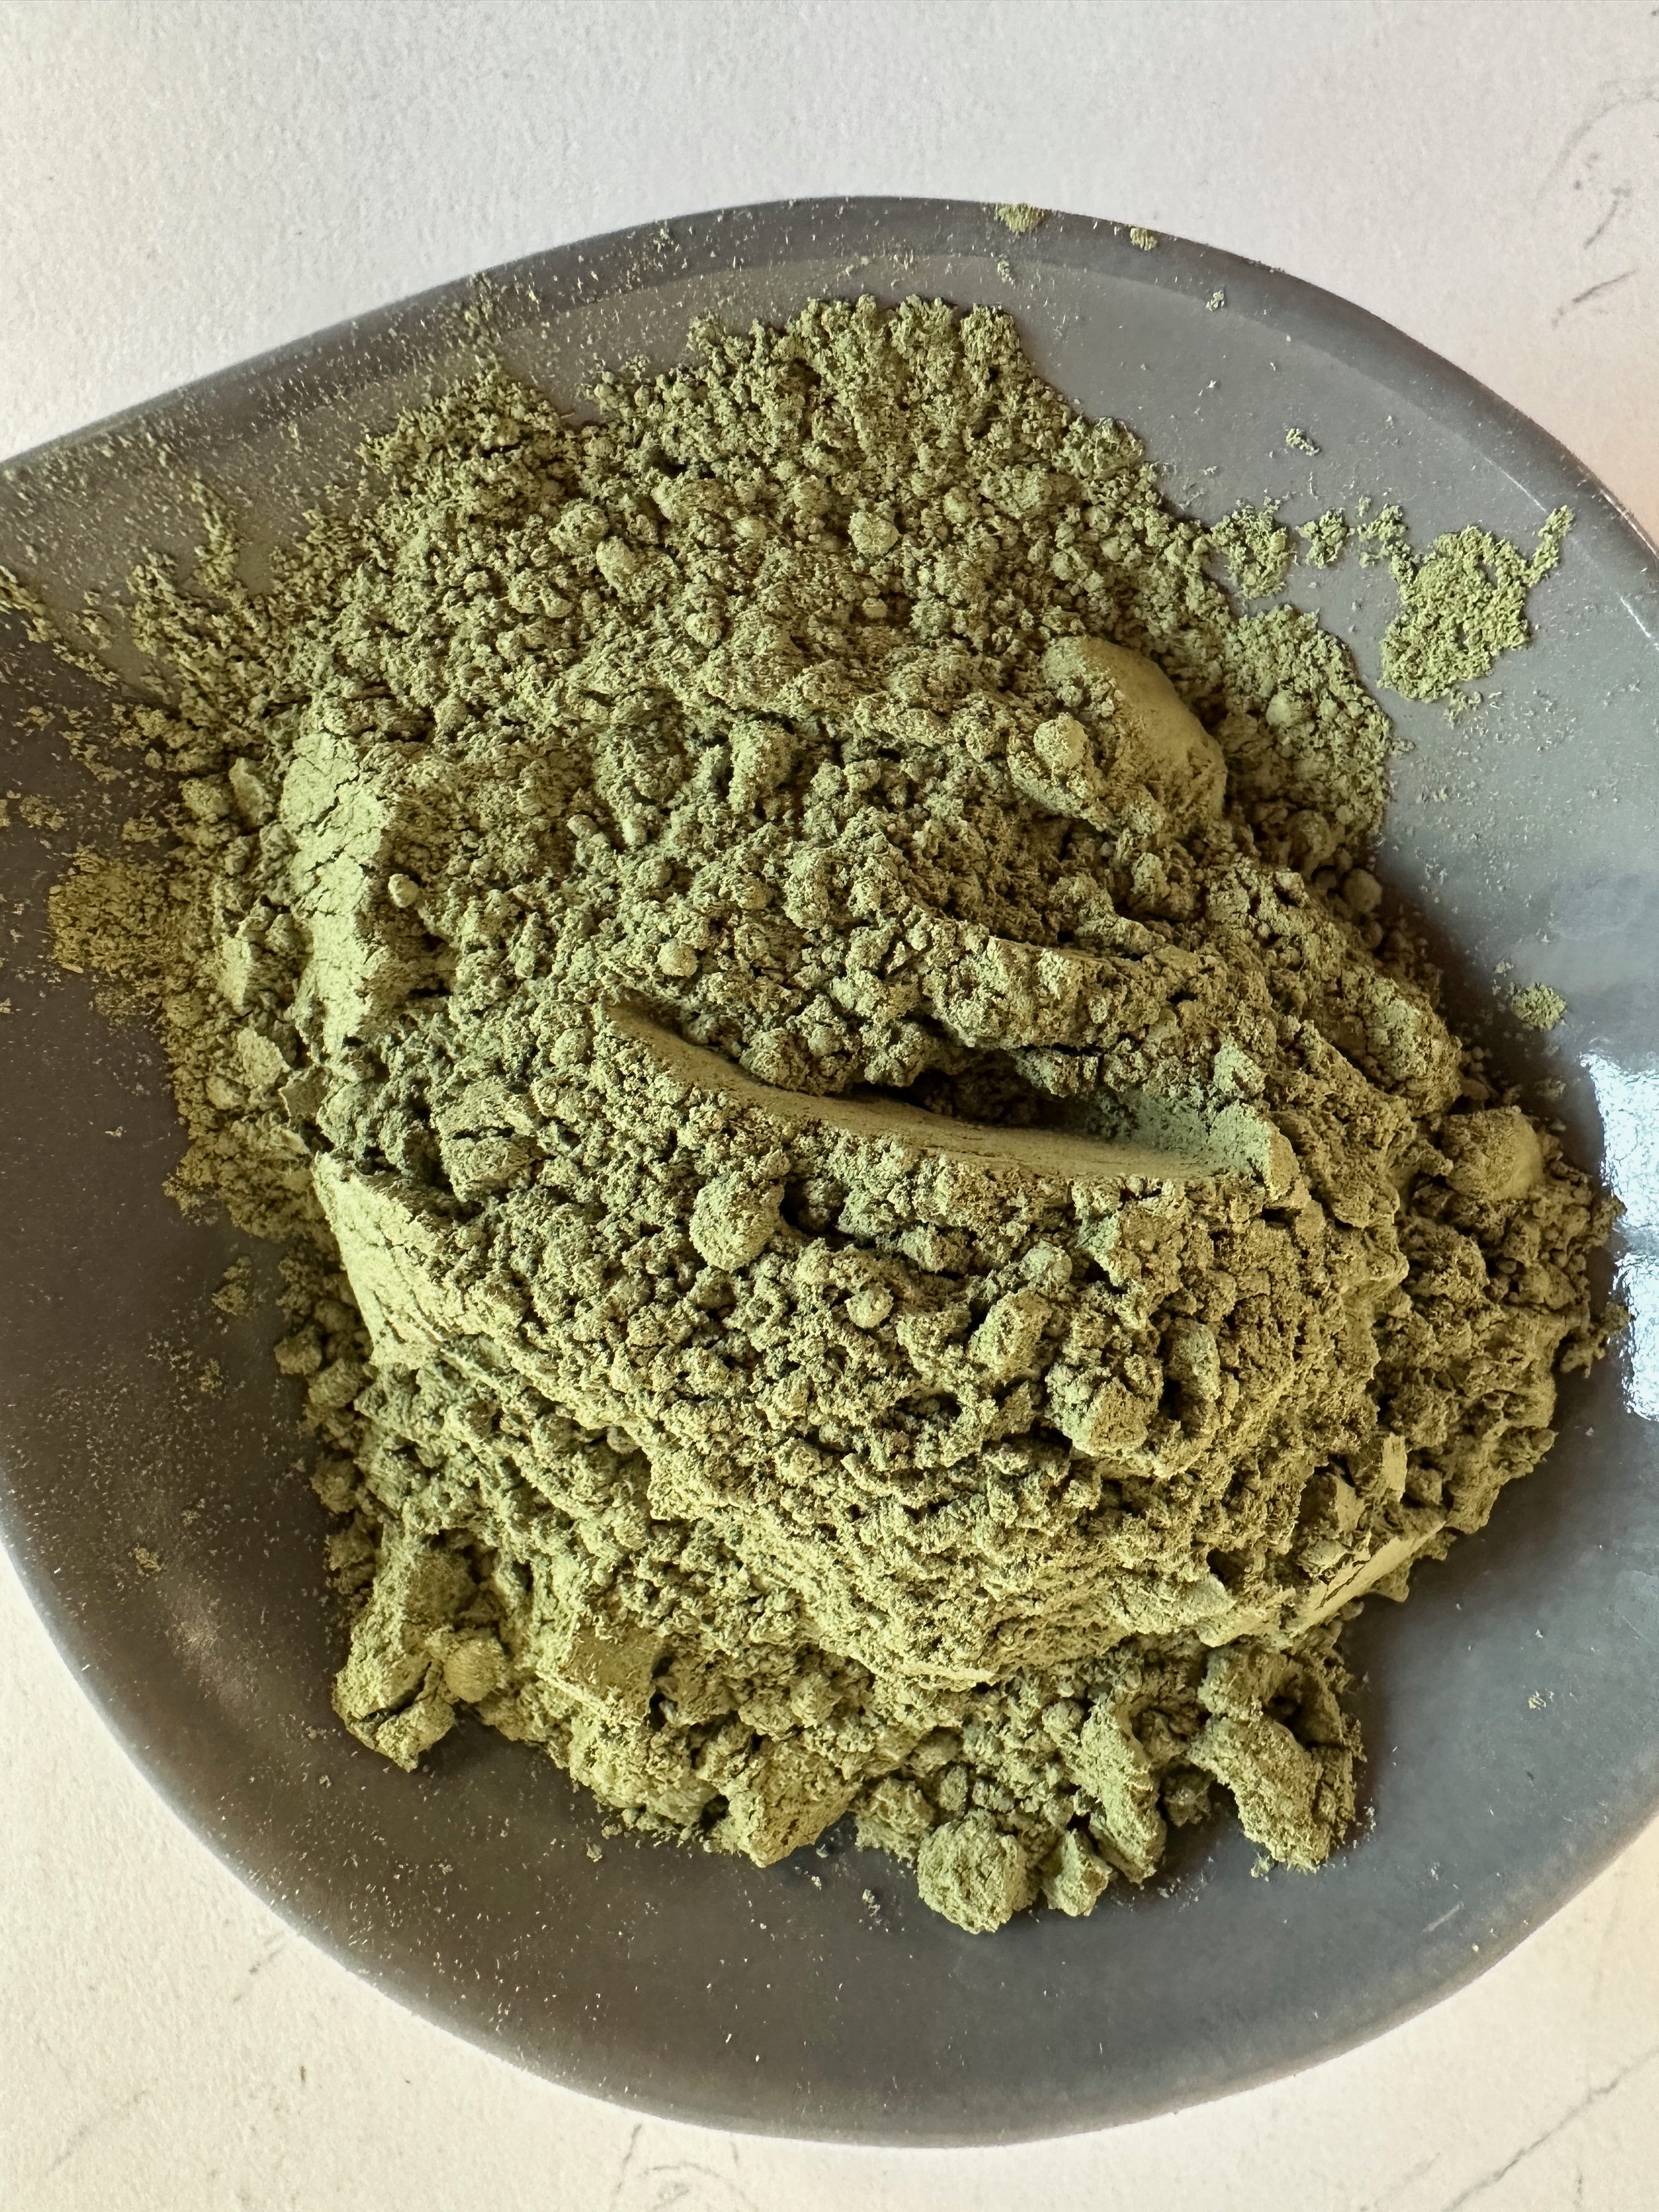
Wheat bran: 5 grams per liter. I typically use “feed-grade” bran sourced from my local farm supply store.
Soda ash (sodium carbonate) OR potash (potassium hydroxide): 25 grams per liter. Either soda ash or potash is effective. (see note #4 below)
Optional: If you have them: dried woad balls/patties or dried polygonum leaves etc., crushed: 5 grams per liter. (see note #5 below)
Note #1: Deciding how much indigo pigment to put into a vat is a complex decision and largely based on:
The size of the vat
The amount of dyeing that will be done in the vat and the size of the dyeable goods
The type of textiles that will be dyed: yardage requires much more volume that yarn.
How long the vat is expected to last.
The fermented vat seems to be very efficient at reducing the indigo available in the vat. I have observed that a vat with 2 grams of indigo pigment/liter can produce a blue that is almost identical to one with 8 grams per liter, but the vat with the smaller amount of indigo will not last as long. Fermented vats will result in pale colors only after much of the indigo has been used up and the vat becomes weaker. My 50-liter vat with 2 grams of indigo per liter took over 20 months to reach a point where it produced pale blues.
I have never added additional indigo to a vat. I have always felt that when a vat was “finished” it was time to start fresh again, although that might be something to consider.
“WEAK” vat using 2 grams indigo per liter. Sample taken 2 weeks after making vat“STRONG” vat using 8 grams indigoer liter. Sample taken 2 weeks after making vat
Although the vat on the right uses 4x the amount of indigo pigment, and the the vats were equally reduced, they are close to identical in depth of shade.
Vats that are kept a long time will build up solid materials on the bottom: mostly lime and wheat bran. When stirring the vat, there is noticeably more “stuff” on the bottom. I suspect that I have kept vats longer than might be recommended – I guess I may not be dyeing enough!
For all the above reasons, I would recommend using a smaller amount of indigo pigment in the vat. Use it up. Dye some pale colors and mix a new one. Ideally, the studio will have two vats: an old vat for pale colors and another for darker colors.
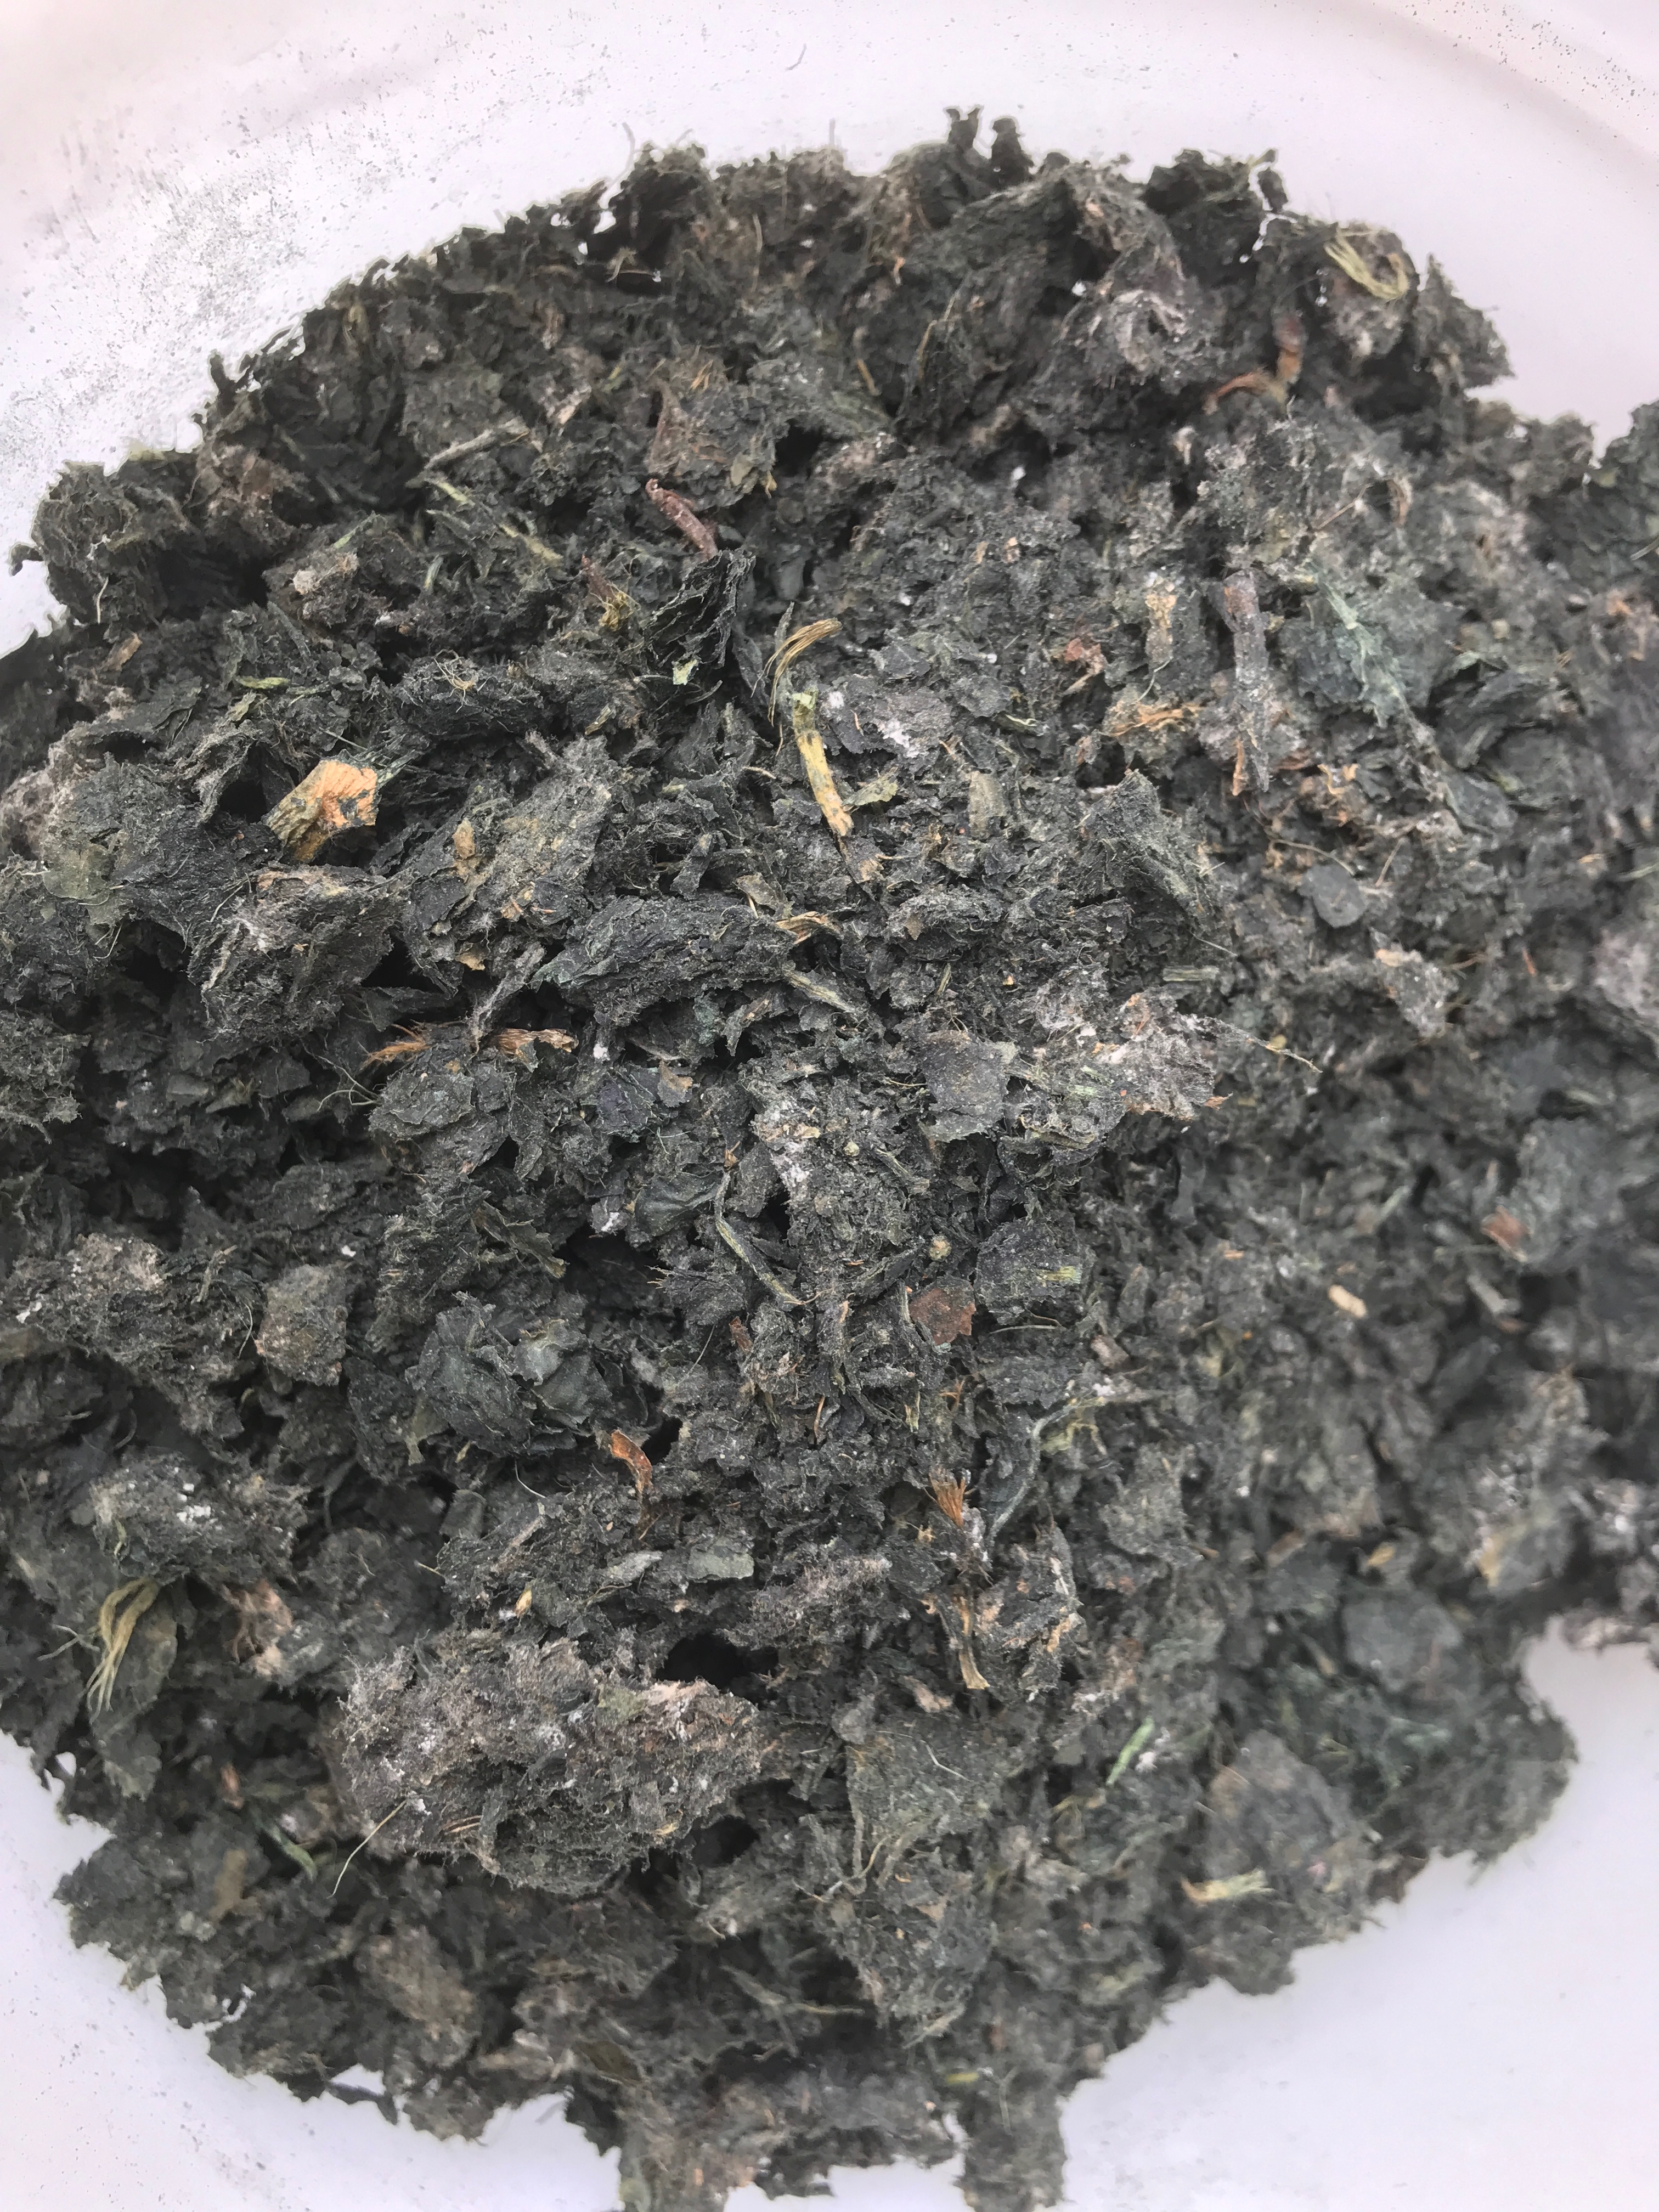
Note #2: “Spent” madder has already been used for dyeing red. The alizarin and other dye components in the roots are not necessary for the fermentation.
When dyeing with madder root, I place the ground roots into a fine mesh bag that is large enough for the dyestuff to move freely. When the red dyeing is completed, I remove the ground root from the bag and dry it. It will dry easily on a tray if left in the open air. Once completely dry, the madder can be stored until it is needed for an indigo vat. Madder that has not already be used for dyeing red can be used but it would a waste of a good red dye. Traditionally, the madder dyers would sell their spent madder root to the indigo dyers.
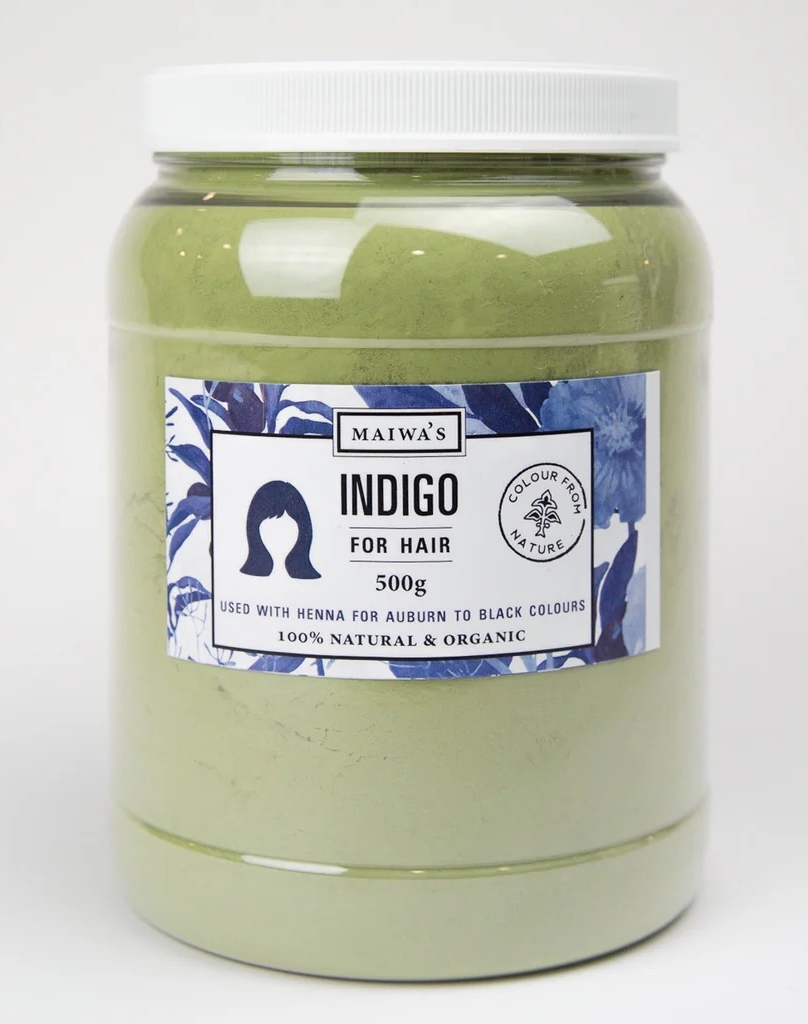
Note #3: Dried and ground Indigofera tinctoria leaves are often sold as “black henna” and used, in combination with madder, to dye hair black. I source mine from Maiwa.
Note #4:The stated quantity of soda ash or potash is ideal to achieve the desired pH (12.0) using MY WATER, which is acidic (pH 6). If your water is neutral, less soda ash might be required.
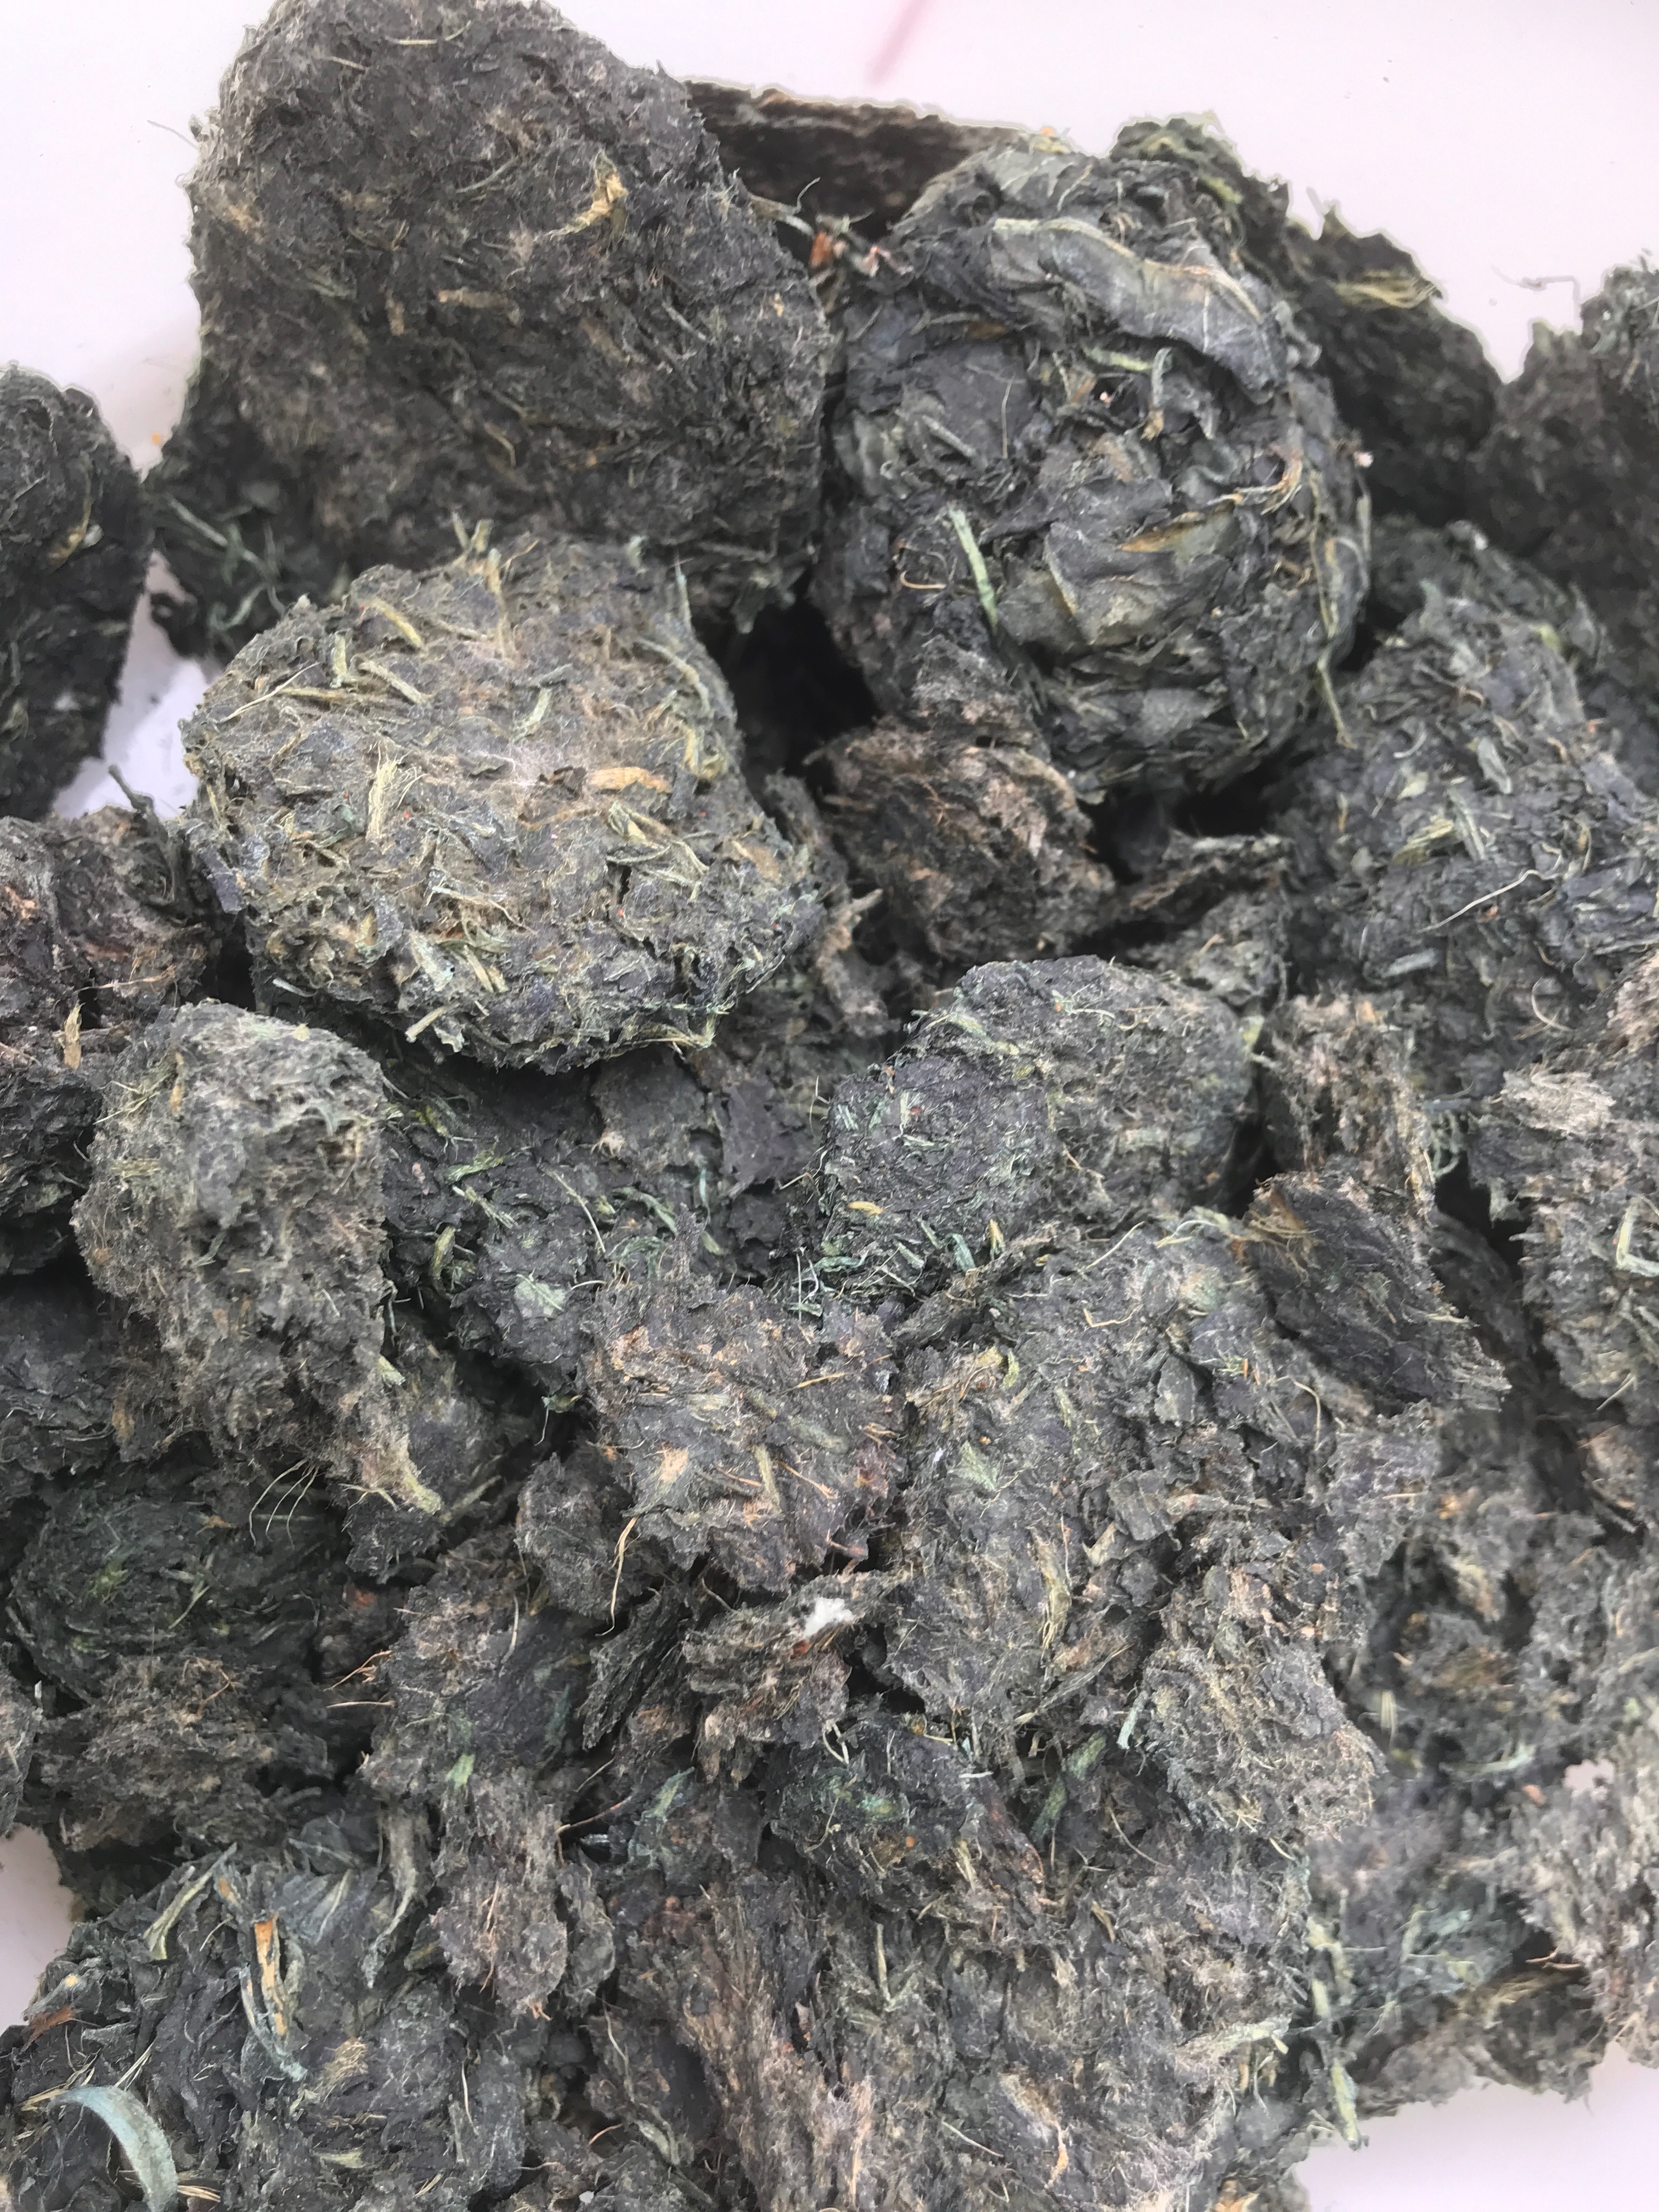
Note #5: When I have fresh indigo of any variety in the garden, I will grind up the leaves, form them into small “patties” and dry them. The theory is that these will introduce supplemental bacteria to the vat. When I use them, my vats tend to reduce a little bit faster. If you do not have fresh indigo to make these, that is just fine.
Indigo leaf patties, made from fresh indigo leaves (left). They are dried to preserve (right) and can be added to feed the vat and to boost fermentation. I have used all types of indigo leaves from my garden for this: Persicaria tinctoria, Indigofera suffruticosa, and Isatis tinctoria.
Procedure:
Thoroughly hydrate the indigo pigment in water unless you are using paste pigment.
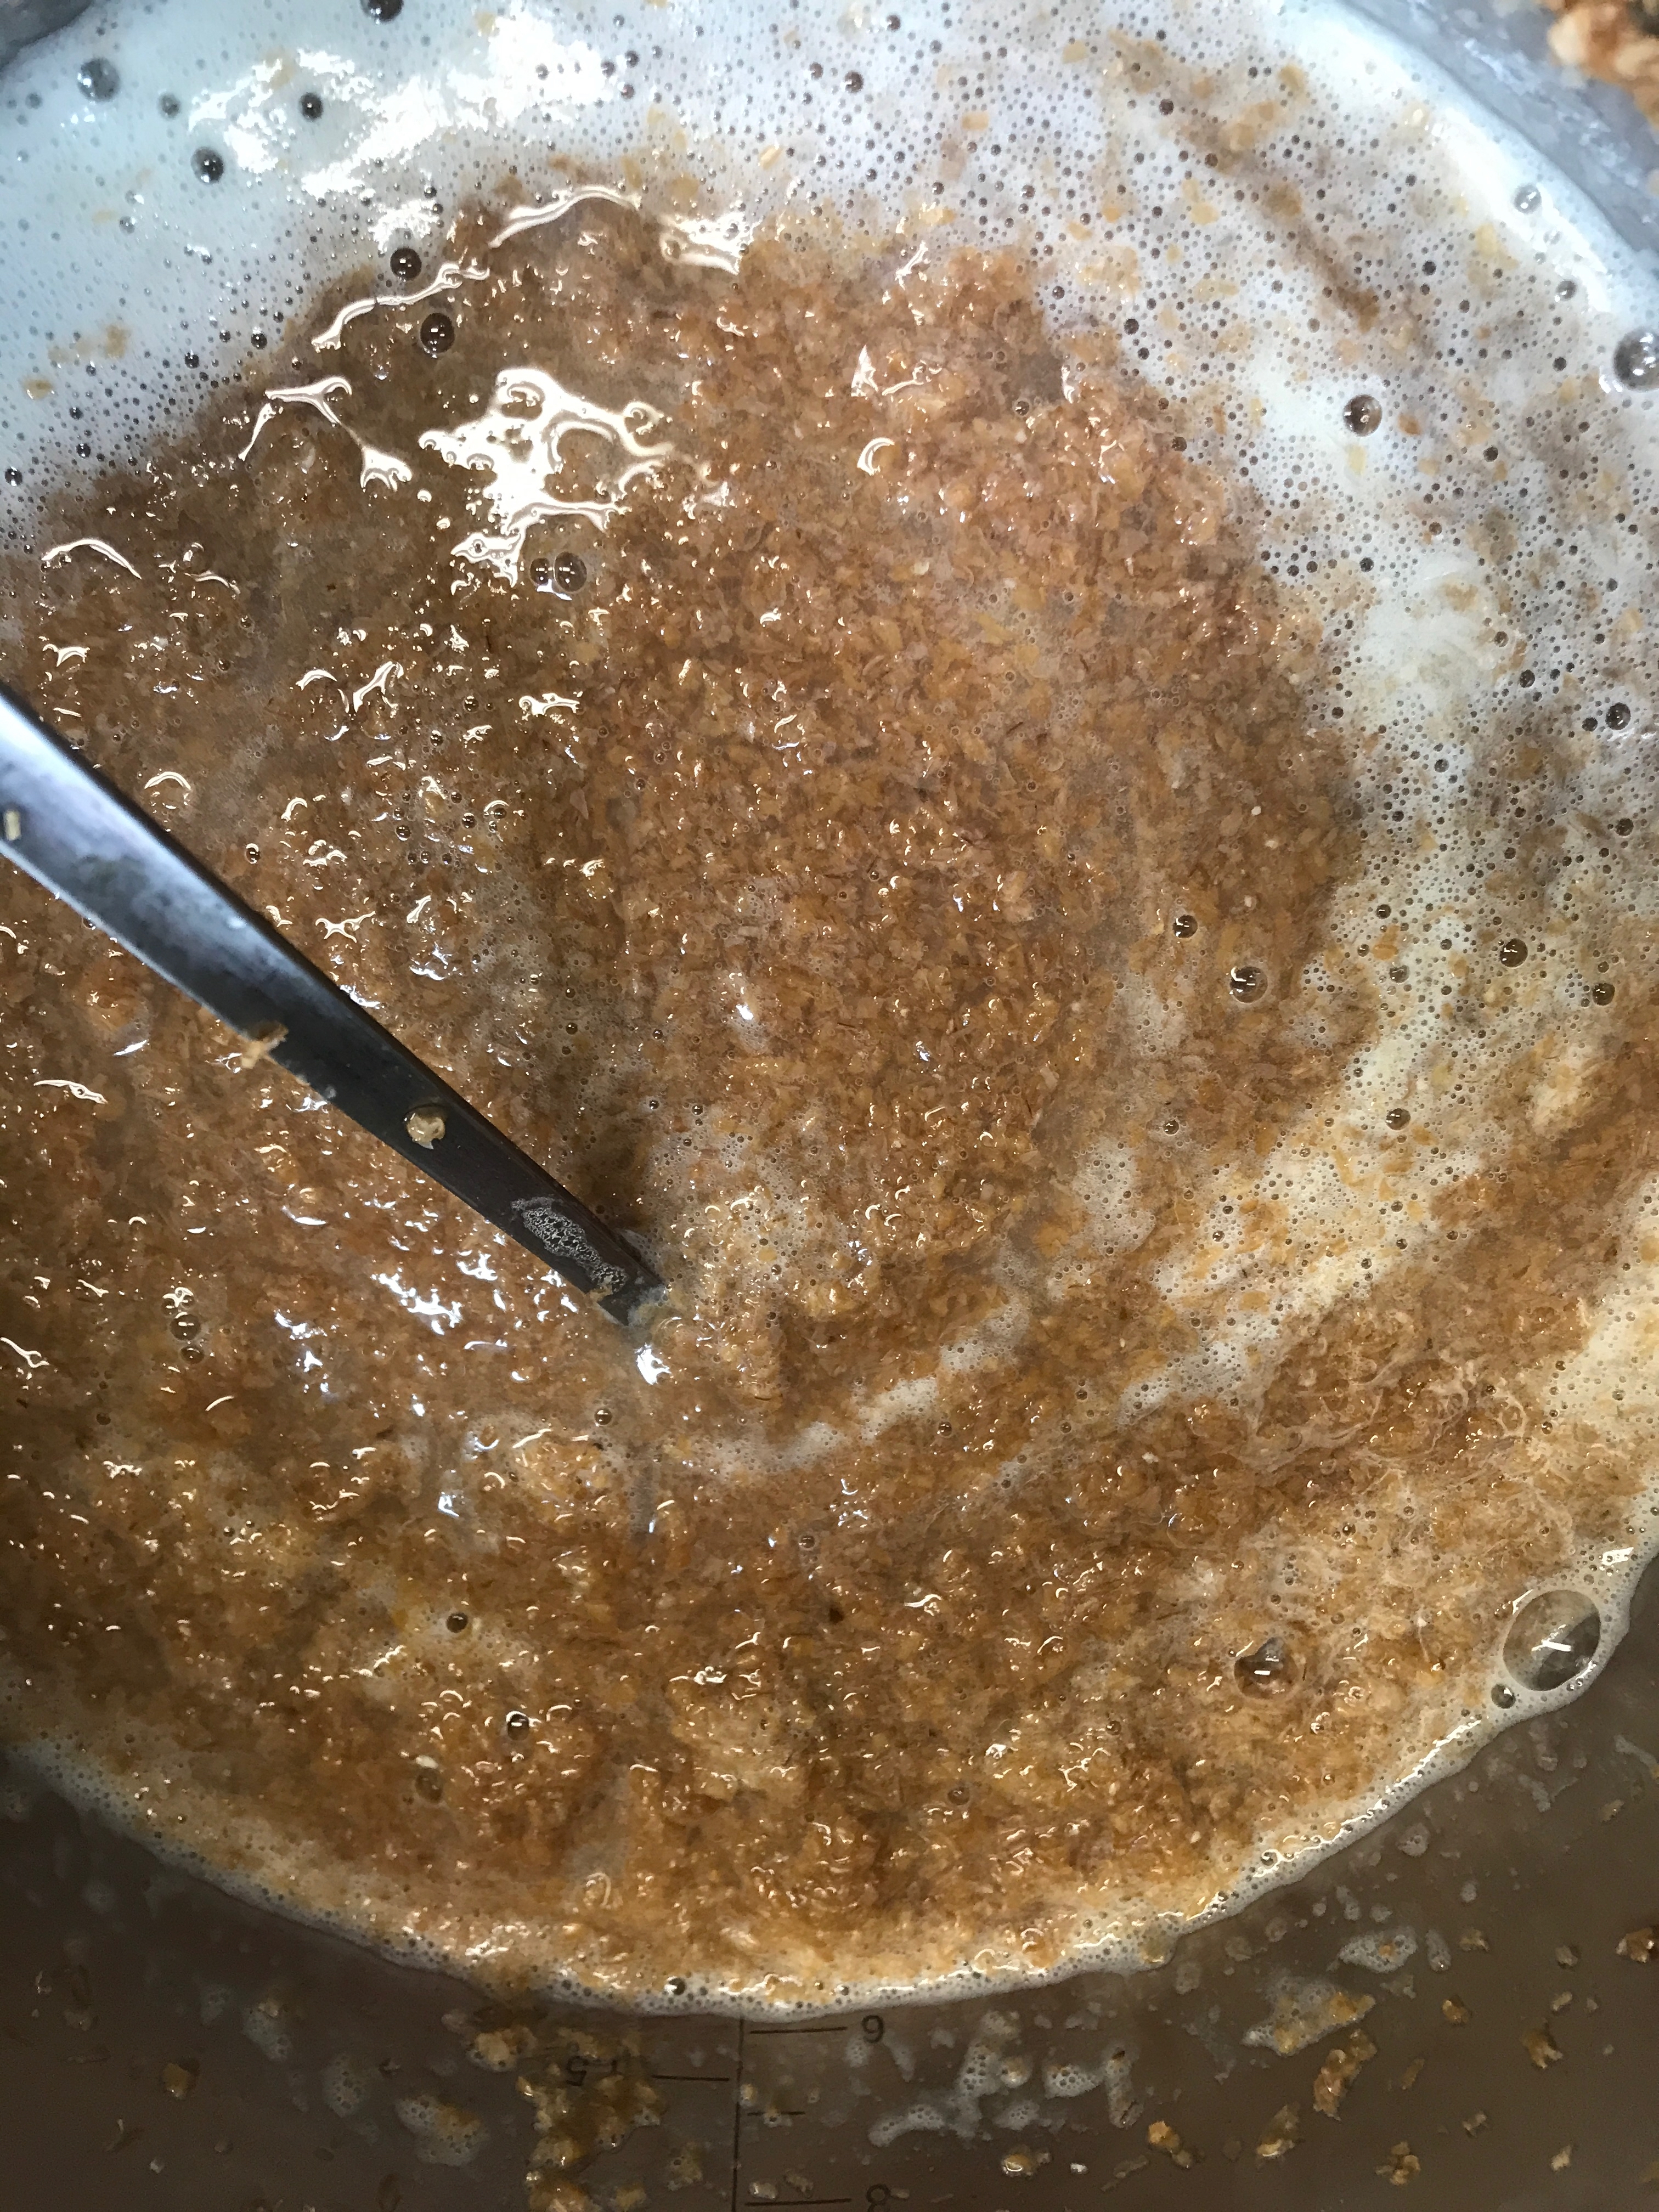
Boil the bran in a small amount of water for about 10 minutes. It should become the consistency of cooked cereal and emit a slightly sweet odor. Cool before use, until just warm.
Prepare the “food” for the vat:
If using madder root, cook this briefly. It can be added to the bran and they can be cooked together for efficiency.
If using ground Indigofera tinctoria leaves, stir them into warm water to make a smooth, watery paste.
If using dried indigo patties, crush them up before adding to the vat
Dissolve the soda ash or potash in boiling water. Cool before use until just warm.
Add warm water to the dye vessel until it is approximately ¾ full.
Add the remainder of the ingredients to the dye vessel.
Wait a few days, to add the liquid to full capacity.
Stir the vat carefully with a circular, centrifugal motion. Cover the vat loosely.
Warm the vat, if required. Optimal temperature for bacteria growth is 30°C/86°F but it can grow between the temperatures of 10-50°C/50-122°F. Bacterial growth decreases at temperatures greater than 36°C/96.8°F
Measure the pH. It should be in the range of 10-11. Once the vat is at full capacity, add a very small amount of lime, (calcium hydroxide) and re-test the pH.
Stir the vat in a centrifugal motion 2-3 times a day.
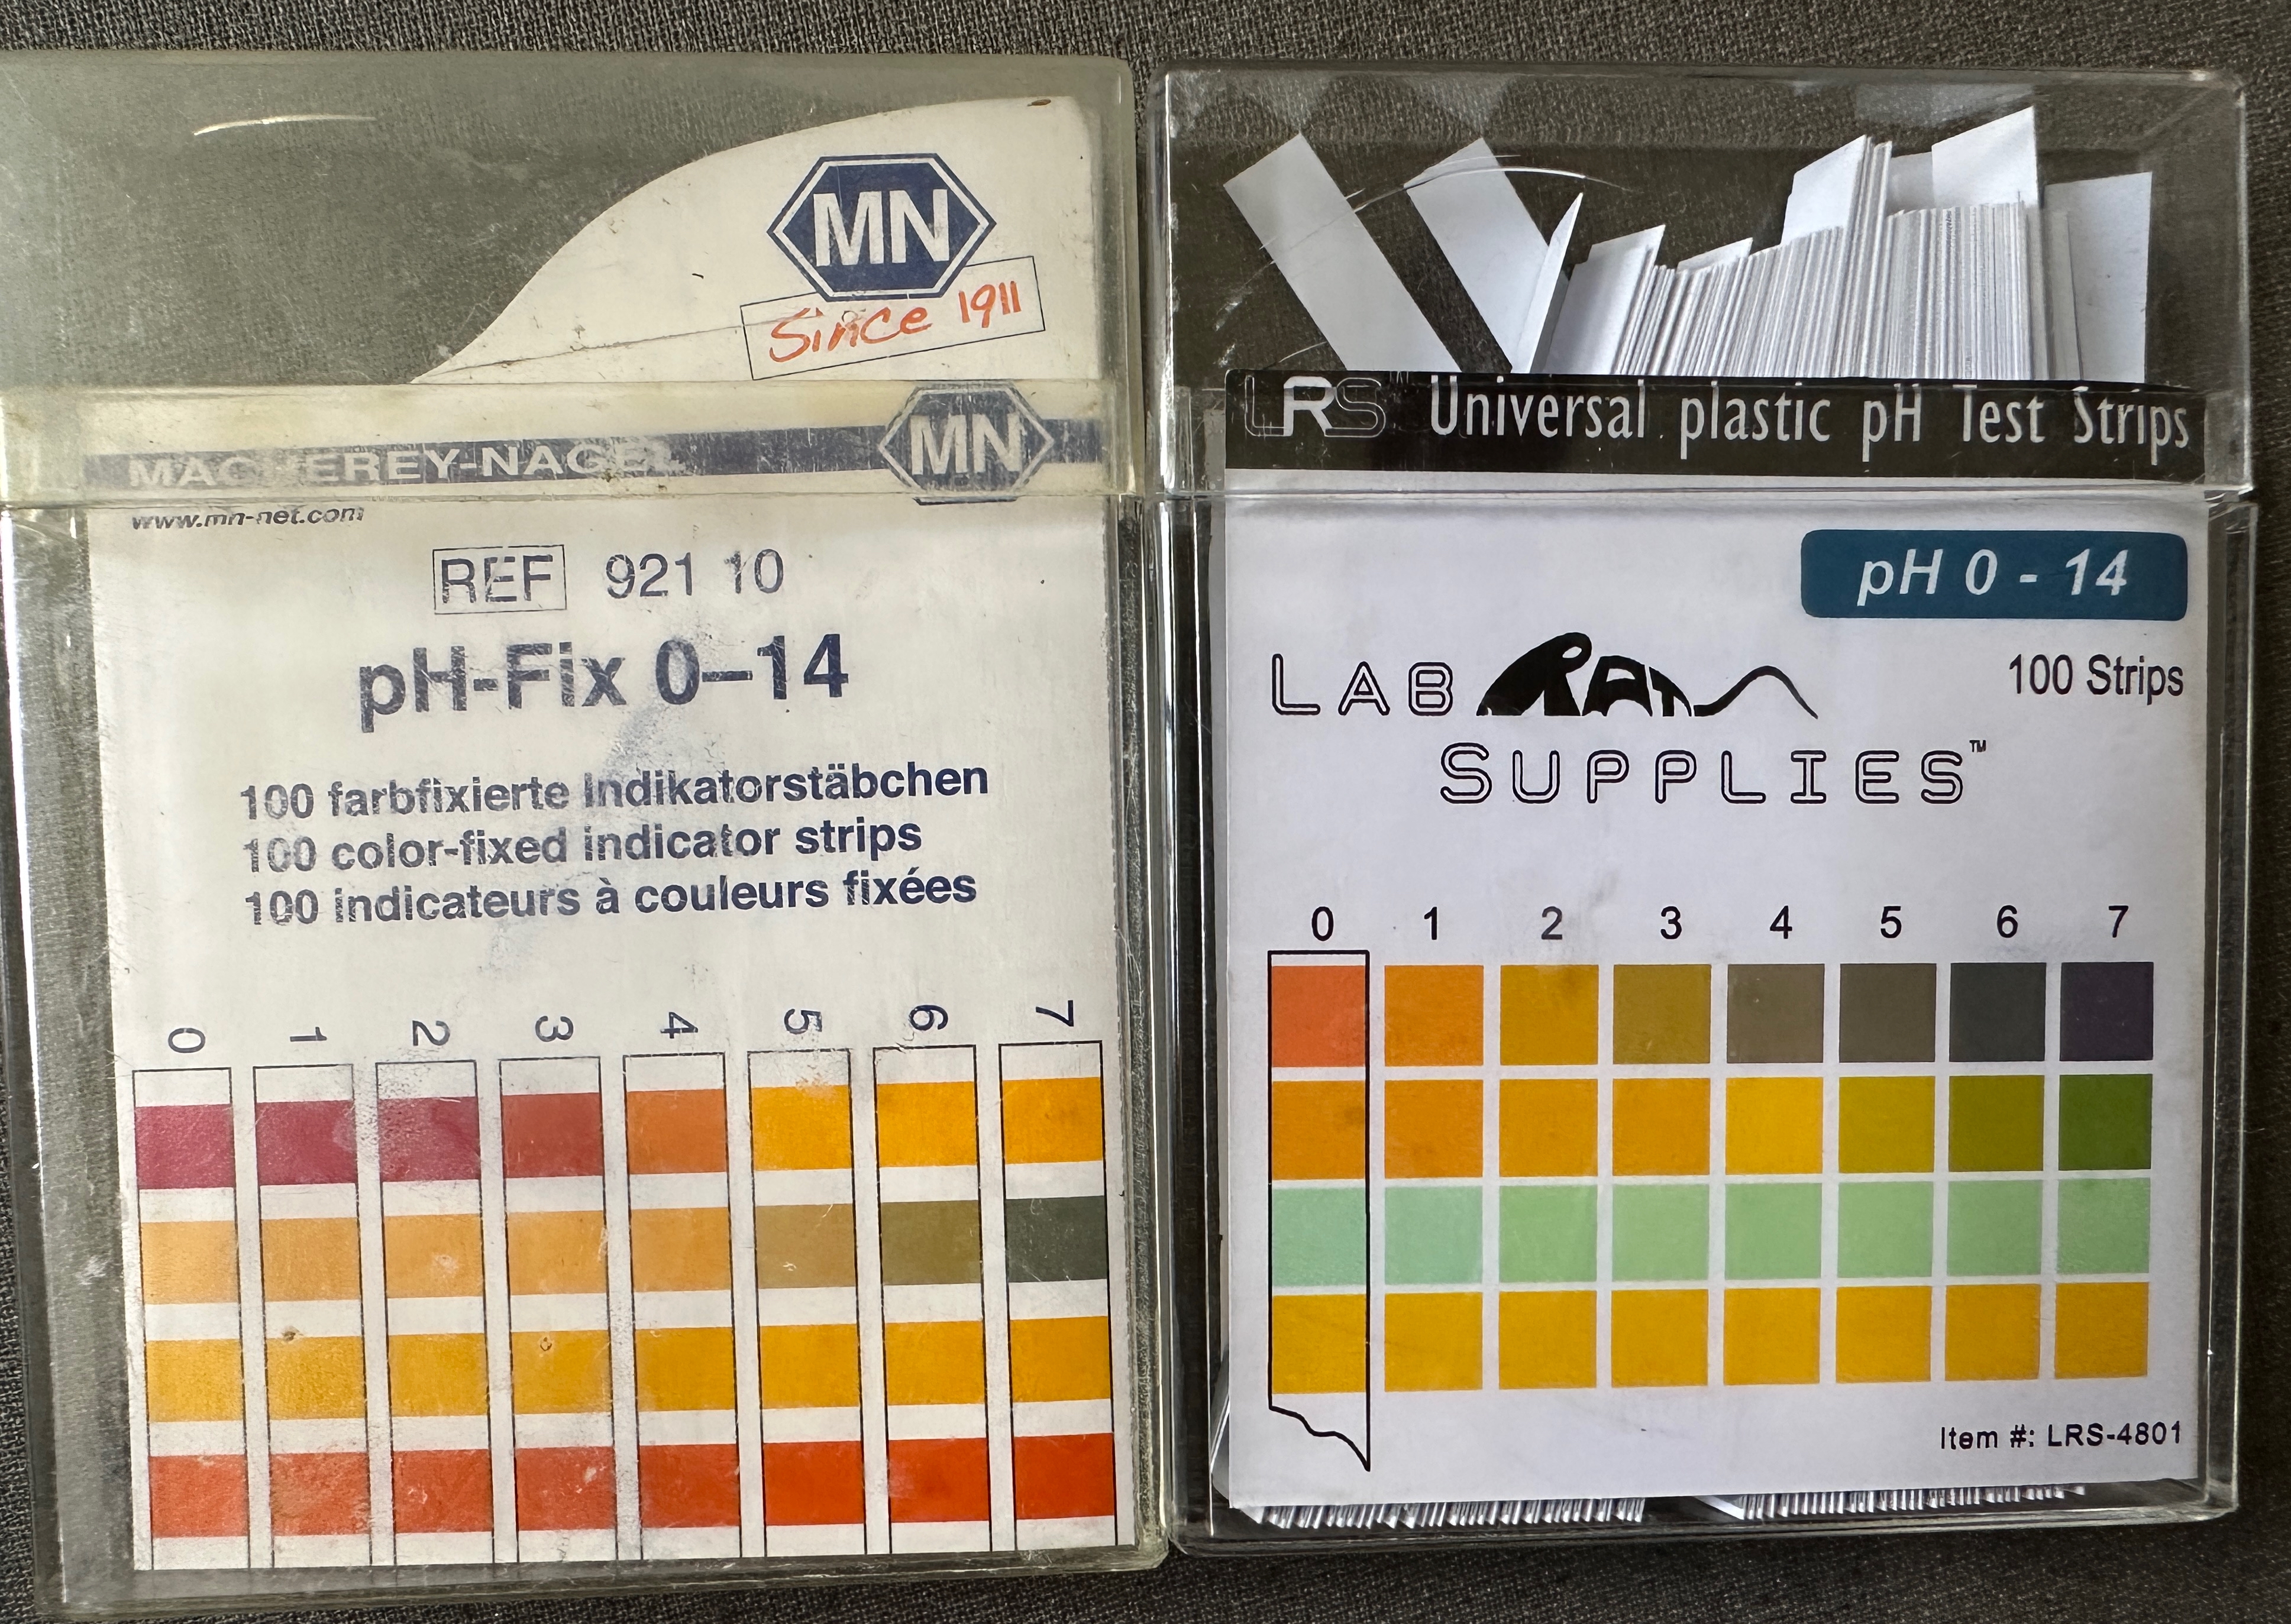
Monitor the pH – A good pH meter is an excellent investment. Alternatively, use pH papers that have multiple indicator zones.
As the fermentation begins, lactic acid will be created, and the pH of the vat will fall. This is the time to completely fill your vat using warm water into which you have dissolved soda ash or potash (25 grams per liter).
Measure the pH It should be in the range of 9.5-11. Once the vat is at full capacity, test the pH and record this.
Add a very small amount of lime (calcium hydroxide), if necessary. Lime is a much more concentrated “fix” for pH adjustments.
Watch for the vat to form an iridescent film on the surface. This is an indication that fermentation and reduction has begun.
Smell the vat. As bacteria causes the fermentation of the vat, the “odor” will be an indicator of activity.
Concurrently, test the color: the best way to tell if the vat is reduced, is to test its ability to dye.
Starting on day two, begin test dyeing. Place a small piece of wetted-out cotton cloth into the vat for 10 minutes. Observe and note the results. Continue to test the vat each day, maintaining a record of the dye tests.
Once the test fabric dyes a clear blue color, the vat is ready to use for dyeing. Usually this takes about 8-14 days.
Dedicate a small notebook to each vat that you build so that the vat can be observed over weeks/months. Place the dyed samples in your notebook. This will be an important resource tool to understanding your vat.
Once reduced, the vat can be monitored by weekly testing.
From this point, follow the instructions in “Vat Maintenance” post, which will follow.
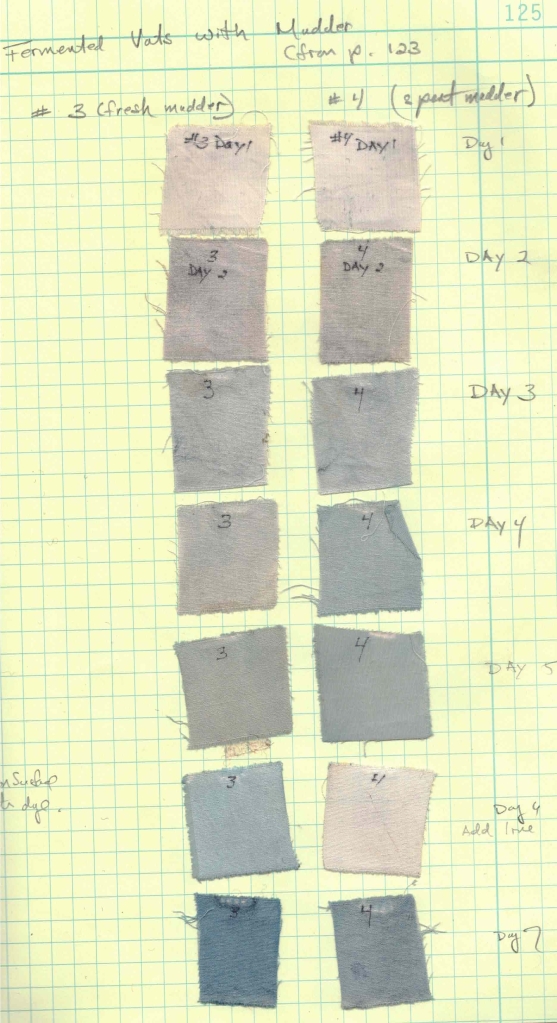
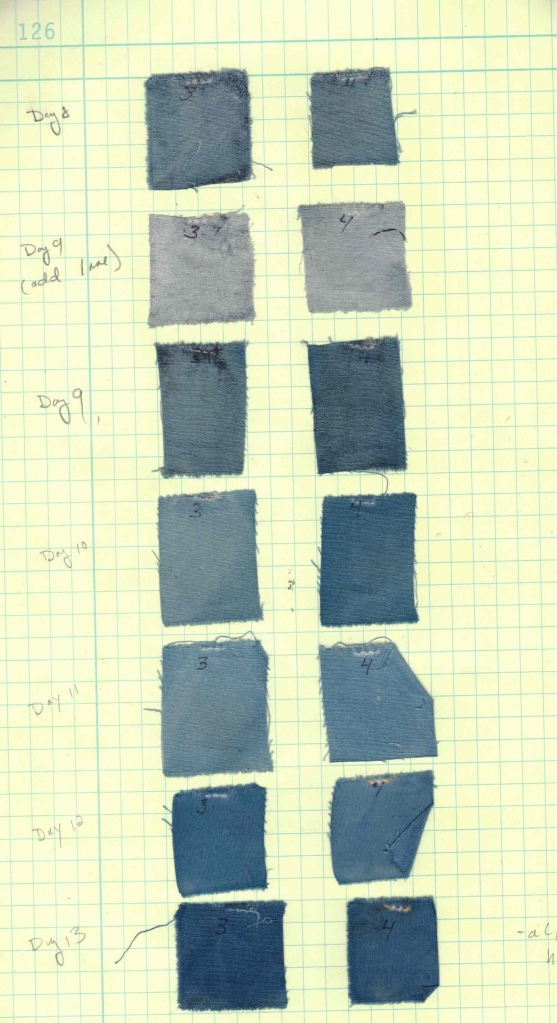
Day 1 – Day 13 of two vats made with madder root. One was made with “spent” root, the other was made with root that had not been used for dyeing. (I knew that they would both work, but sometimes I just need to prove it to myself!)
By day 6 the pH had begun to drop. The lack of color on that day is a great indicator that something is out of balance – and most likely it is the pH. A small amount of lime was added to both vats, and the color improved.
The same drop in pH happened on day 9. This illustrates how easy it is to read the condition of your vat from dyed samples. After day 13, I began using these vat for dyeing.
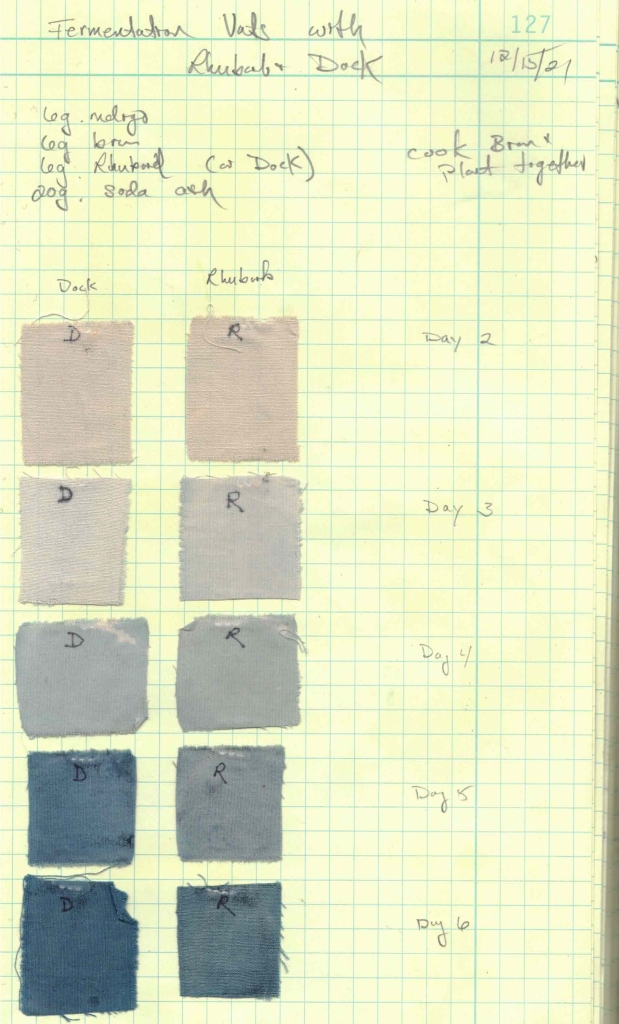
A similar test using spent dock root (Rumex crispus) and rhubarb root (Rheum palmatum). Reduction came more quickly in these vats. Perhaps this is because the plant material was a finer ground powder and more easily accessed by the vat. I source dock and rhubarb that are prepared for medicinal purposes.
Fermentation is a biochemical process in which complex organic molecules are broken down into smaller molecules through the action of bacteria, yeasts, or other microorganisms.
In food production, it can broadly refer to any process in which the activity of microorganisms can bring about a desirable change to a foodstuff or beverage, such as the making of cheese, yogurt, sourdough bread, vinegar, fermented vegetables (pickles and kimchi), or beer, wine, or kombucha, in which sugars are transformed to alcohol.
In biochemistry (and specifically in indigo fermentation) fermentation is a process that occurs through the action of microbial enzymes under alkaline and anaerobic (in the absence of oxygen) conditions. The result is a reduction of the indigo dye molecule to make it soluble.
Many microorganisms and bacteria thrive in this unique alkaline/anaerobic environment. The most important are Alkalibacterium sp., which produces lactic acid as a biproduct. The lactic acid will also bring down the pH.
Many grains contain this lactic acid bacteria. When grains are dry, those bacteria are dormant. But when soaked in water (or an alkaline liquid as in the case of indigo) the bacteria become active and produces enzymes that are useful to the reduction process. Wheat bran is a substance in which the indigo reducing bacteria/organisms live. It is a key ingredient in the fermentation vat. Traditional recipes use wheat bran as an element of the vat, and it is added periodically to maintain the health of the fermented vat.
Sukumo is composted indigo (polygonum tinctorium) leaves. Though it might already contain some of the bacteria that are needed for fermentation, wheat bran is always added to this vat as well.
Extracted indigo pigment lacks the microorganisms necessary to initiate the fermentation. This is especially the case of any pigment that has been dried. Organic material MUST be added to the vat to stimulate and maintain fermentation. Since medieval times spent madder root (Rubia tinctorium) was added to the vat to maintain fermentation. This “spent” madder was a waste product from madder red dyeing after the roots had been used to extract the red dye. The fermentation delivers a constant supply of glucose by breaking down starches and celluloses from the organic matter (madder root).
Over the last few years, I have experimented with spent madder root and other organic substances to determine alternative plant materials that can be used in place of the madder root, or in addition to it. I have successfully used spent rhubarb root, dock root, and dried Indigofera tinctoria leaves.
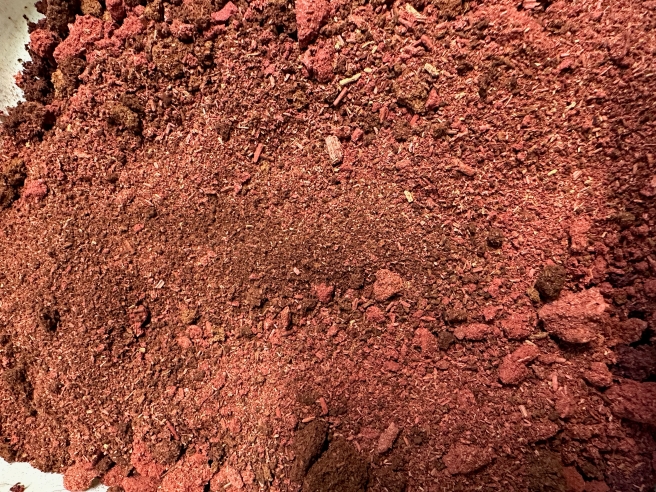
Ground madder root, which has already been used for dyeing, dried in a shallow tray. It will be stored and ready for use in an indigo vat.
Dried, ground Indigofera tinctoria leaves (often sold as a dye for hair)
Some bacteria in the vat create lactic acid as a byproduct, which is a major reason for the decrease in pH that will naturally occur in the vat. For this reason, the pH of the vat must be carefully monitored and maintained on a regular basis. A fermented vat is a long-term investment. Be prepared to treat it as one and commit the time to monitor it by regular stirring, pH testing, feeding – and of course, dyeing in it!
Having a good pH meter on hand is very helpful (This is the one I have) but pH papers with multiple pads for enhanced accuracy can also work well.
Full range pH papers with multiple pads for measuring increases the accuracy.
For further reading: This is a sampling of scientific papers (with links) that discuss the bacterial process of fermented indigo vats.
On this blog site, I have previously written about the indigo fermentation vats in very general terms. I have been using these fermentation vats exclusively for over 5 years now and I feel strongly that it is the best approach to use for indigo dyeing. So, I have made the decision that I would like to share much more specific information regarding how to make and maintain these vats through a series of posts in coming weeks. I hope to roll a new one out every few days days or so.
Since I began the transition to using ONLY natural dyes in 2008, I have continued to learn and to refine my practice. Dyeing with indigo has been one of the most rewarding, yet challenging adventures. Striving for, and practicing a level of mastery related to indigo dyeing, is necessary to achieve a full palette of color using natural dyes and having the ability to control shades of indigo blue is a necessary skill.
In the 1970s, I did my first indigo dyeing using sodium hydrosulfite as a reduction agent for my vat. I never liked dealing with the reducing chemicals, such as sodium hydrosulfite or thiourea dioxide. The smell was off-putting and, more importantly, I had concerns regarding the safety of such chemicals. I abandoned their use (and indigo dyeing) until many years later.
I was thrilled when I learned from Michel Garcia that indigo vats could be made using benign substances such as sugars, plants, ferrous sulfate, and lime (calcium hydroxide) which I was able to purchase in the grocery store as “pickling lime”. Vats made this way are considered to be, or described as, “quick reduction” vats. They reduce and are ready for dyeing within hours and can be maintained for an extended period with proper attention. I was very happy. These are the vats that Joy and I included in our book “The Art and Science of Natural Dyes”. I believe that these are still the best vats for short term dyeing workshops and other situations where a working vat is required quickly.
Over time, though, I observed that there are issues and challenges with these vats.
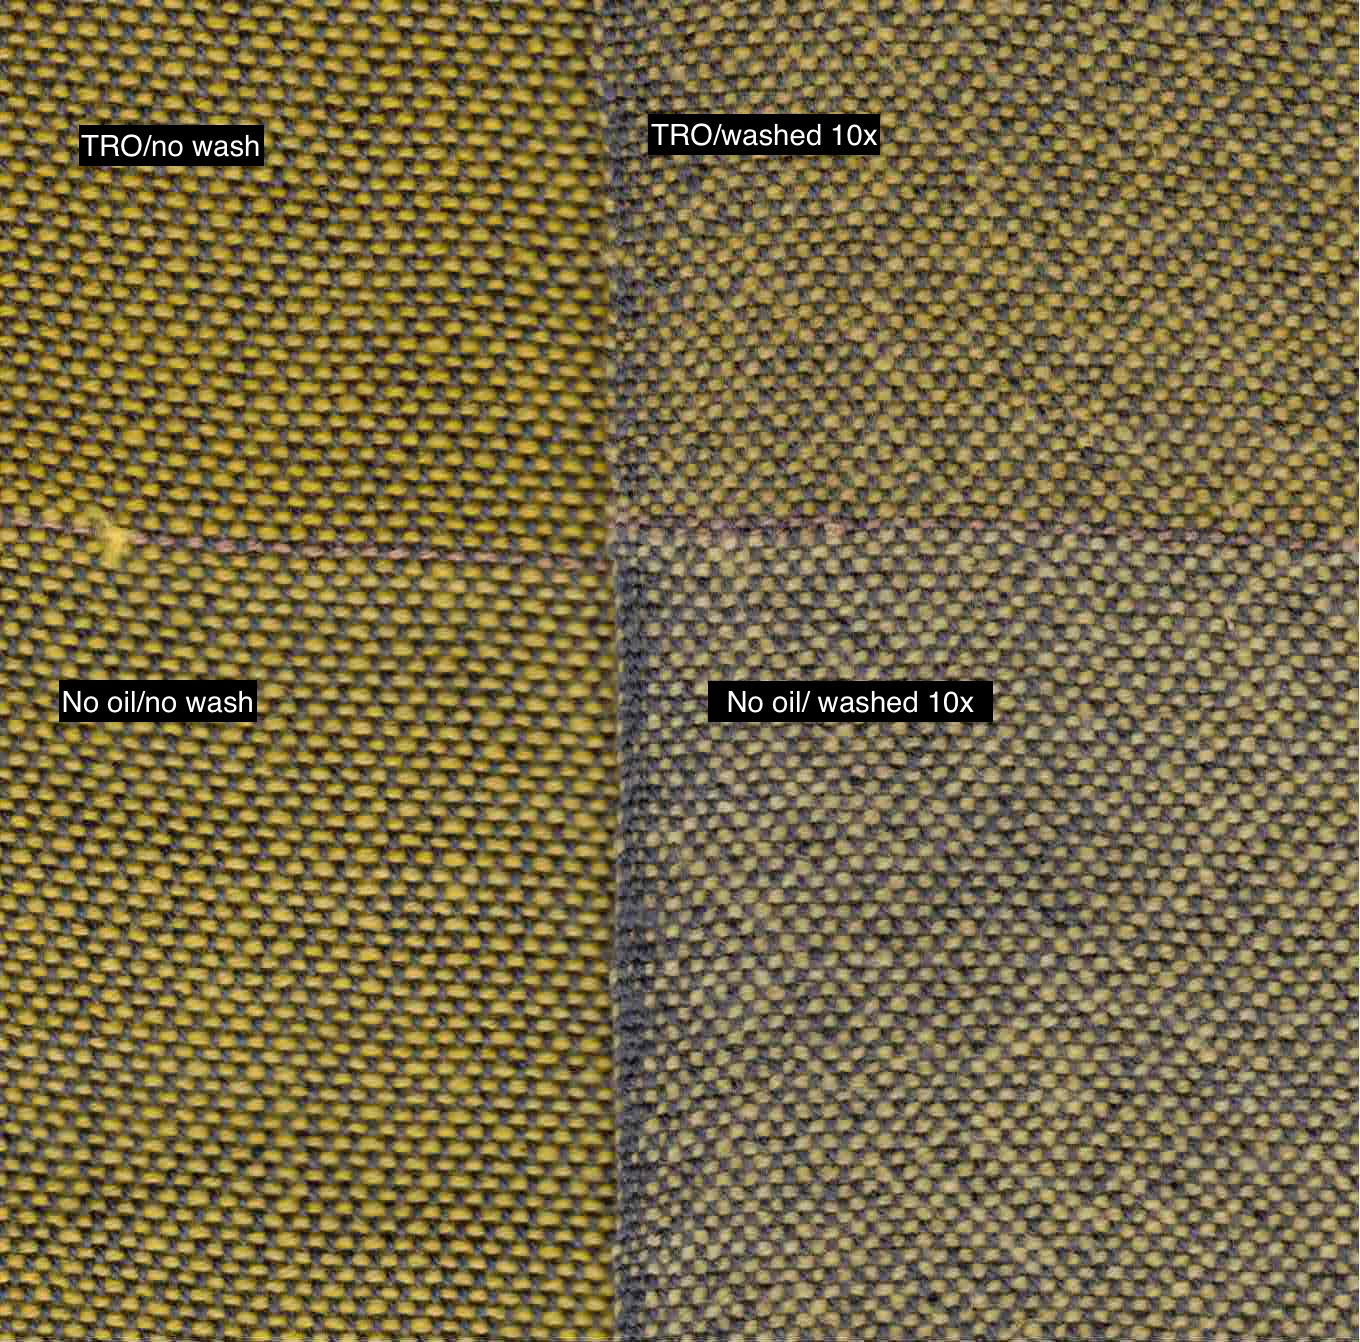
Crocking (the rubbing off of color) was a problem, despite proper finishing and washing, and especially when dealing with knitting or weaving yarns, which are handled a great deal. All indigo dye seems to exhibit poor resistance to rubbing to some extent, but the quick reduction vats seems to crock more. What I understand is that excess calcium may react with the reduced indigo and makes it into insoluble compound. These vats depend on the use of large quantities of calcium (calcium hydroxide). I am now thinking that it is possibly the reason for the bad rubbing fastness or crocking.
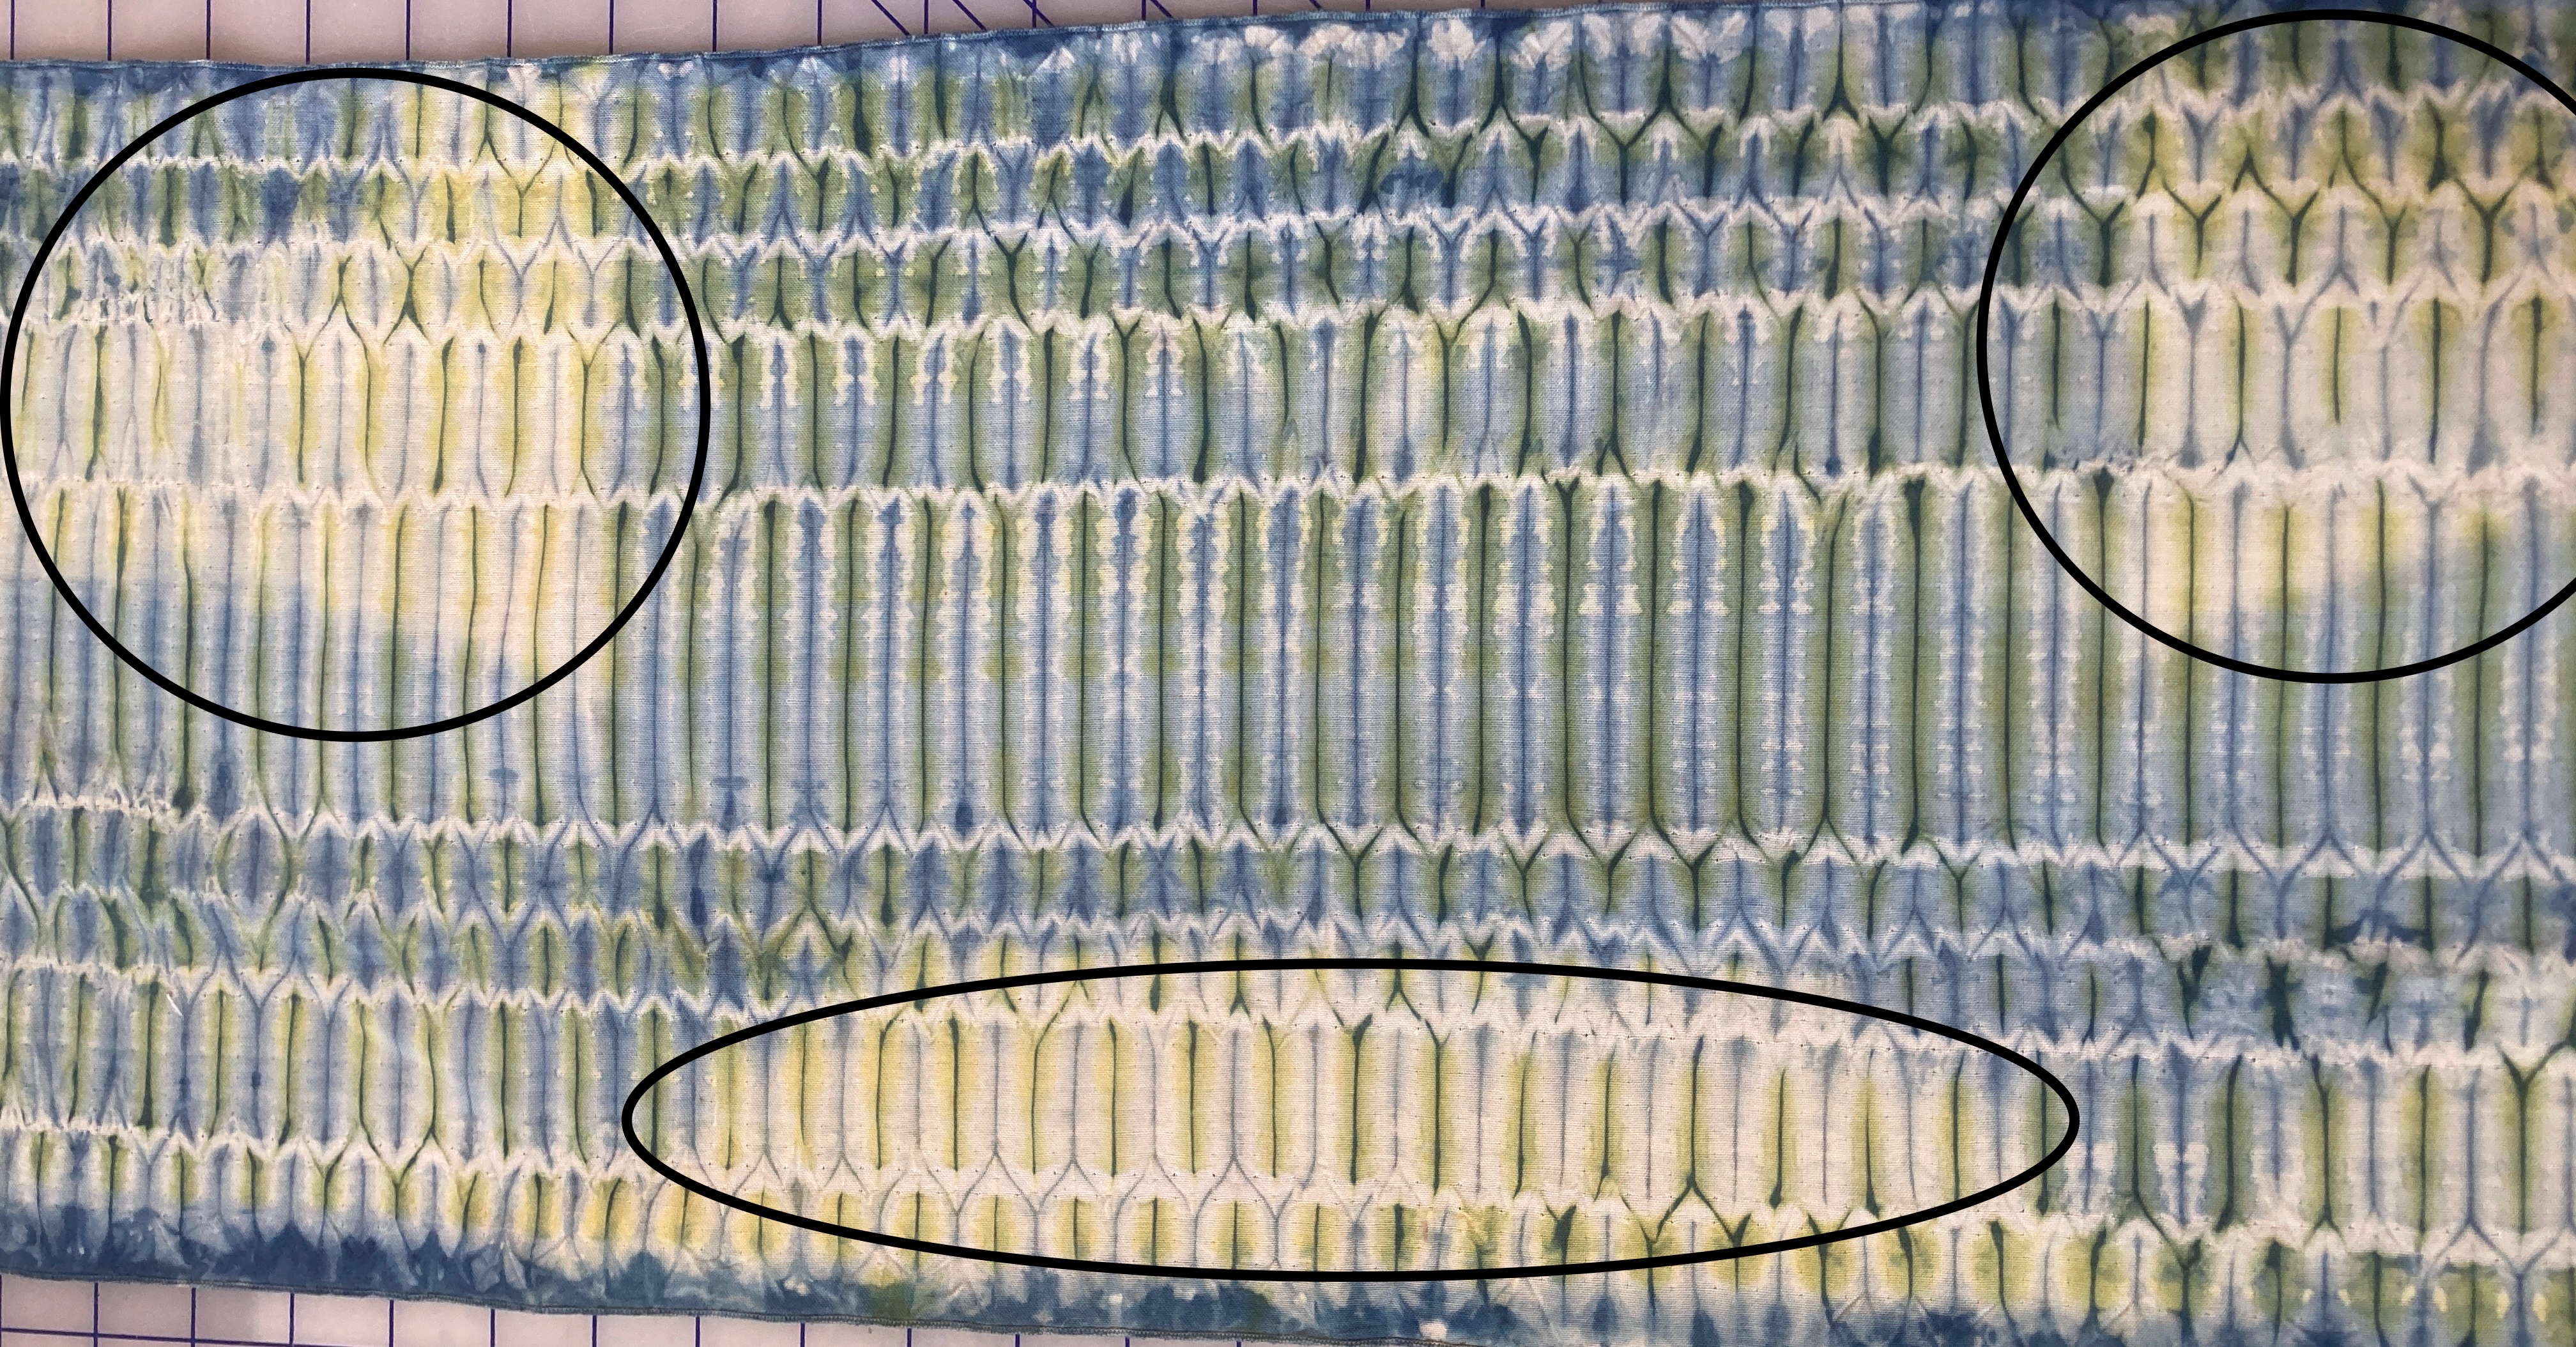
This shows the “fading” which occurred on the folded cotton cloth that was stored in a dark place for a number of months. The indigo blue has nearly disappeared in some places. The fading mirrors the actual folds that were in the cloth. It is NOT an intentional design element.
The color often faded inexplicably, turning pale and displaying washed out areas, or just completely disappearing. I have observed this occurred where cloth was folded and put away on the shelf. Even when a textile was rolled up and stored in the dark, I would find that the blue had literally disappeared in some parts of a textile despite careful finishing and neutralization. I’ve had discussions with other dyers who have also experienced this same phenomenon, so I know I am not the only one who took note. I always do lightfast test on the dyes that I choose to use for my work but this was something else entirely
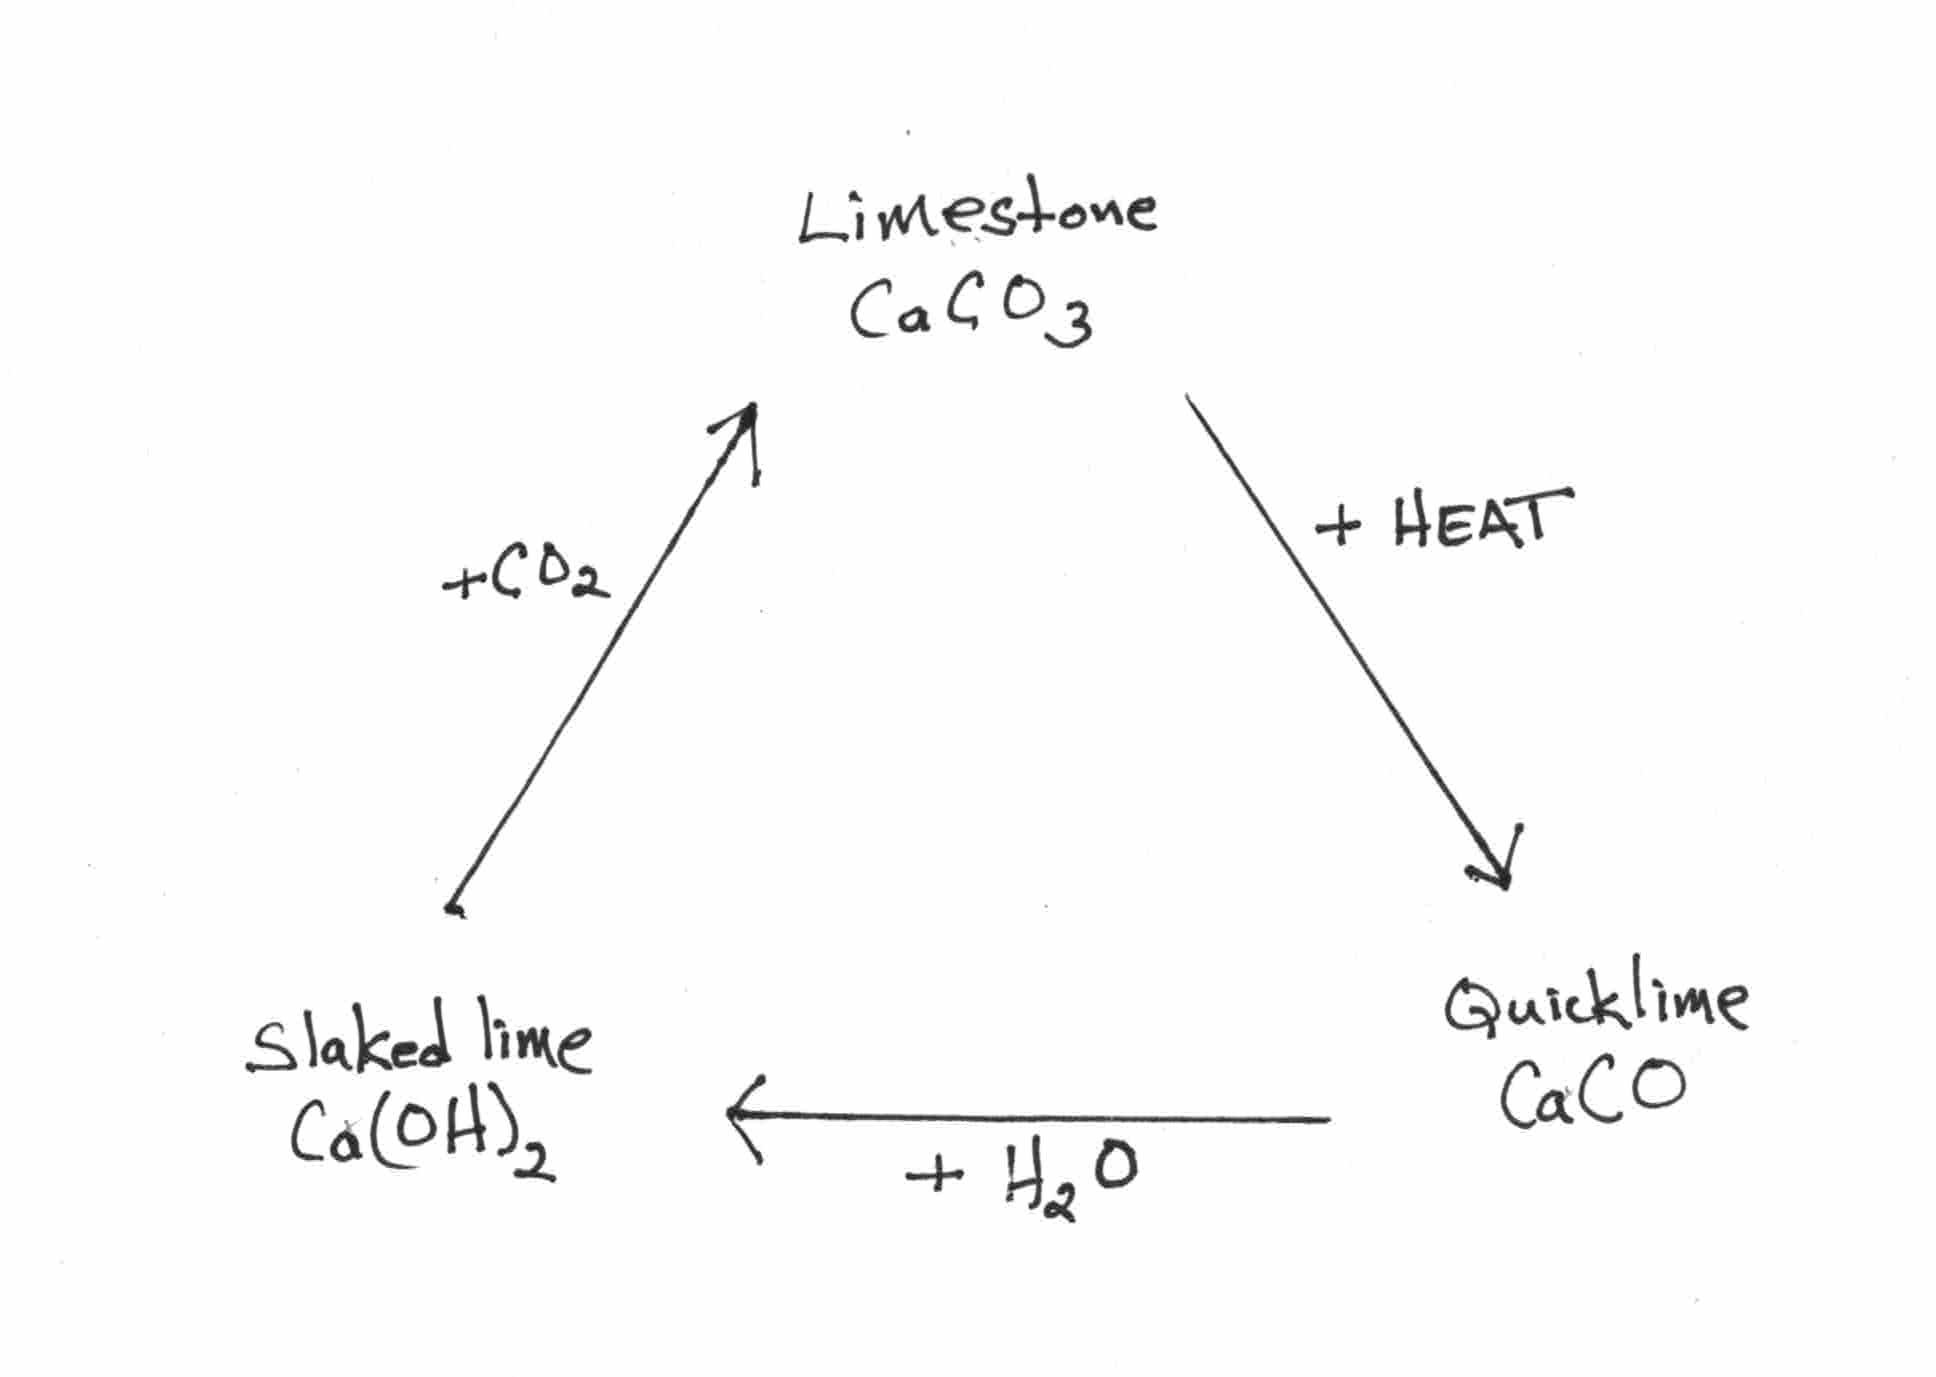
The “lime cycle” illustrates how limestone is heated to create quicklime. Water is added to make slaked lime. Does exposure to air/carbon dioxide turn the lime back into limestone again?
In 2017 I began my journey using indigo vats that reduce by the activity of fermentation after meeting Hisako Sumi, Japanese indigo dyer and researcher. Hisako encouraged me, guided me, and even put together and gifted me a small “kit” which she mailed from Japan, so that I could start my first fermented vat. I began experimenting, testing, dyeing, observing, and never looked back. Hisako generously ‘coached” and mentored me from from her home in in Hokkaido and provided me with a much deeper understanding of my vats.
The COVID pandemic kept many of us home for long stretches of time, and during that period many of us learned new skills or honed old ones. That time provided me the opportunity and focus to tend indigo vats and to develop and refine an understanding of the fermentation process. My indigo dyed textiles have never been better! I no longer fret over potential “unexplained” fading. The quick fermentation vats require high alkalinity (pH 12). The fermented vats are able to be maintained at a lower pH than the quick reduction vats (pH 9.5-11). This is accomplished by the use of wood ash lye, soda ash, OR potash to achieve the correct pH. I have used all of these alkaline sources successfully. Lime (calcium hydroxide) is used in very small amounts and only to “tweak” the pH maintain desired levels. The lower alkalinity of the fermented vats is more suitable for all fibers. I will likely never return to quick reduction vats, unless specific circumstances require their use.
In some of my previous blog posts, I have written about this process in general terms and also have given credit to Cheryl Kolander, whose online recipe was a good starting point for me, but until this time, I was not ready to publish anything definitive of my own. In fact, I have never published an “actual” recipe on my blog: Natural Dye: Experiments and Results.
I am not a trained scientist/chemist, but through experimenting and multiple observations I have done my best to understand what happens in the fermented indigo vat so that I can use and maintain the vat. And now it is time to share that specific information and information about the process I have used. Over the coming weeks (and about a dozen blog posts) I hope to “walk through” the planning/making/maintaining of a fermented vat and to encourage and guide dyers to explore on their own. And, as we approach summer in the northern hemisphere, it is a good time to try these vats. But do keep in mind, fermentation vats may not be the best for a beginning dyer or for someone who does not have the time and focus for it.
One does not do this alone. I owe much to Hisako Sumi, Michel Garcia, Joy Boutrup, Dr. Kim Borges of Warren Wilson College, and to all my colleagues and students who have been willing to experiment with me.
As a dyeing community, perhaps we can all help each other to learn, understand, and to work through the process of indigo fermentation. Your comments are most welcome. My goal is to start that process with a series of blog posts that might help you begin your own journey. By all means, if you have a “dye mentor”, do consult them! I don’t have all the answers but maybe we can get there together.
Turkey red is a process of dyeing cotton with madder. It uses oil to treat the textile before mordanting and dyeing to increase the brilliance of color and its ability to withstand washing. It was widely used in the 18th and 19th centuries.
A few years ago, Joy Boutrup and I did some quick tests together. We treated cotton with Turkey Red Oil. But the results were not good and so I abandoned it. Admittedly, I did not do further research at that time.
Following Maiwa’s online class, Natural Dyes: Alchemy Chemistry Craft, a small group of colleagues and I began a “study group”. Both the class and the study group have been a catalyst to delve a little deeper into some processes, includingTurkey Red. Here are some of the results of my own testing and observations. This time I prepared myself better, did lots more reading and research and have been quite intrigued by the results.
My starting point was Julie Wertz’s new book: Turkey Red (Bloomsbury, 2024). In this book Wertz does an excellent job of presenting its history, some chemistry, and the series of steps involved.
Turkey Red Dyeing is a process by which cottons were treated with oil prior to mordanting and dyeing (or printing) using madder. It was practiced regularly in the 18th and 19th centuries in Europe and, I believe, some in the US. The result is a brilliant red dye color that is very fast to washing. It was an important discovery in the textile industry, though its roots likely go back much further to madder dyeing in India where oils were commonly used centuries ago to treat cotton textiles. Oil is also used in Indonesia prior to mordanting and dyeing cottons with Morinda bark (Morinda citrifolia).
It is believed that the oil combines with the mordant and then with the dye, making a compound that is faster to washing and light. All the literature refers only to its use with madder red. To the best of my knowledge, no other dyes are ever mentioned relative to the oiling process.
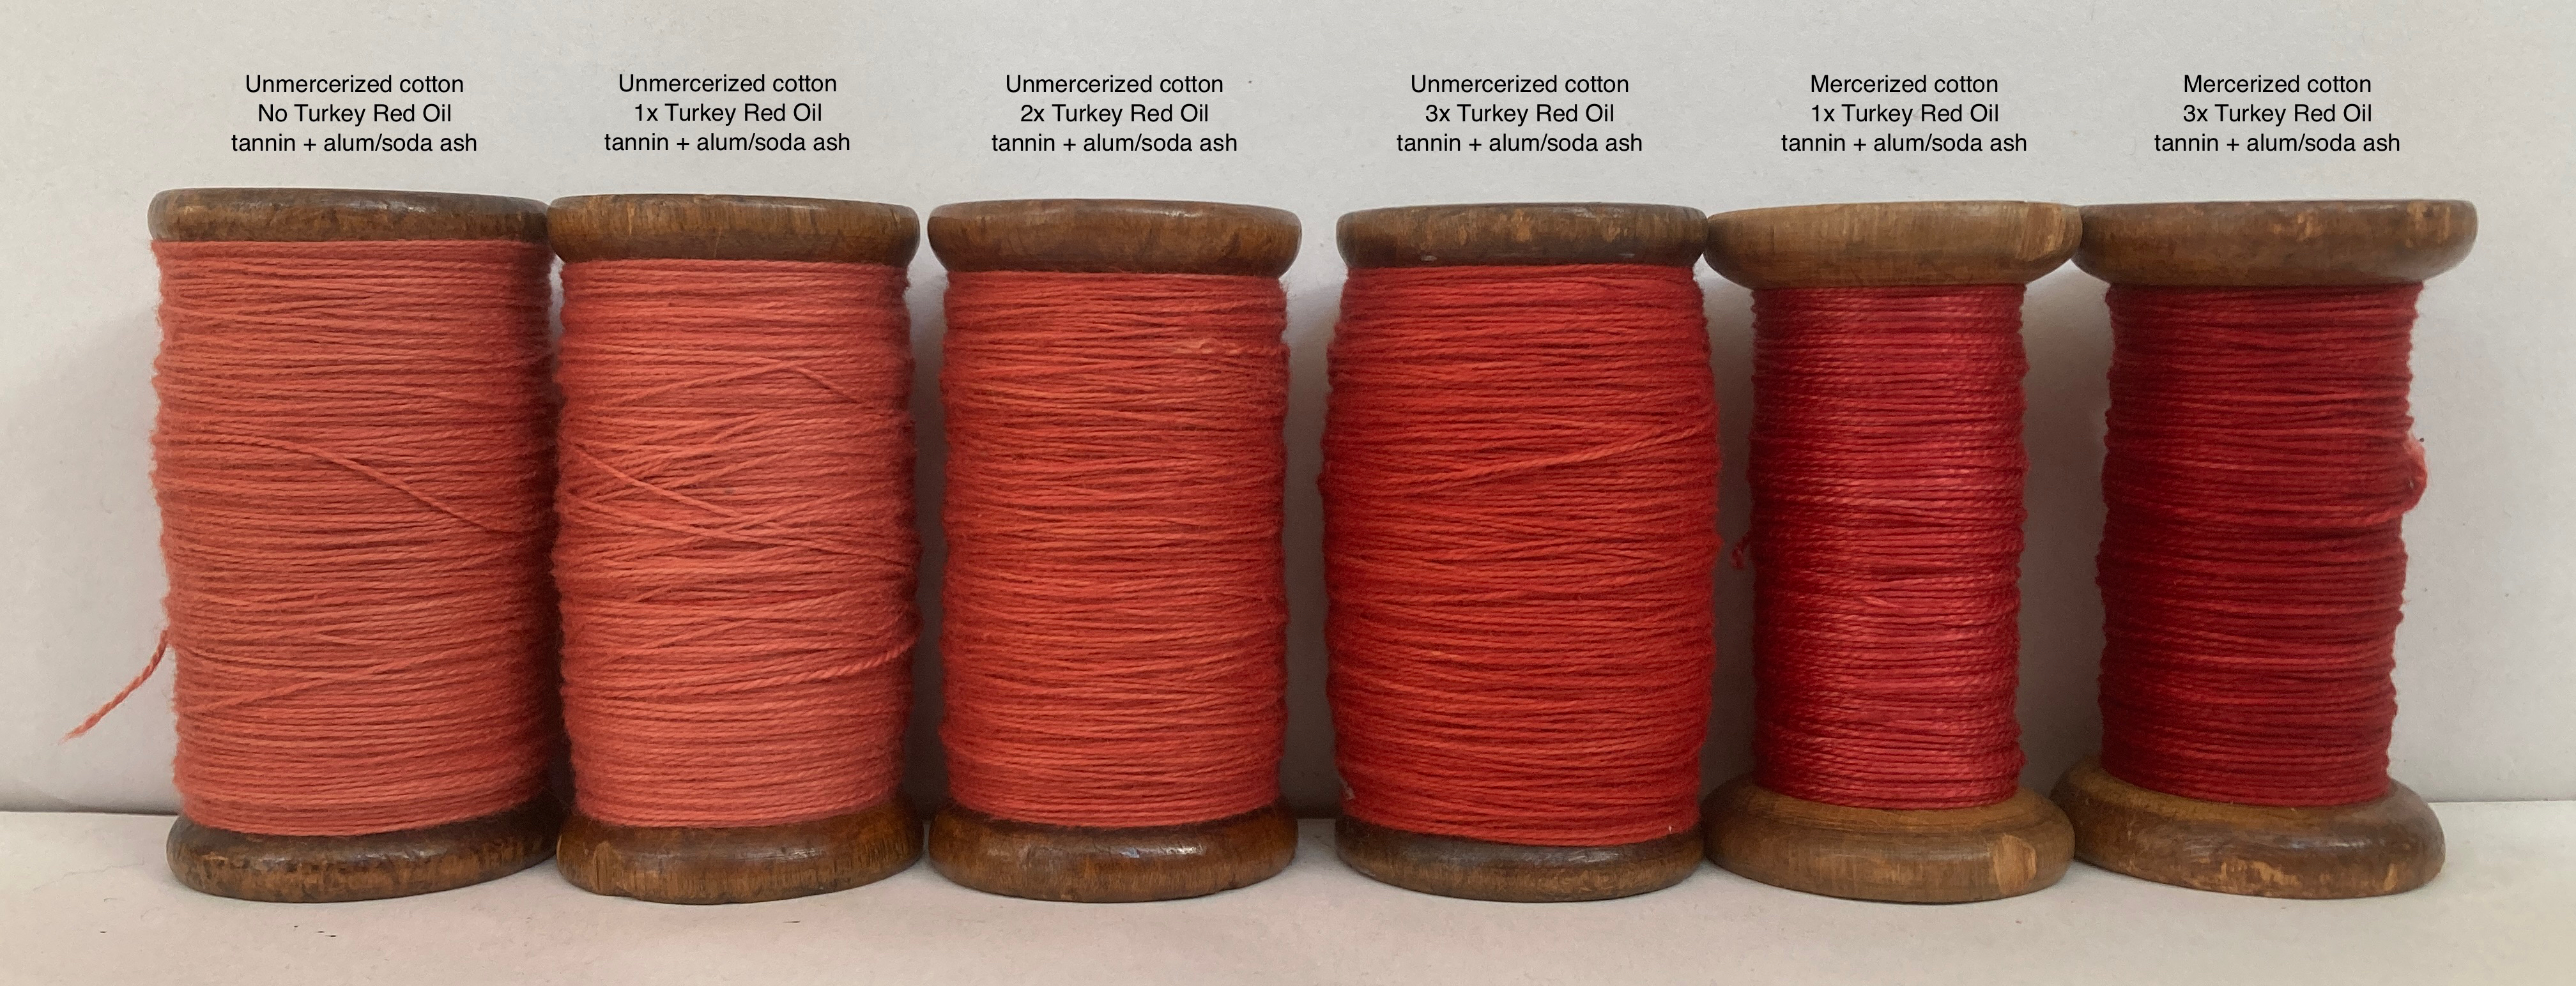
Turkey Red Dyeing was usually done on unbleached, and non-mercerized cotton. These cottons do not have an affinity with mordants and thus are more difficult to dye with deep, saturated red colors.
Jim Liles, in the Art and Craft of Natural Dyeing discusses the Turkey Red process in some detail and includes recipes. My other resources include old industrial dye manuals* from the early 20th century. These are the same manuals that Joy and I used to develop some of the recipes in The Art and Science of Natural Dyes.
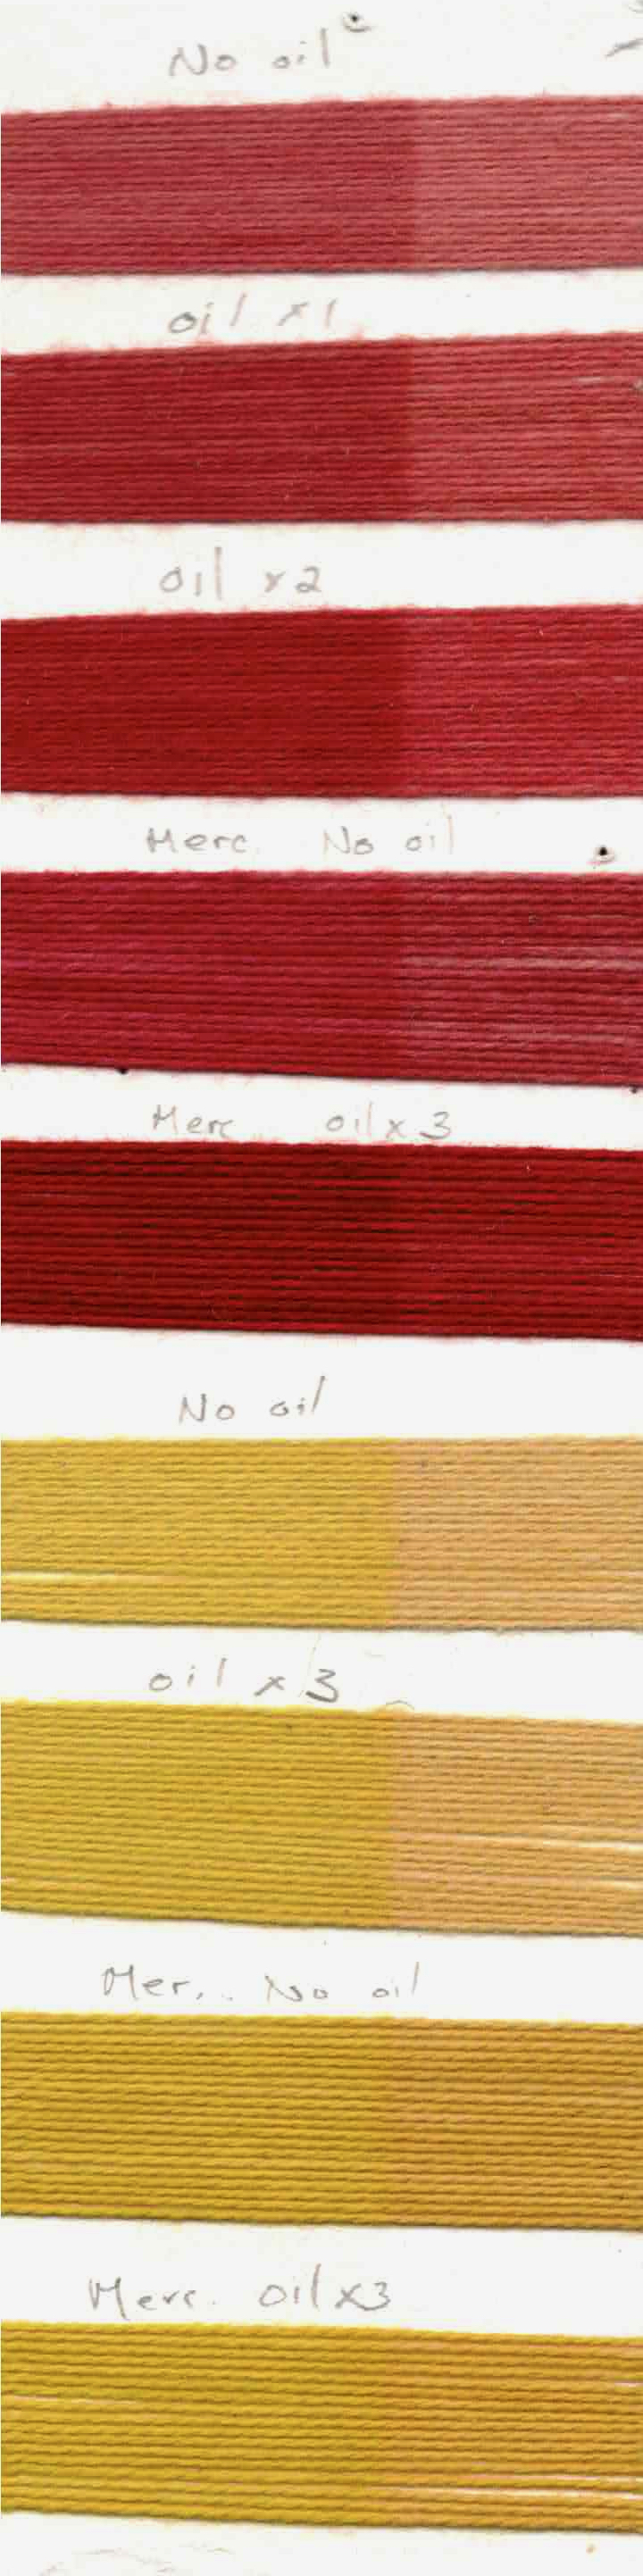
The Process: Un-mercerized cotton yarn was scoured thoroughly and allowed to dry. The dry yarn was then immersed in a 50% solution of Turkey Red Oil and water, then dried again. Multiple oil treatments are recommended, drying in between each. I oiled and dried the yarn up to 3x.
All samples were dyed using ground madder root @ 50% weight of dry fiber. I did not use oil in the dye bath or as an after treatment, as some recipes recommend.
My initial tests do indicate the effectiveness of the oil treatment. A deeper red color results after the treatment with oil. A single oil immersion resulted in a slightly deeper shade of red, but three oil immersions in the oil (drying in between each) resulted in a much deeper color. What would happen if it was oiled 4-6 times – which is recommended?
Oil applied to mercerized cotton yarn also illustrated the effectiveness of the treatment. Mercerized cotton always takes up mordant and dye more readily without any additional treatment. Clearly, the oiling did increase the dye take up even more.
An interesting fact: John Mercer, who invented the mercerization process in 1844, also has his name on the patent for Turkey Red Oil. Mercerized cotton always dyes more easily and results in deeper colors with any type of dyeing. Perhaps, when mercerization became common, the need for the labor intense process of oiling was no longer necessary or financially viable.
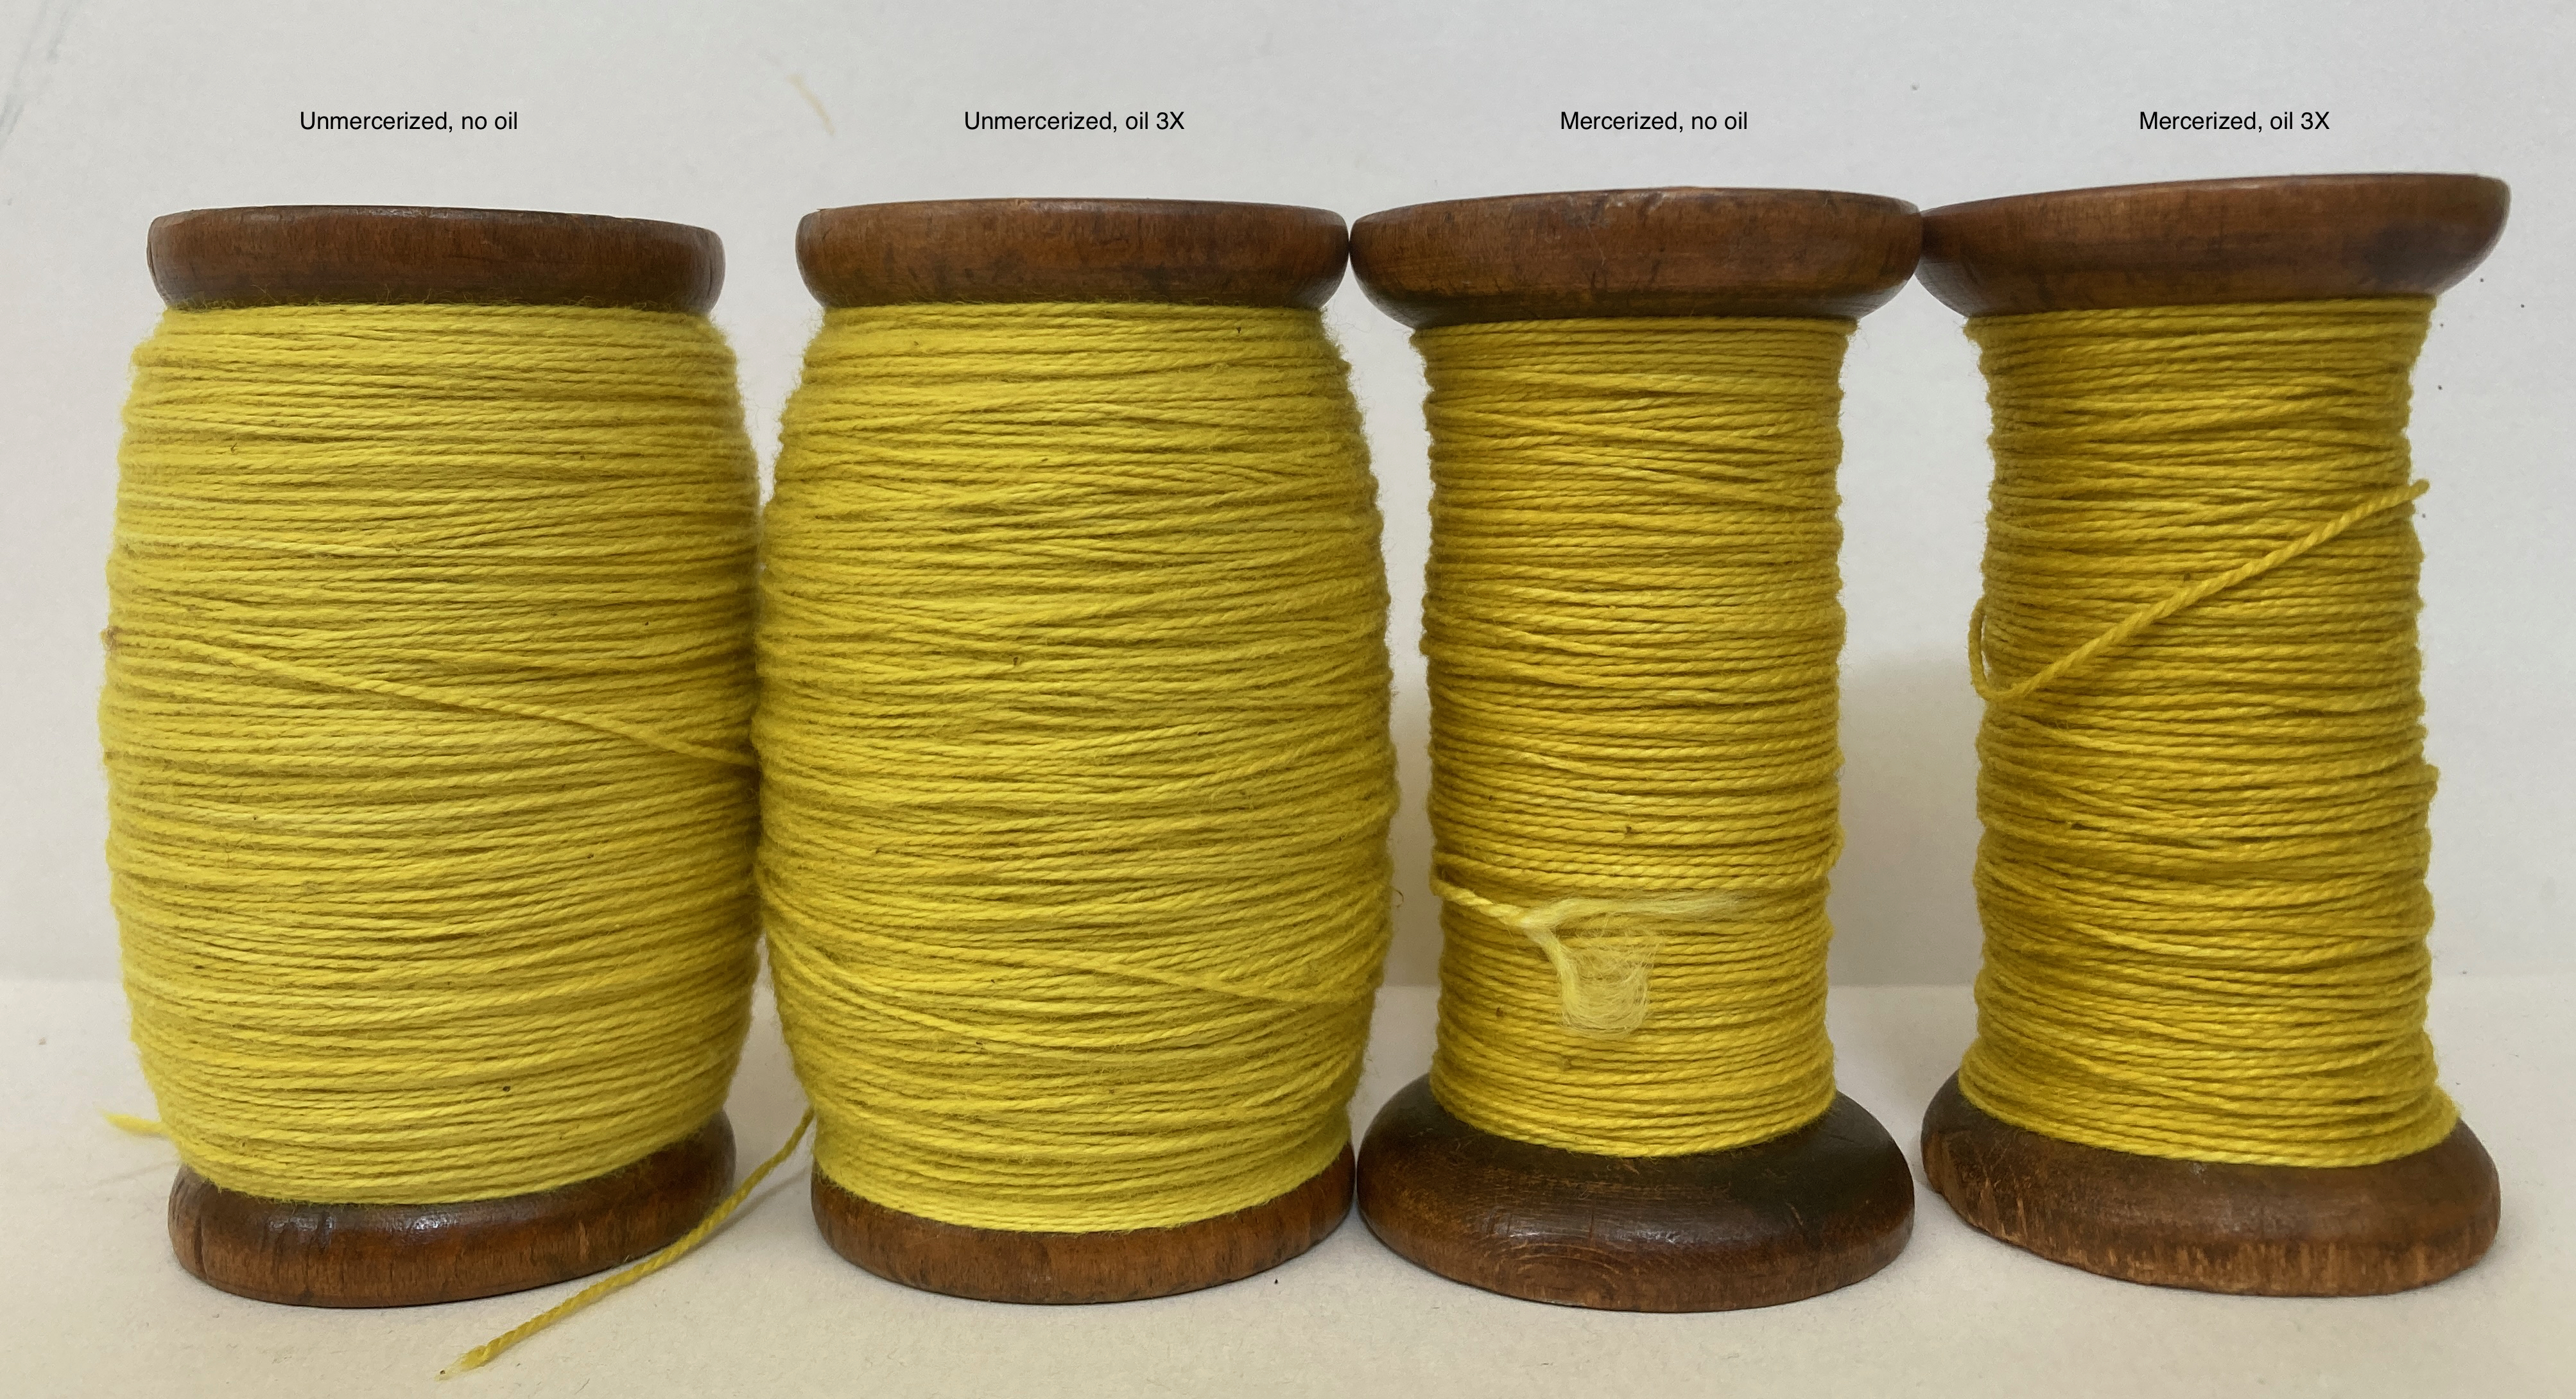
Follow-up question: All references to Turkey red dyeing use madder as the dye. Is there a bond made only between the oil and the mordant? Would oiling of the textile prior to mordanting and dyeing with weld or another dye also result in a deeper color?
Initial testing indicates that the oiling of cotton prior to dyeing with weld results in a slightly deeper color but it isn’t nearly as dramatic as the madder dyed textiles.
After completing lightfast tests with both dyes, I observed a subtle difference in the way they reacted to light, taking into consideration the relative “before” and “after” of each dyed yarn following 3 weeks of exposure to direct sun.
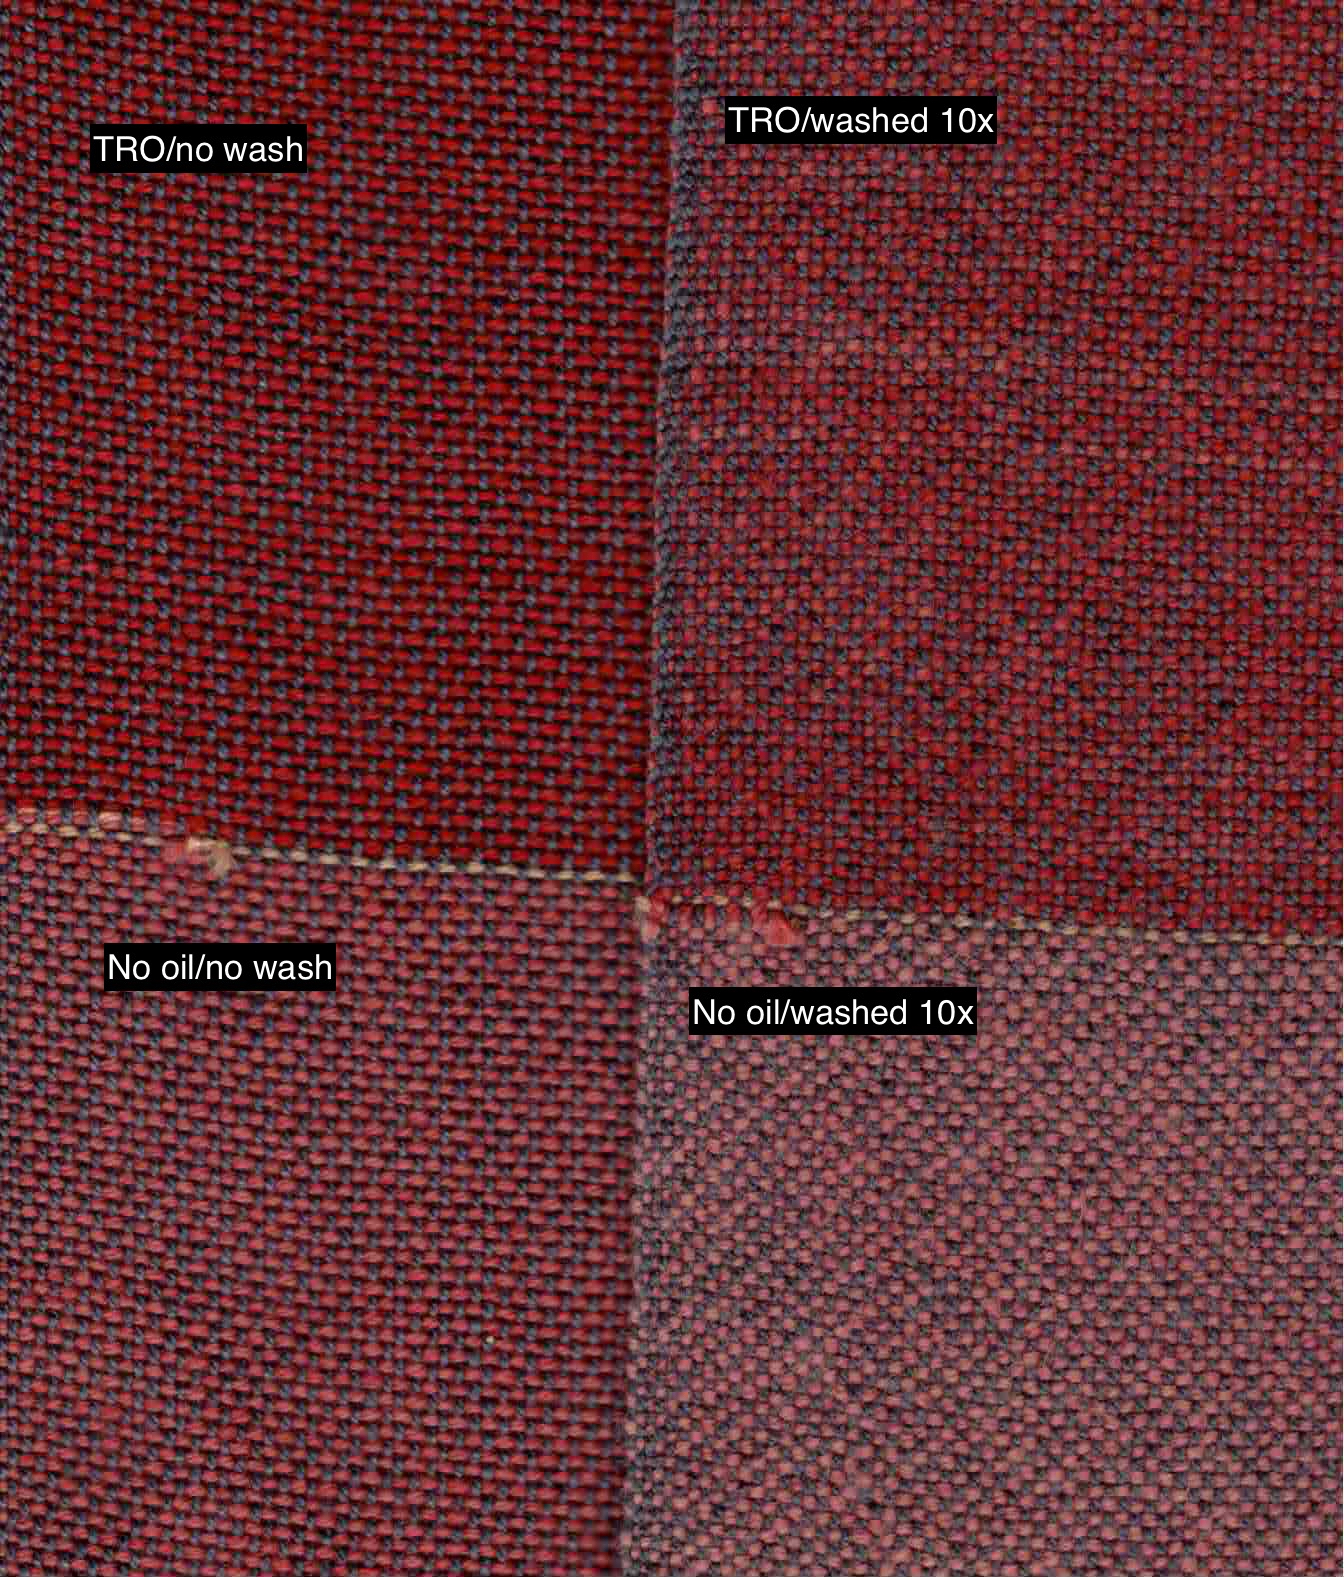
Wash fast tests, on the other hand, were much more dramatic. I used yarns that had been dyed both with and without the turkey red oil treatment. The yarns were then woven into a cloth with a dark grey warp. After only 10 regular wash cycles in my machine (along with the rest of my laundry), I observed a significant difference in the color loss of the dyed yarns with both the madder and the weld.
Once again, I am humbled by the research of dyers who came before us. I will seriously consider using the oil treatment when making textiles that could be laundered frequently.
*General Dyestuff Corporation, Manual for the Dyeing of Cotton and Other Vegetable Fibers (1936)
I am always trying to learn more about the natural dye process. Mostly, this is to become a better dyer, but there is also an intellectual curiosity that keeps me asking questions, testing, and observing. Joy Boutrup, my co-author of The Art and Science of Natural Dyes, is a textile chemist and engineer. She has generously explained so much to me over the years, giving me a glimpse of the logic behind all of our dyeing processes, but never overwhelming me with the technicality of the chemistry.
Last summer, Joy and I were teaching at Penland School of Crafts at the same time as Tim McLaughlin and Charllotte Kwon of Maiwa. It was there I learned of the chemistry class for dyers that they had been developing. In a desire to learn more and expand my ability to understand process, I enrolled in the class, Natural Dyes: Alchemy Chemistry Craft when it was offered for the first time. The class is presented in 18 separate modules, each a seriously “deep dive” into electrons, molecules, acids, bases, and the nature of plants that we use in our processes. Each lesson is presented in video format by Tim and Charllotte with printable notes that link directly to the video script.
To be honest, much of it was over my head, as I do NOT have a chemical background.
The class is not a practical “how-to” of dyeing, but instead, a serious look into the principles behind the process. As the lessons progressed, I found myself making connections and the processes that I know well were explained even further. There is a reason for each of the steps we use in the dye process, whether we see them, understand them, or not.
Several of my colleagues also took the class. Early this year, when the class was offered for a second time, several other colleagues enrolled. So, a small group of 7 serious and curious dyers decided that we would go through the class together. This would give us an opportunity to discuss, compare notes, and work through the class together. An enrolled student has three years to access the videos but the printable notes are yours forever, making them a valuable studio reference.
Our “Study Group” members are located all across the US. We opted to do our watching/reading separately and come together once a week via zoom to discuss a single module.
We tried this for a few weeks, but then decided that we needed a deeper focus to smaller parts of each module. Each of us now takes on the responsibility to further explore, research, and understanding one (or two) aspects of a module. This allows for more in-depth research, more focused questions, and possible dye/process testing and observing. When we complete this series of modules, I do believe that we could start all over again, and still learn more about the dye/chemical process.
Understanding and practicing natural dye is a never ending process. Learning WHY we do things is key to being our best as dyers.
During the first chemistry class in the fall of 2023, we received the shocking and sad news that Tim McLaughlin had passed away very suddenly. No one in the Maiwa family or in our larger community of dyers was prepared for this. It made continuing with the class difficult at that time, but now I feel that we are honoring Tim by continuing to learn from what he has created. We miss him dearly.
I am awe of the work that Tim and Charllotte put into this class – in order to make all of us better dyers.
Maiwa is offering the dye chemistry class once again this spring…. Serious dyers should consider taking this class and I would highly recommend working with a group of colleagues in the process.
Tim and Charllotte taught an ink making class at Penland School of Crafts in the summer 2023. At the same time, Joy and I were teaching a weaving and natural dye class together. We had so much to discuss after long days in the studios! This is where I first learned of Maiwa’s upcoming science class for dyers.
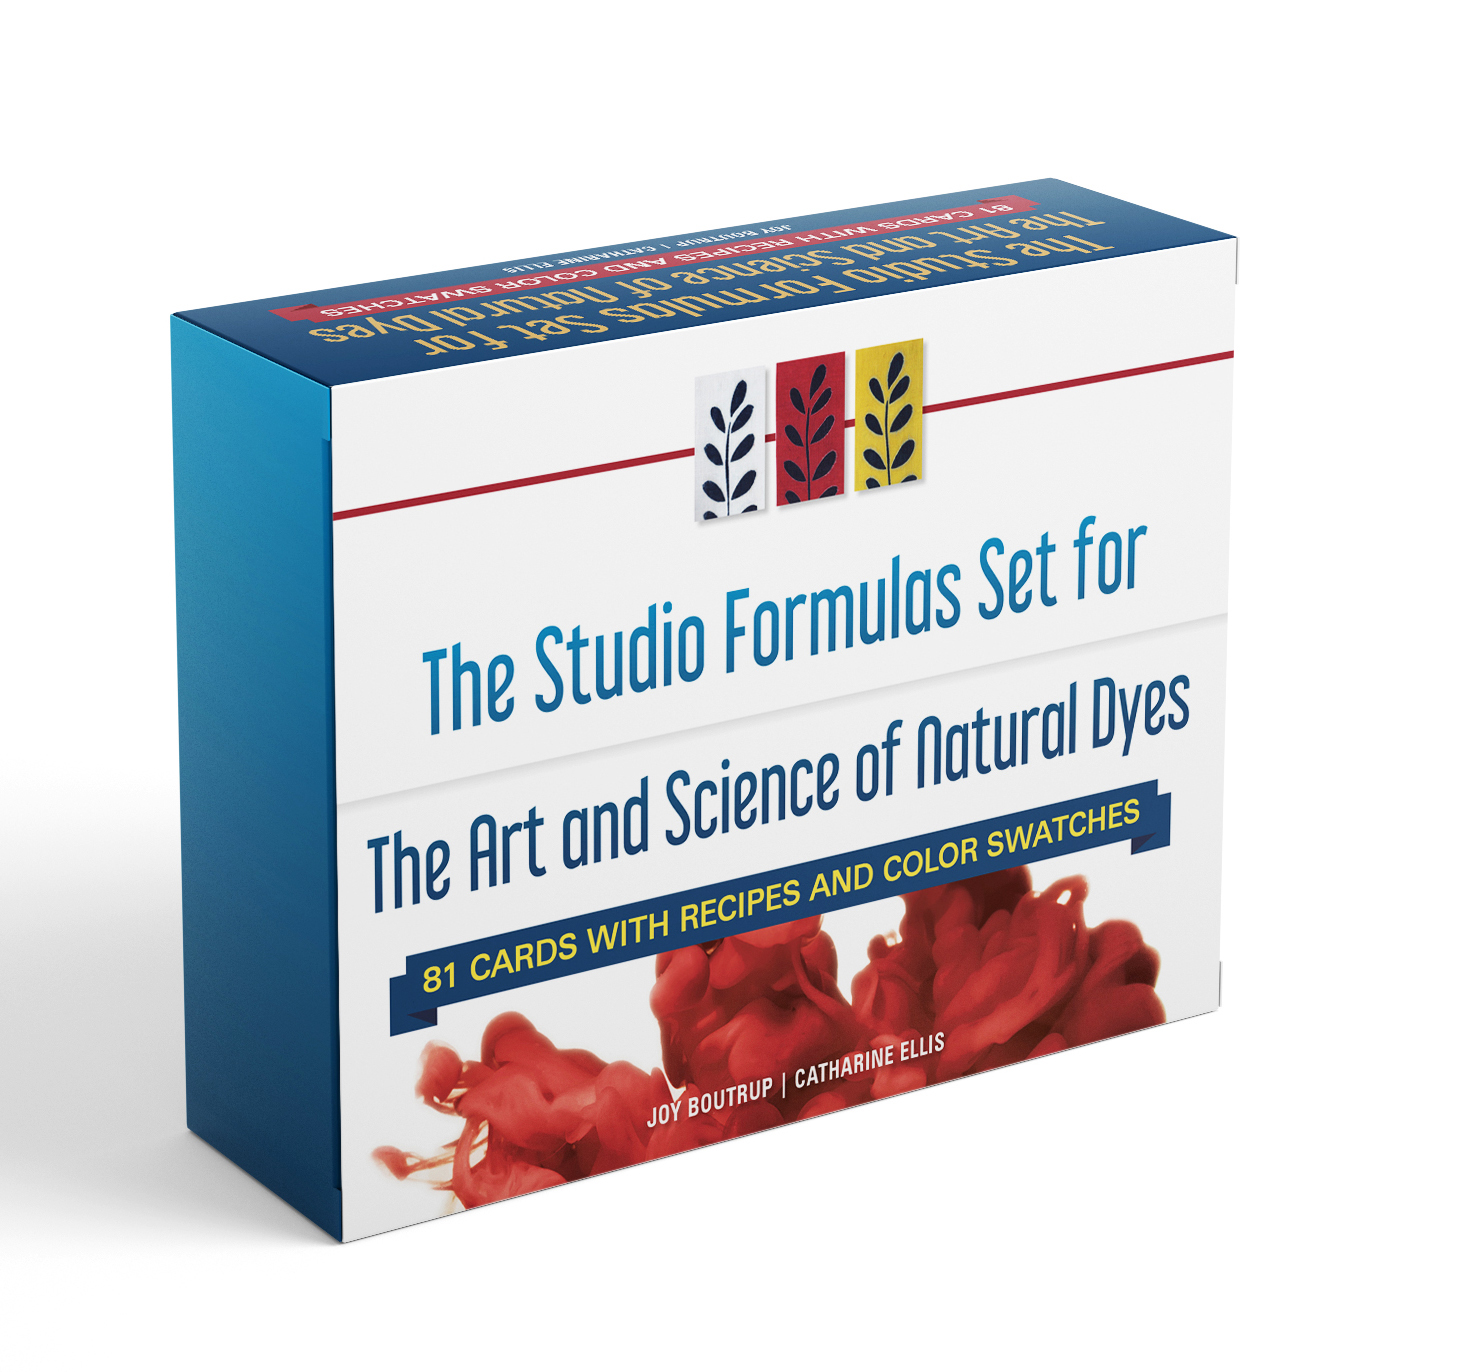
It’s been a busy summer, but it’s time to follow up on my earlier post about the recently released Studio Formulas Set dye recipe cards. I received my own set of dye and recipe cards from Schiffer just before Joy Boutrup arrived from Denmark for a class we taught together at Penland School of Crafts in June. Teaching together was a great opportunity to receive some feedback about the set.
Every recipe from the book is represented by a single card. Additonal colored cards illustrate individual dyes and color mixing. We opted to use wool as “the fiber of choice” when creating the initial printed cards as it such a commonly used fiber. The dye cards in the collection document the most important dyes: indigo, madder, cochineal, and weld along with a couple other tannin based dyes.
The dye color cards are beautiful and just as I had imagined they would be. Schiffer did a superb job of reproducing my dyed wool samples in print. Color matching is perfect! I was told that it took several tries to get it just right. I can appreciate that kind of care and accuracy – the same care and precision that I put into my dyeing. Although the cards are durably coated, it is easy to write on them with a ball point pen or ‘Sharpie” and there is room for personalized notes on the back of each card.
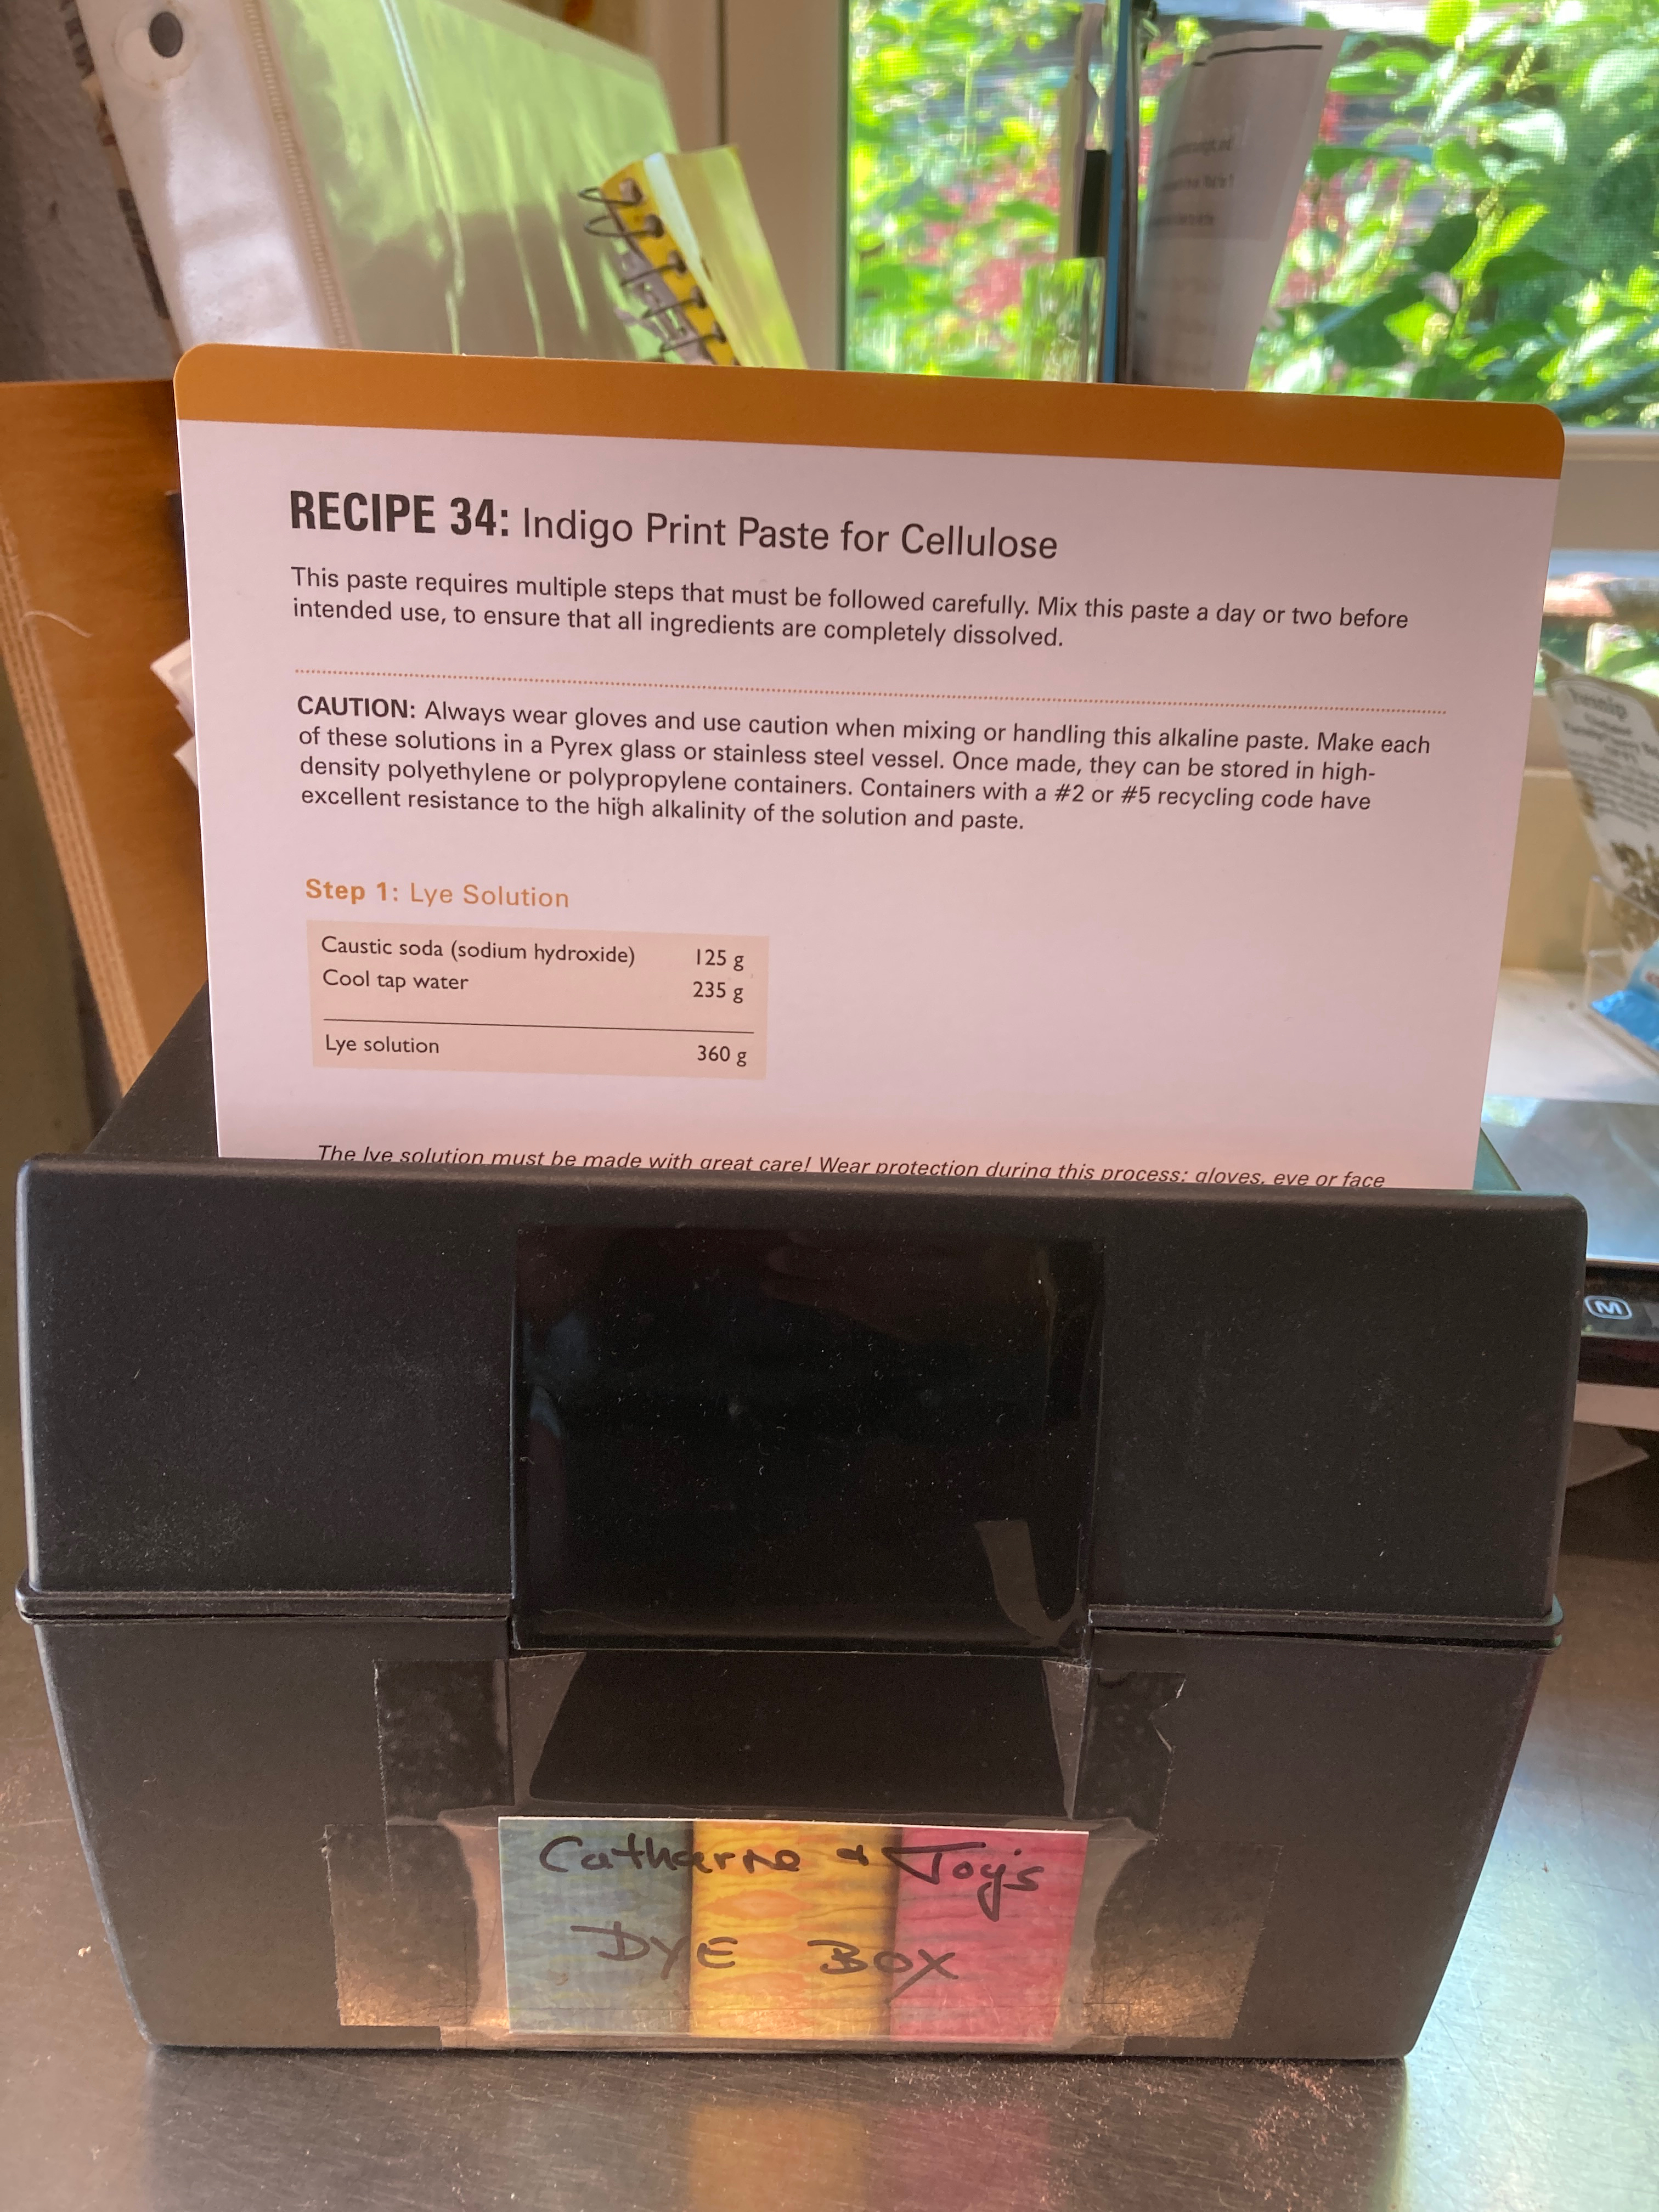
The cards come in a box that is custom made for the set. It even has a magnetic clasp to keep it closed. BUT for me to get the most use out of the cards, I removed the cards from the original box and placed them into a much larger file box. This allows plenty of room for flipping through the various recipe cards, adding tabs for easy reference, AND for adding my own customized cards to the collection. You might want to do the same.
Studio Formulas Set moved into a plastic file box, purchased for less than $10, with lots of room to expand.
Having individually printed recipe cards is proving to be very convenient in my own dye studio. Instead of dripping dye all over my book, I now can pull out the required card and work from that. And, YES, I do use the recipes from the book and I don’t have every one of them memorized!
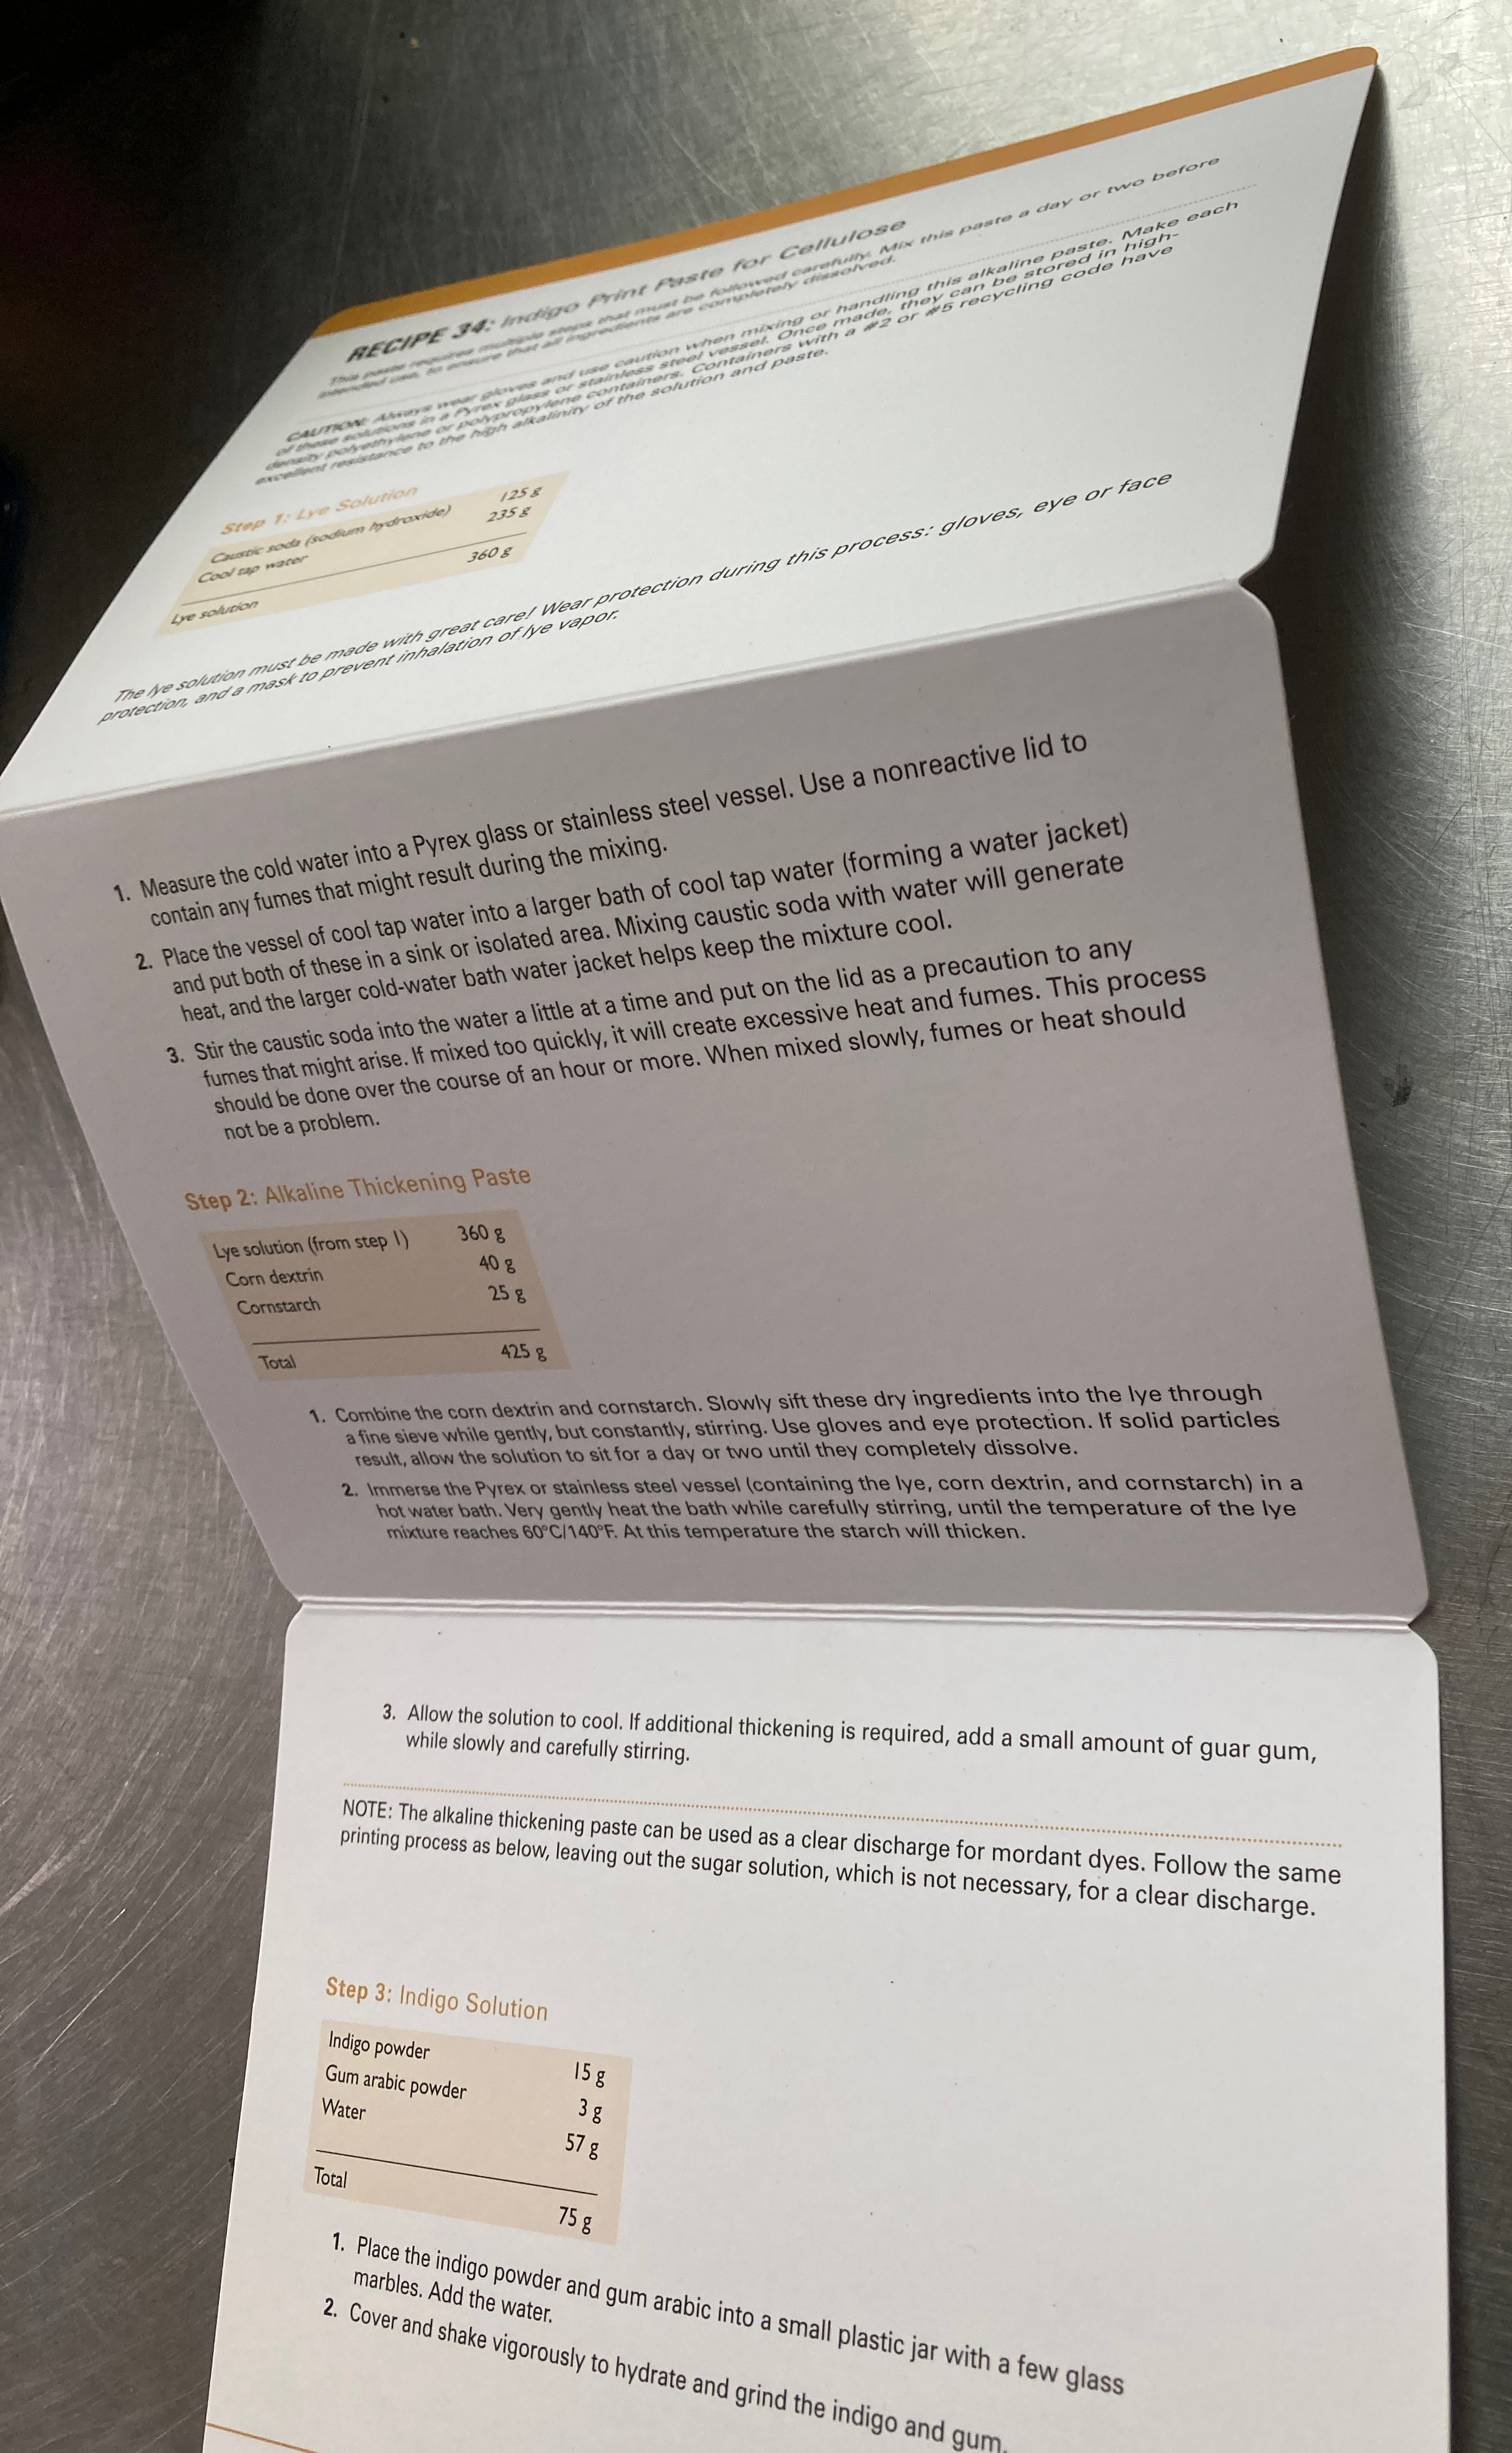
Studio Formulas Set moved into a plastic file box, purchased for less than $10, with lots of room to expand. Multiple folds of Recipe #34: Indigo Print Paste
The use of cards containing easily referenced materials and samples has changed the way I work over the last several years. As you know, I am seemingly always testing dyes and process. Once I complete an initial set of tests (recorded in detail with samples in my lab notebook), I then mount the final samples on a card, filed for easy access and reference.
Here is a great example of how useful this process can be:
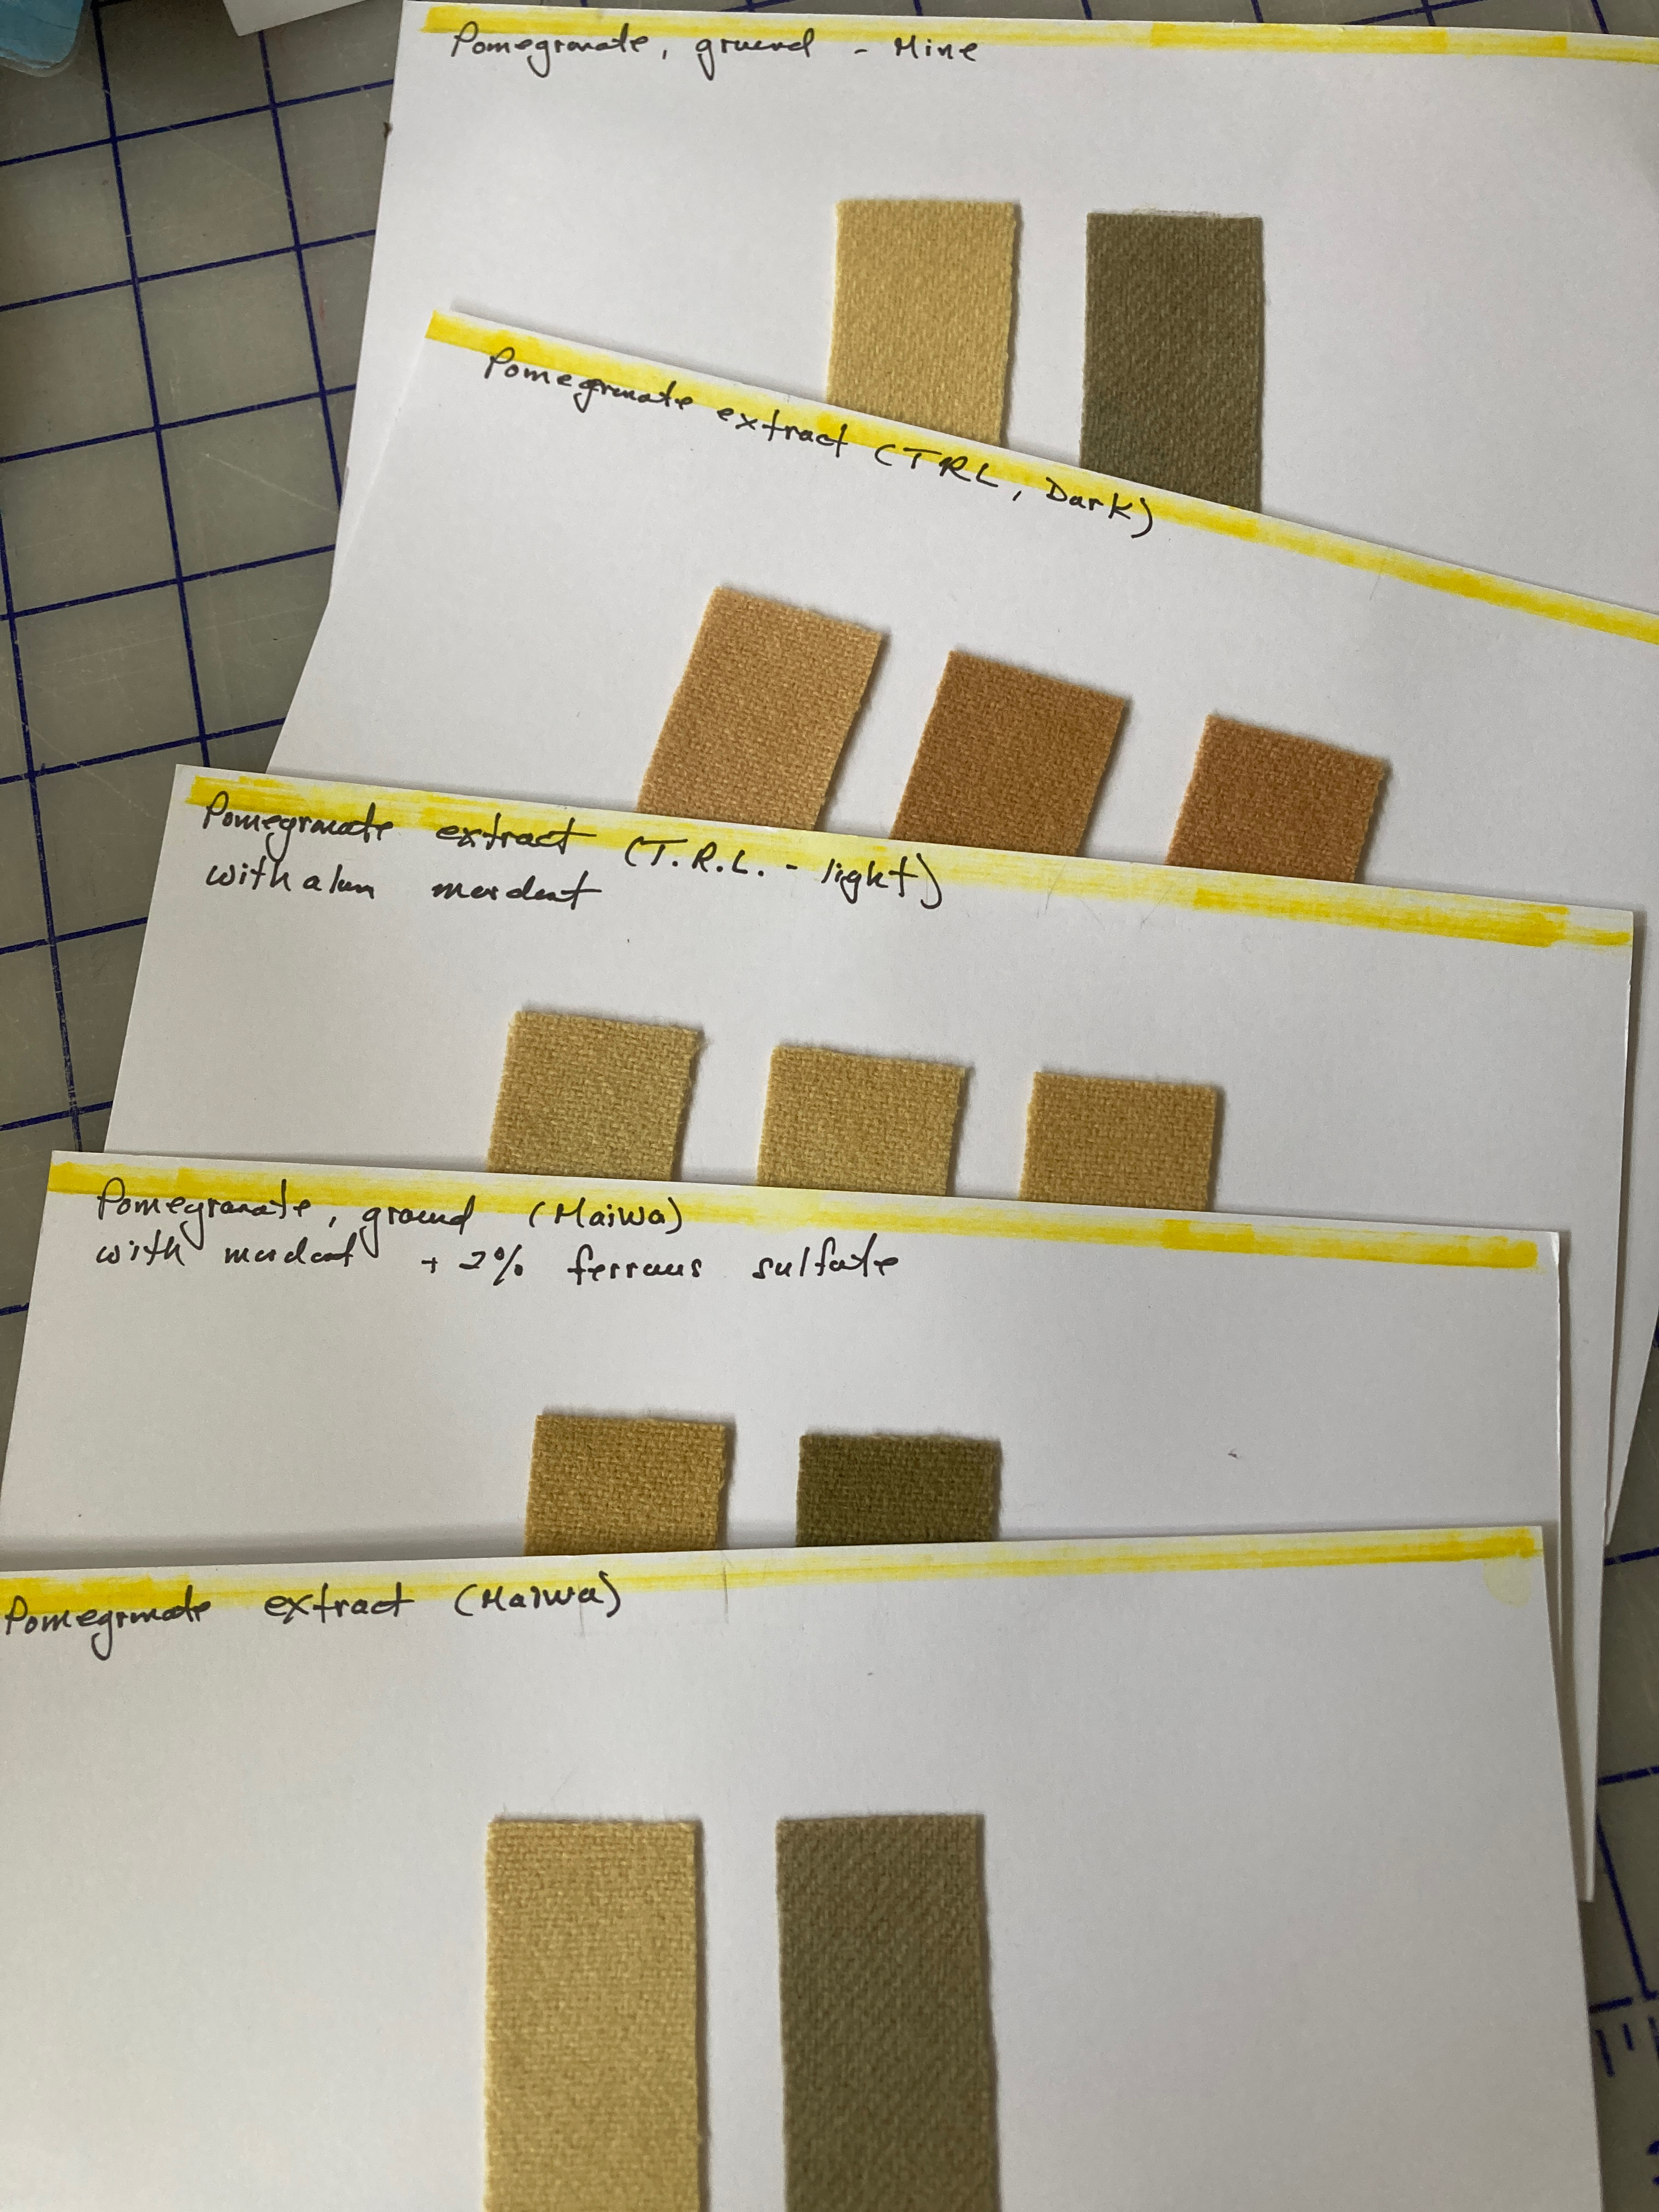
I recently I went to my dye shelf to look for pomegranate rind for a specific dye project. I found that I had 3 different extracts and two jars of ground pomegranate rind (including one that I had ground myself). Were they different? the same? After making samples of all the various pomegranate dyes (on both cellulose and wool) I can now objectively see the subtle differences between each of these dye sources and make a better informed decision.
Having of a record on hand of the dyes in the studio is an essential discipline that takes the guess work out of the dyeing process. Whenever I obtain a new dyestuff (purchased or grown myself) my goal is to complete a test dye on the appropriate textile material. Sometimes that means dyeing several samples as I explore various depths of shade on different fibers.
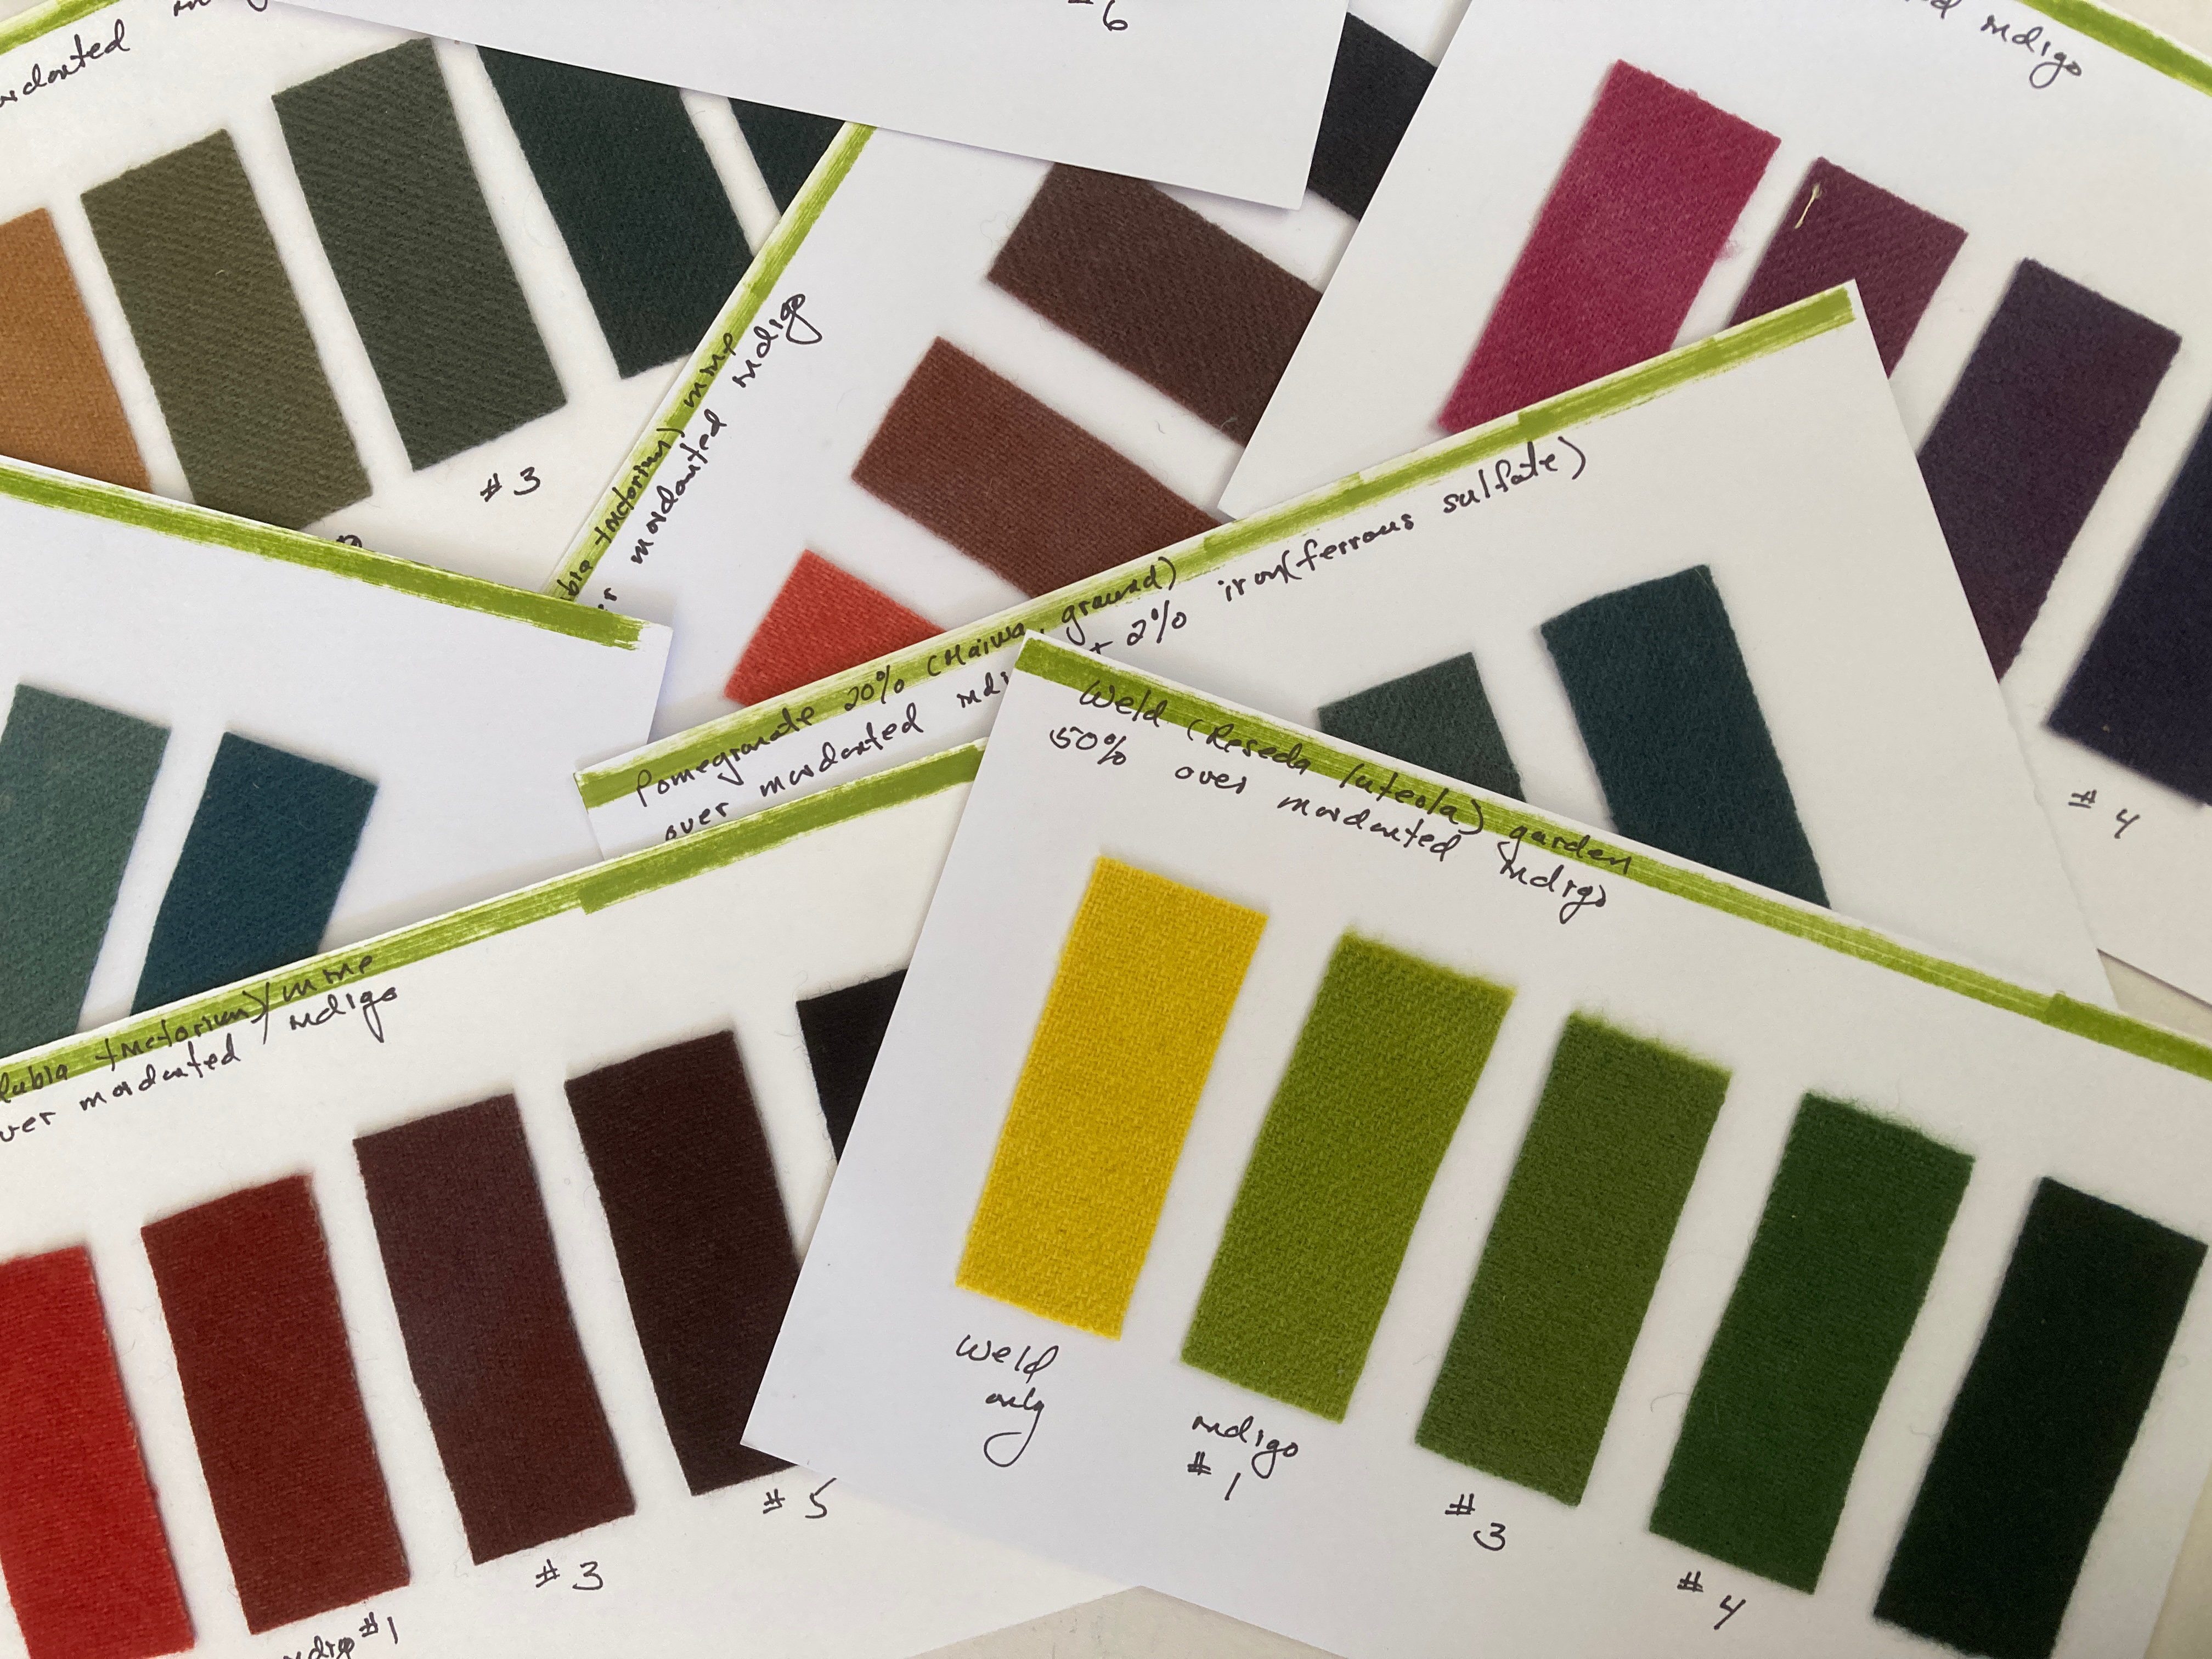
Documentation of the various pomegranate dyes on wool.
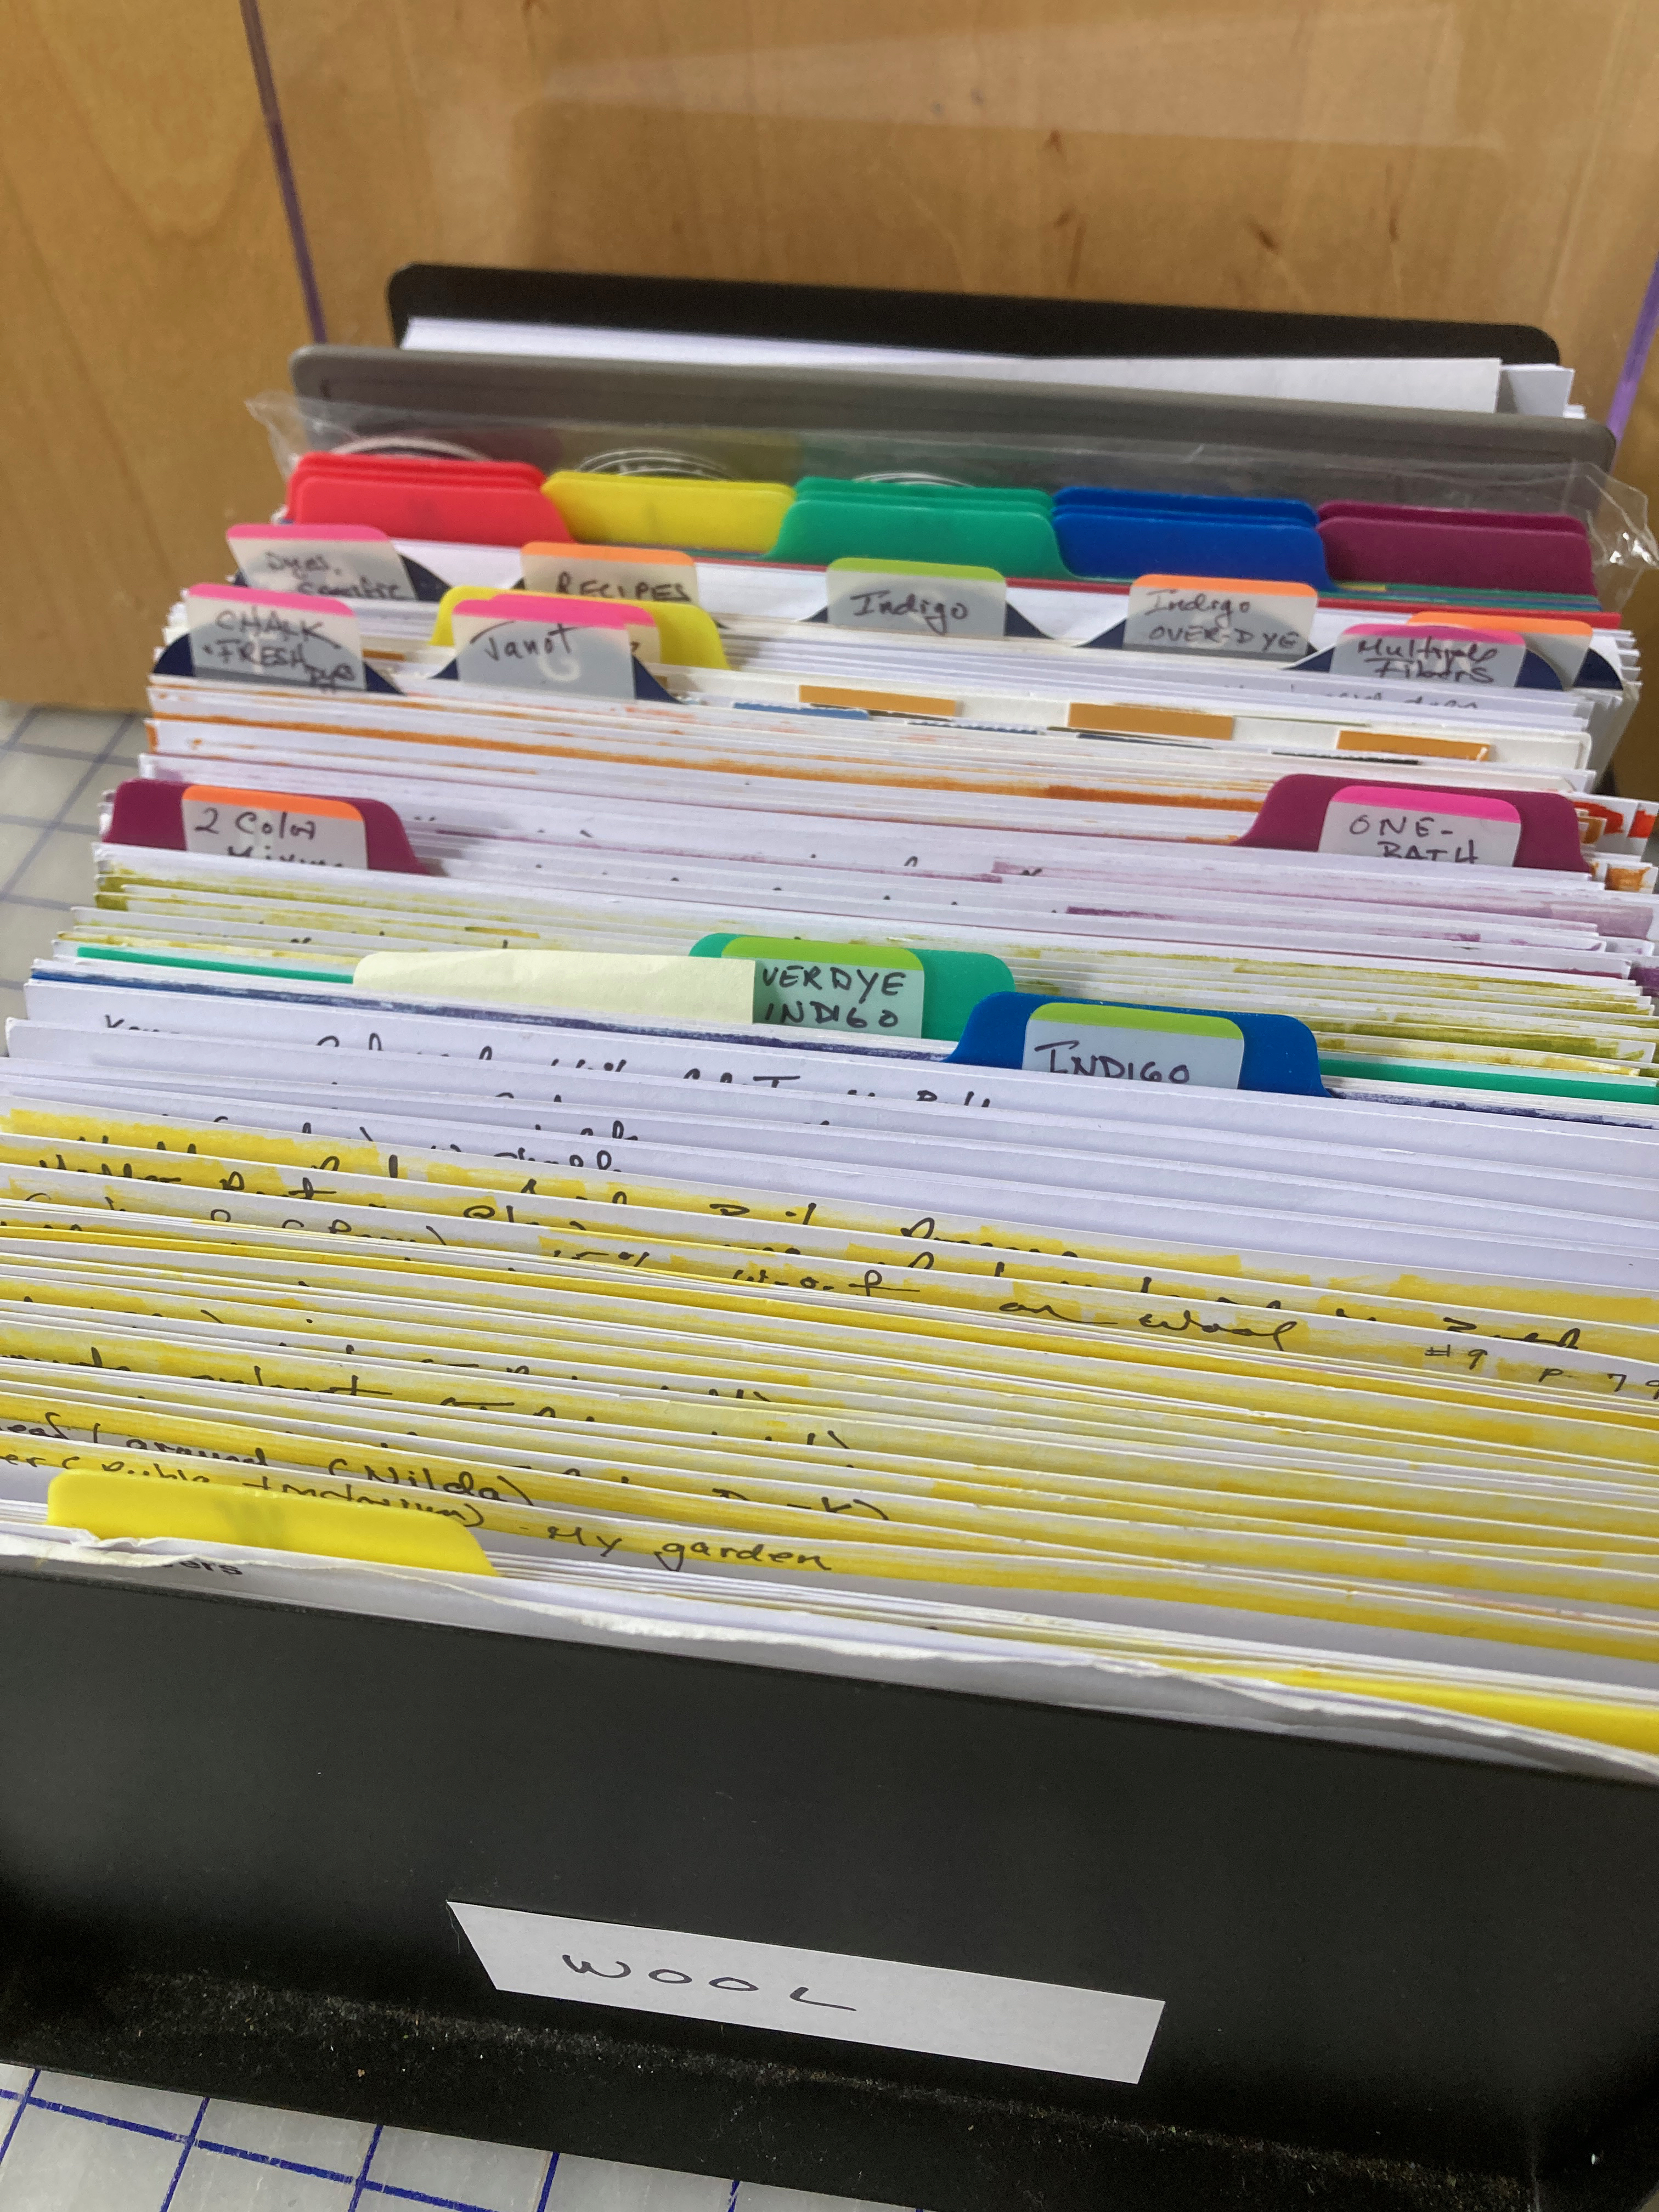
If one chooses to add actual cloth/fiber samples to the box, available space fills quickly. Thus, a larger, file box quickly becomes a necessity. Currently I have one box earmarked for documenting protein fibers and am building another that is dedicated to cellulose.
My personal (and expanding) box of dye samples on wool
Careful measurement of the dye used per weight of textile can result in greater control over the palette of color and discourages wasting of dye. It has the potential of bringing natural dye to a level beyond experiment and discovery: controlled color.
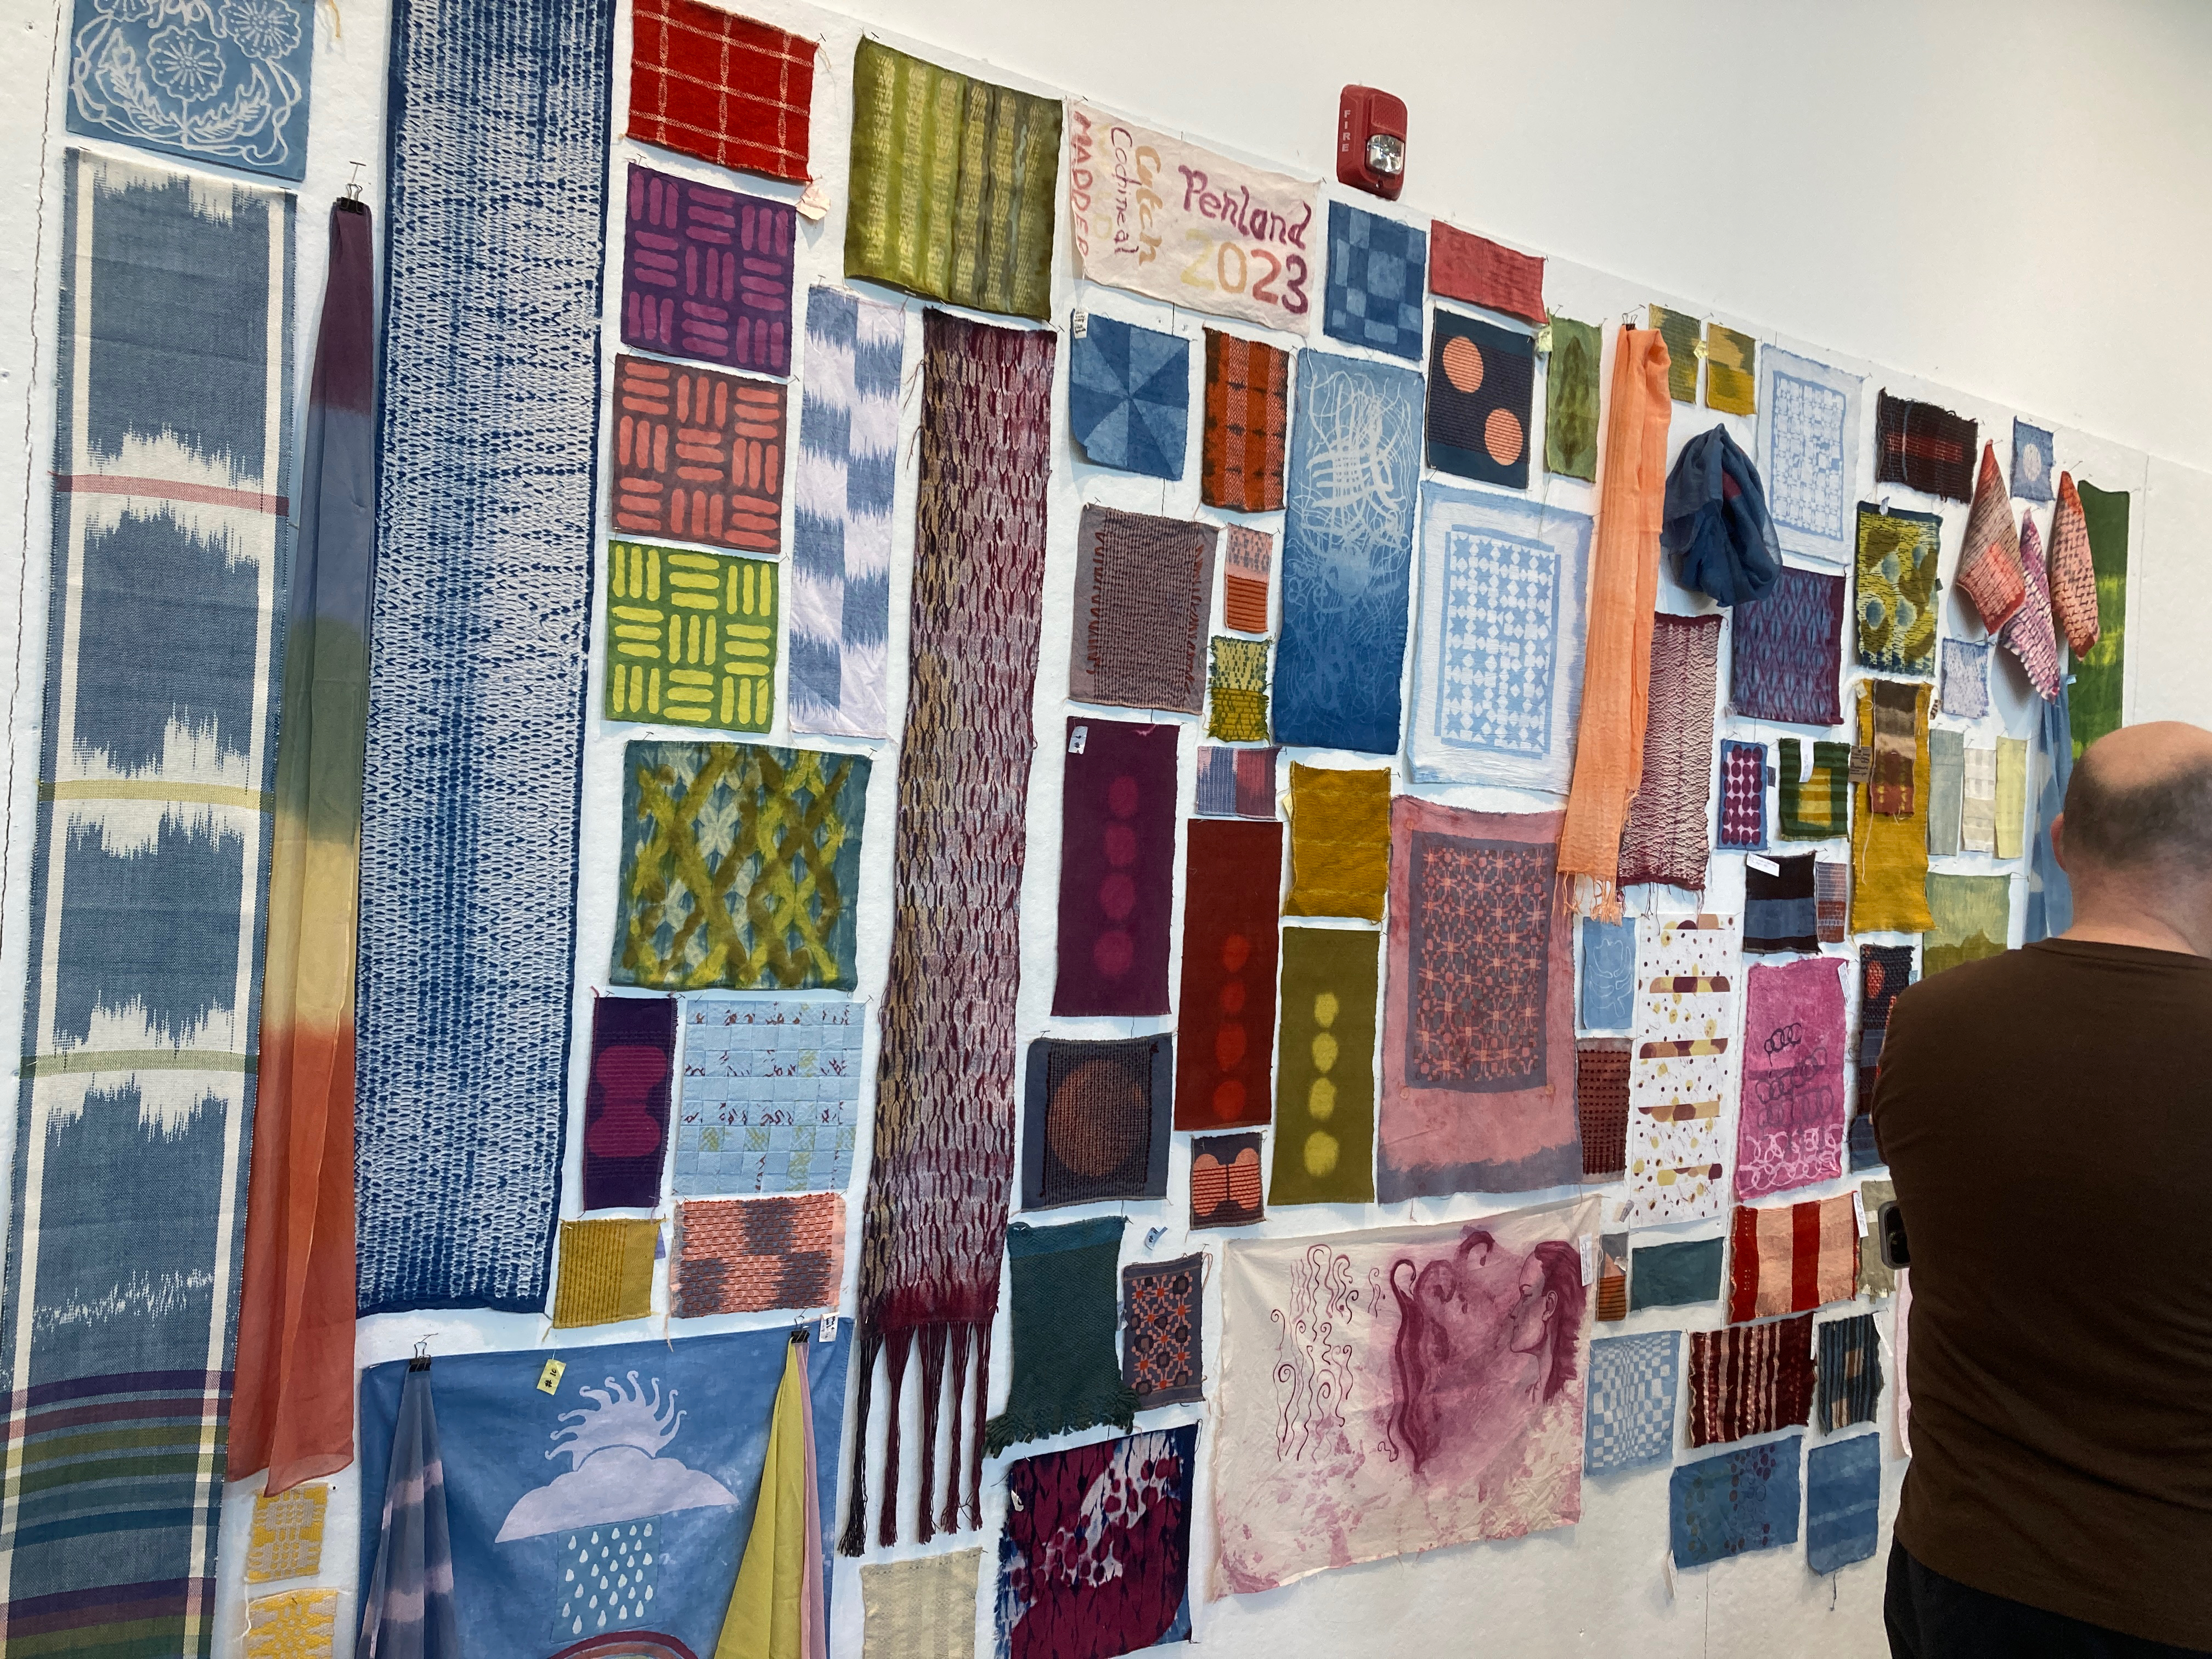
When Joy and I taught together at Penland in June, we used the cards throughout the session as a quick reference for dyeing in the class. By seeing (and understanding) the function of color mixing with natural dyes, students were better able to predict the colors that they would ultimately achieve. I am sure that you will also find them a useful tool in your personal studio practice.
Student experiments in weaving and dyeing at “Show and Tell” on the last day of our class at Penland.
It has been a while since I have posted here, but I assure you that I am staying busy, still learning, and have been developing some new projects and ways of working.
Last year, Schiffer Publishing Co. approached Joy and me about making the the recipes that are included in The Art and Science of Natural Dyes more accessible to the user. A we thought about how to accomplish this, I was reminded that in my household kitchen, I use the same recipes over and over again and used a recipe box and cards regularly. Maybe this would be a good idea for the dye kitchen as well.
In 2020 I posted about Dominique Cardon’s newly published Workbook, Antoine Janot’s Colours. This little book has been a great inspiration to me. It was surprising and enlightening to find that Janot’s full palette of 55 colors was made with only 4 dyes: indigo, madder, cochineal, and weld. That bit of information has mostly changed the way I am now thinking about dyeing and color.
When I first began using natural dyes I thought it was important to have/use/stock every dyestuff and dye extract that I could get my hands on; I didn’t want to miss any opportunity! The large number of dyes on the shelf always led to confusion when I got ready to dye. At some point, I finally did lightfast tests on all the dyes on my shelf , making fastness to light a criteria for selection. Ultimately, I ended up with a much smaller number of dyes I was willing to use. Those are the dyes that we include in The Art and Science of Natural Dyes.
The documentation in Janot’s workbook helped me to take color and color mixing to the next step, which was truly learning to master my dye colors.
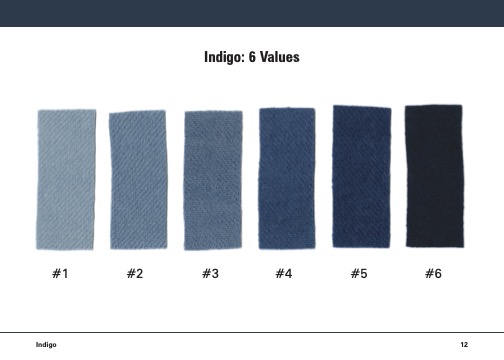
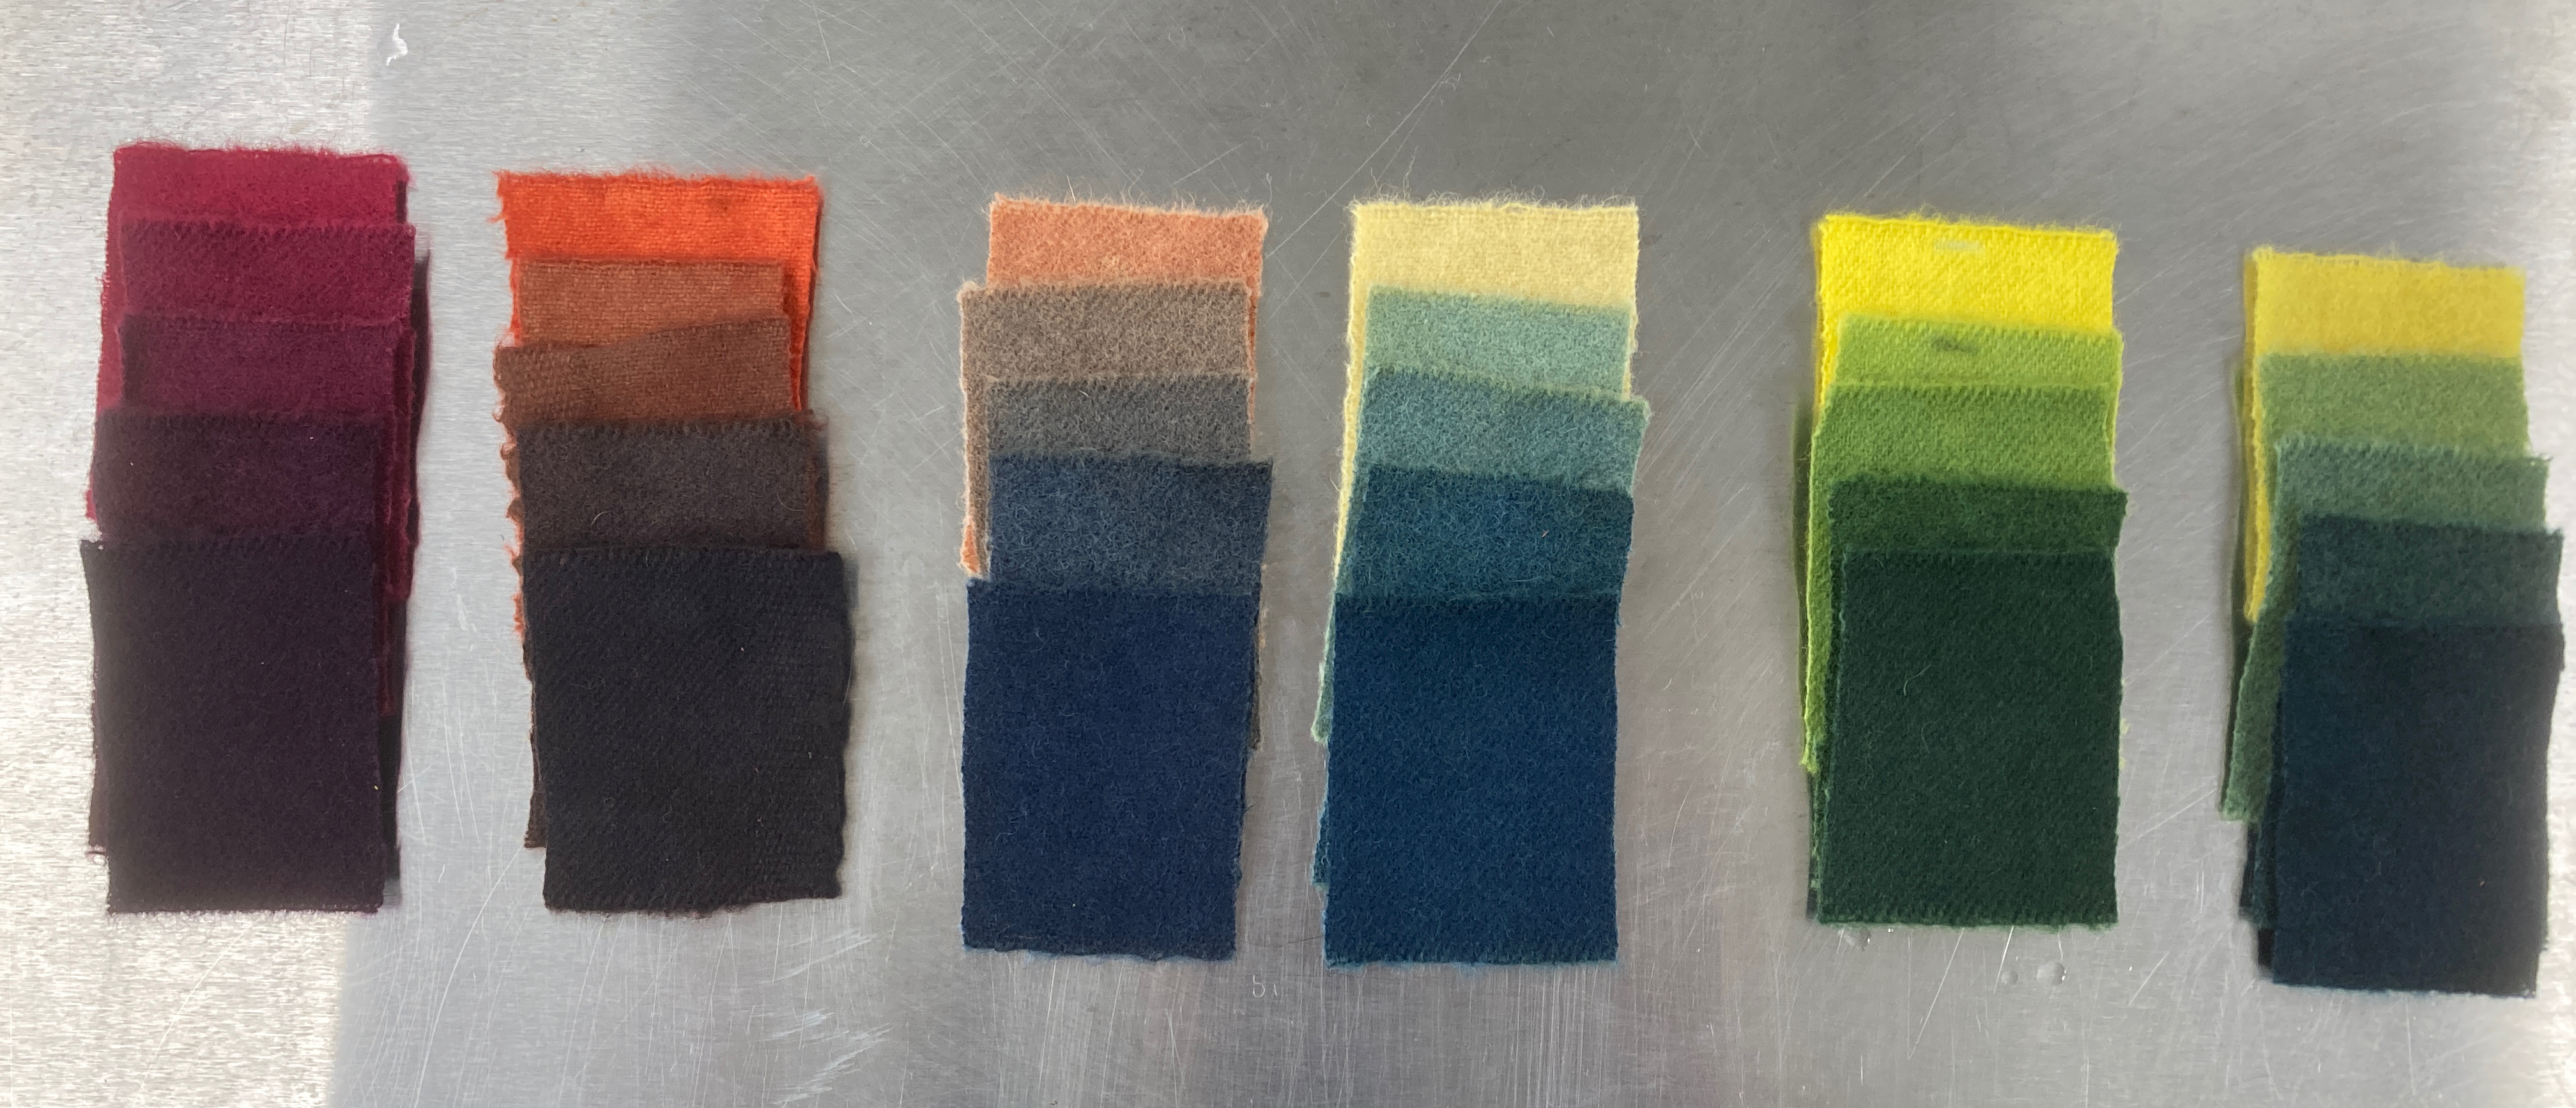
The first thing that I felt I needed to do was learn to control the various shades of indigo. Janot used 8 different shades of blue, each with its own name. I had to learn how to consistently achieve different shades with my fermentation indigo vats. My goal was 6 different values. Dyeing consistent blues is like capturing a moment in time, as the vats change over their life span. My first fermentation vat was over 2 years old before it finally gave me the pale blue that I needed for some of the color mixes.
The 8 shades of indigo blue used by Janot
The 6 values of indigo blue chosen for use on the cards and subsequent color mixing
So, I began dyeing a series of predictable, repeatable color using indigo and a handful of other dyes using various depths of shade.
Various shades of yellow from weld
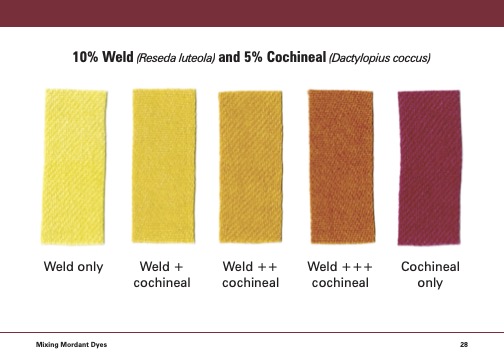
Various shades of indigo + a strong weld result in one set of green colors
The same shades of indigo with a weak yellow results in a different set of greens.
My lab notebooks are fabulous repositories of all of my testing (I am now on volume #10) but they are not always the most convenient place to go for a quick color reference. So, I began putting my color mixes and repeatable dye colors on cards – the kind that you can file in a box for easy reference. And then I began USING that reference. It was at my fingertips and ready to look at whenever needed
My own first set of studio dye cards
I realized that this was also a perfect opportunity to combine the recipes from The Art and Science of Natural Dyes with a set of color mix cards, that will give the dyer some basic color mixing information.
The dyes included in the color mix box are: indigo, cochineal madder, weld (and a little bit of the tannin dyes: pomegranate rind and cutch )
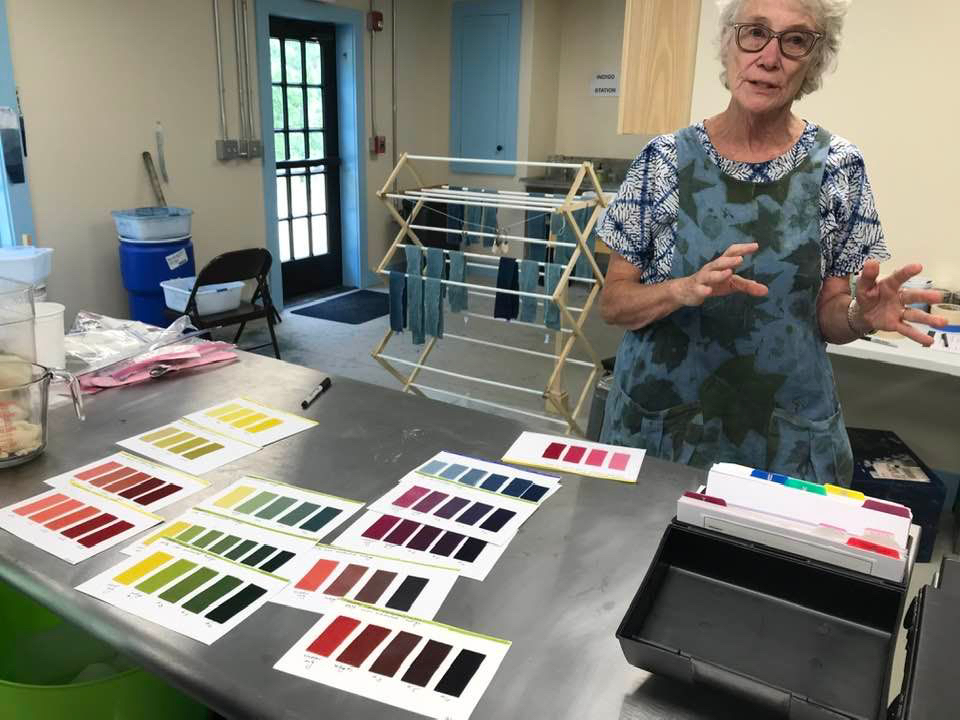
I have used my “box of colors” in teaching over the last months. It is rewarding to see students refer to the cards, make their own color choices, and their ability to achieve very similar results.
Teaching at Sanborn Mills Farm using my own set of color cards. Sara Goodman, at Sanborn Mills Farms, referring to my own box of samples.Sara’s dyeing, based on cards references that utilize indigo, over-dyed with mordant dyes.
To follow soon: ideas of how to best use your own set of “Box of Cards” in your own studio dye practice.
It is my belief that learning about natural dye takes a whole community of people who are willing to experiment, observe, and share. The sharing has been the most rewarding part of my own journey in natural dyeing. I have met many dyers, both in person and virtually, who are willing to be part of that communal knowledge base.
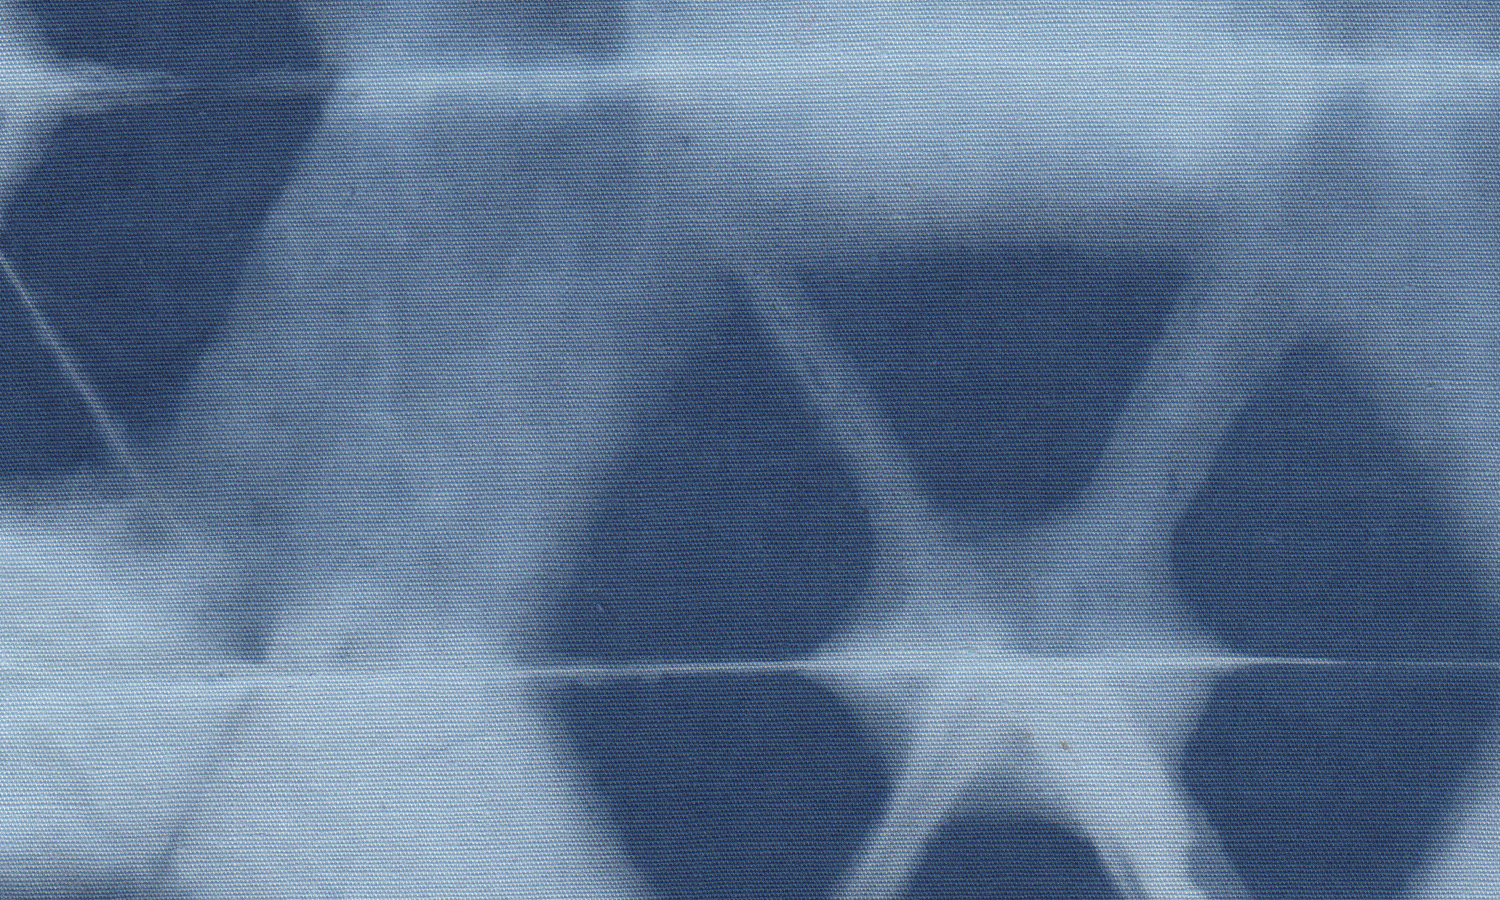
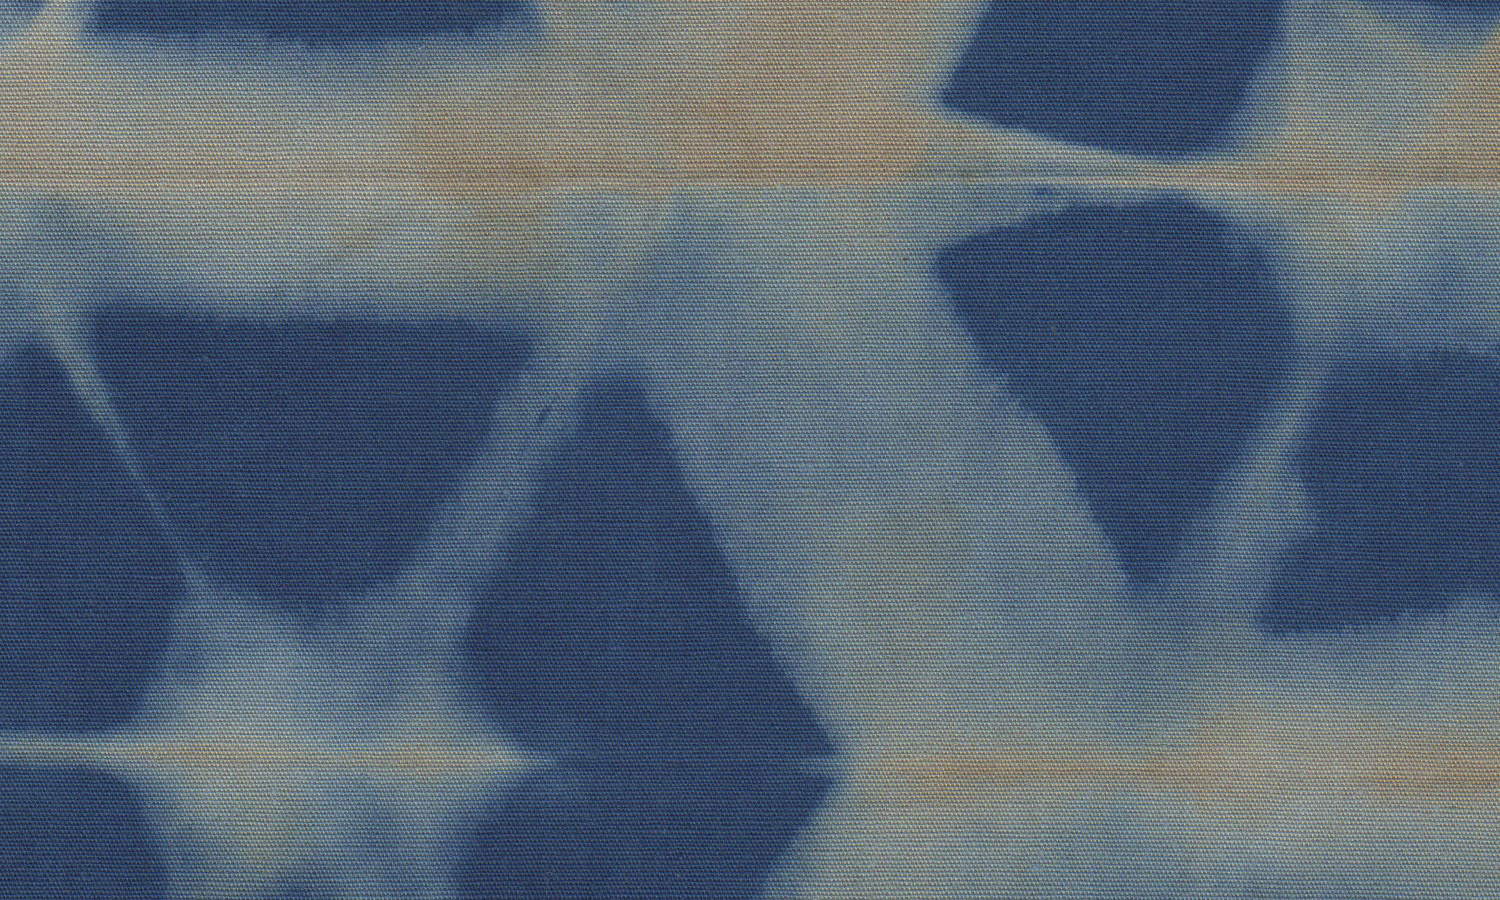
While my co-author, Joy Boutrup, and I were preparing and writing The Art and Science of Natural Dyes, we experimented with potassium permanganate, a strong oxidizing agent that can be used to discharge indigo. It provides a unique approach to removing indigo dye. When combined with resist, such as “itajimi” clamps, wonderful resist patterning will result. Changing the chemical treatment will result in a “permanganate brown” color. When the textile is pre-treated with a tannin, it is possible to achieve even darker brown colors juxtaposed with the indigo. All of these recipes/processes are included in the book.
“Itajimi” resist and indigo discharge
“Itajimi” resist with “permanganate brown”“Permanganate brown”, pretreated with tannin
But direct application or printing with the potassium permanganate proved problematic. Any gum used to thicken the mixture rendered it chemically useless for discharge. In the book, we included a resist paste made with soy flour and lime (calcium hydroxide) in order to achieve some controlled resist printing effects. I had learned to make this paste while in China and found that the paste could be used as a resist for the potassium permanganate solution. Unfortunately, the soy/lime paste, although effective, is harsh and very difficult to remove from the textile.
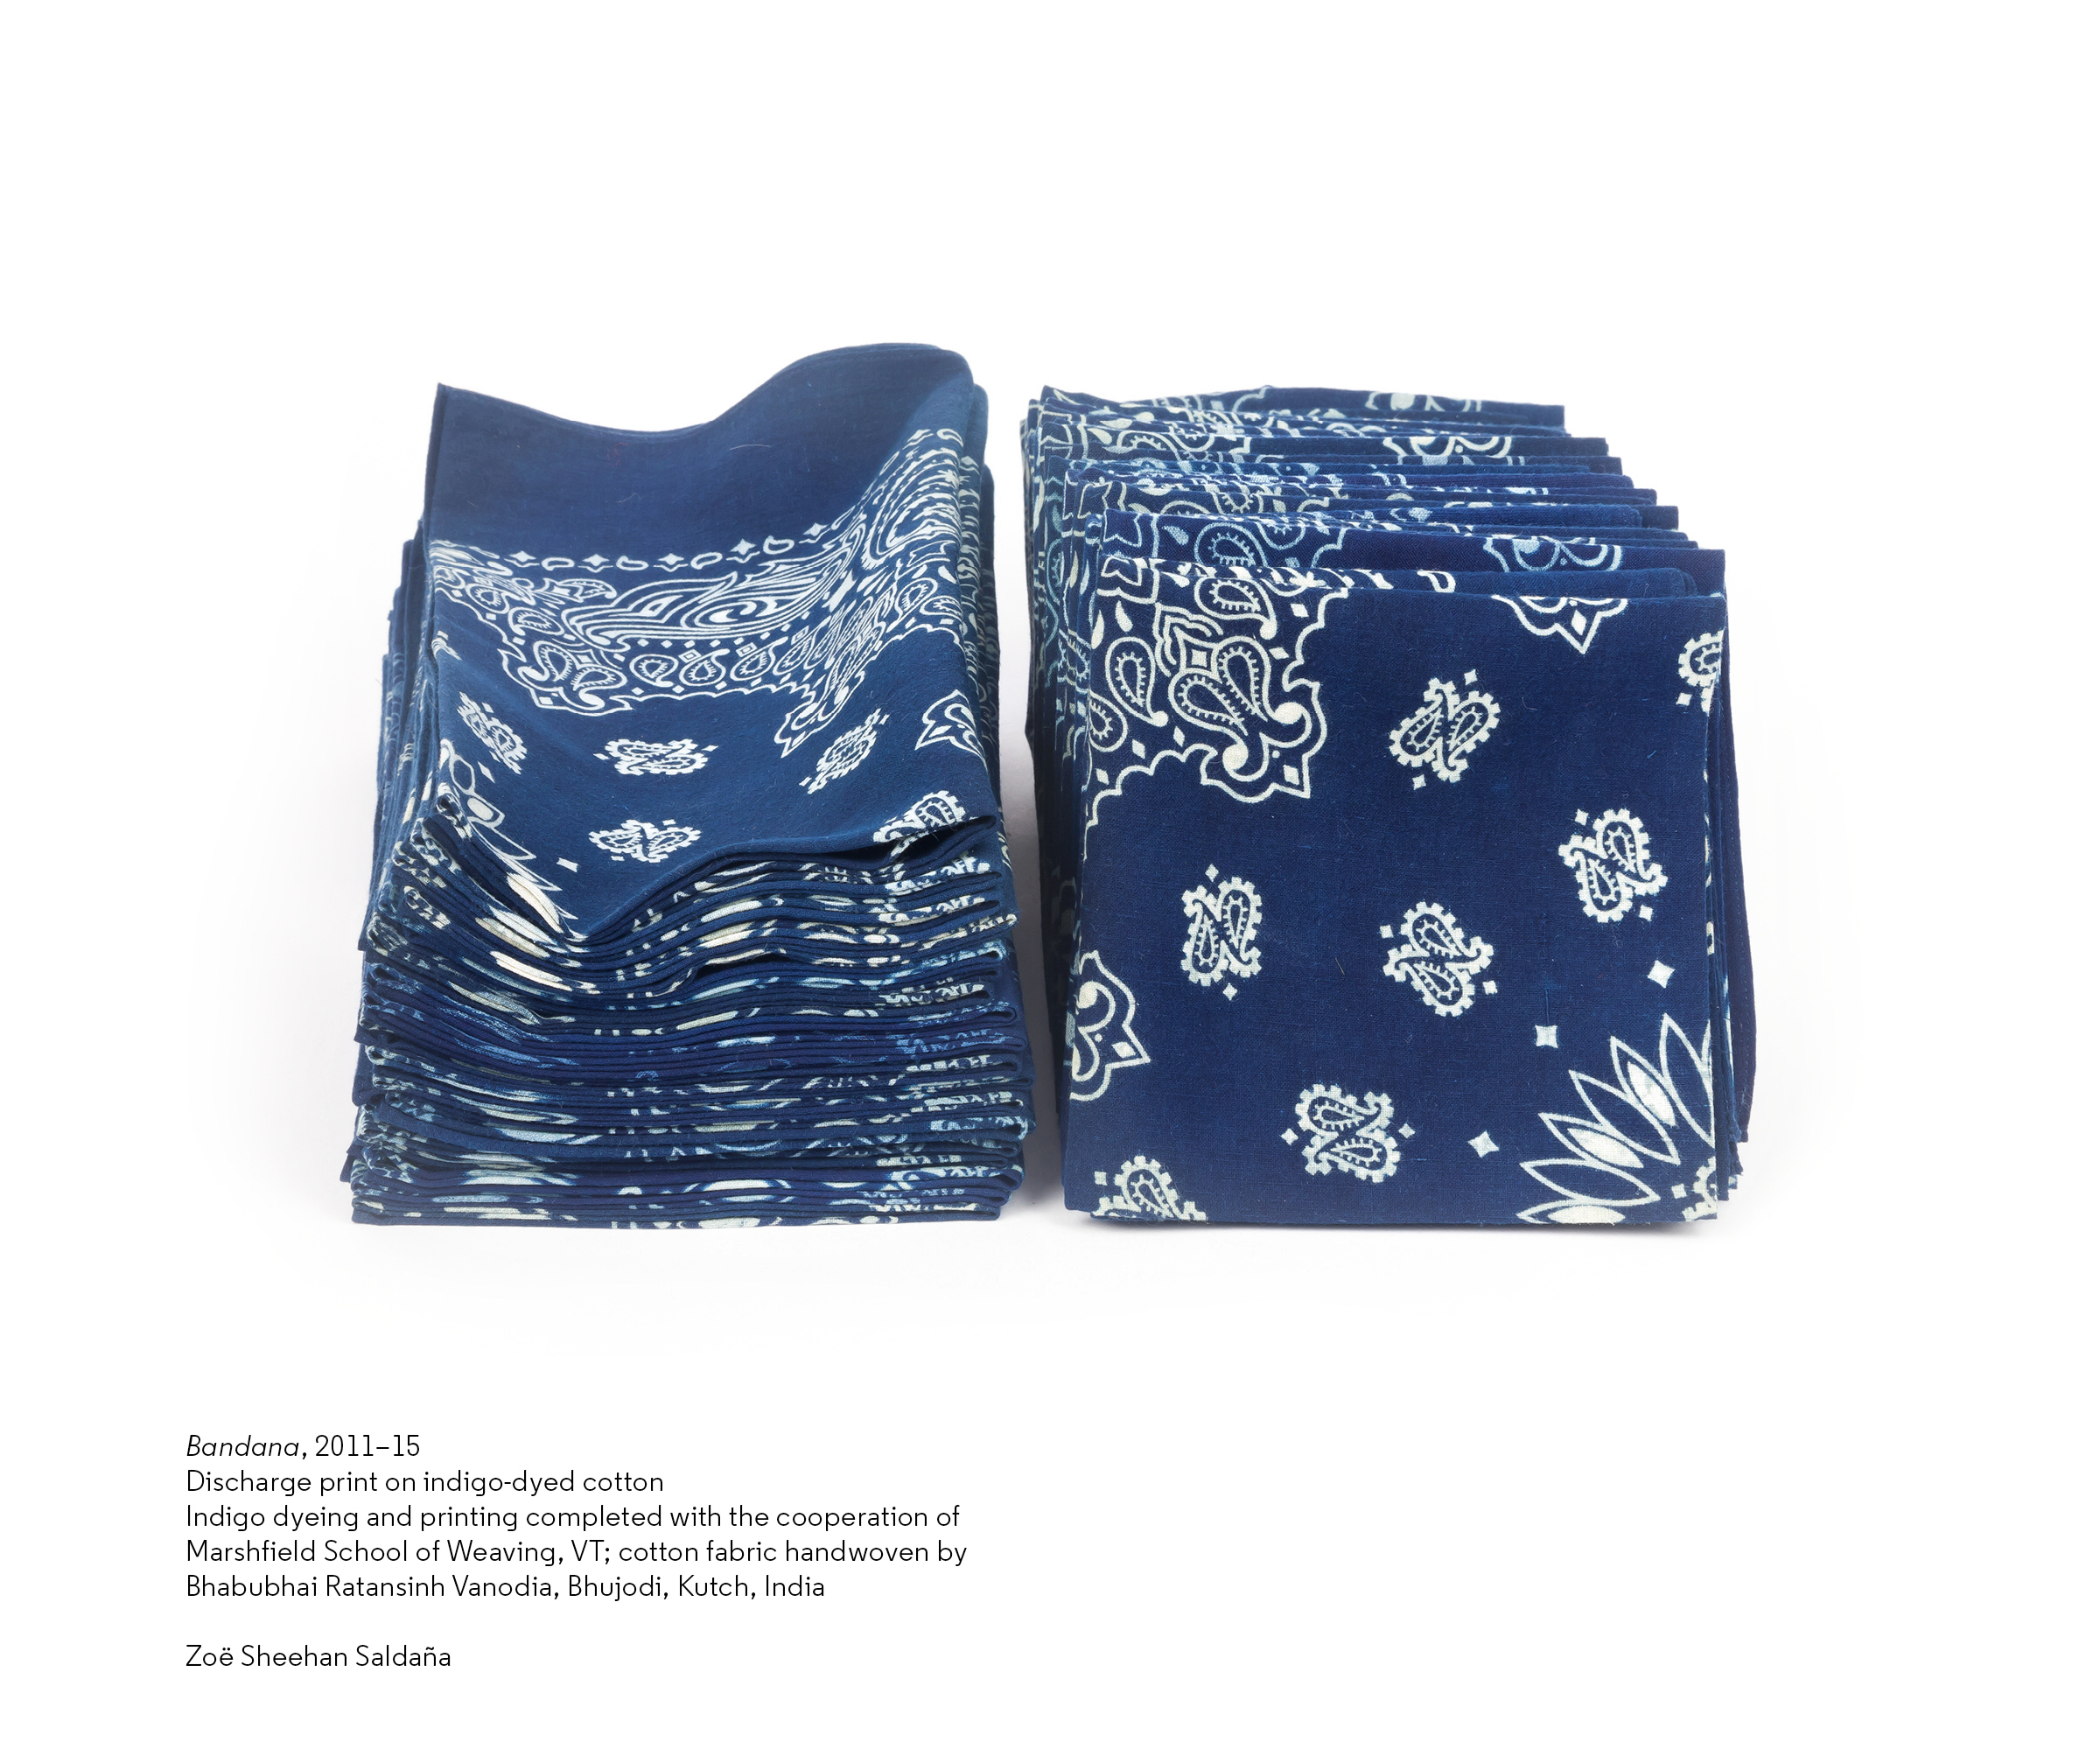
After The Art and Science of Natural Dye was published, we received an email from Zoë Sheehan Saldana, an artist who has been using potassium permanganate. She experienced the same challenges when printing – but she solved the problem by thickening the potassium permanganate with a fine clay. The clay is inert and does not interfere with the chemical oxidation of the indigo. Either bentonite or kaolin are suitable clays. These are the same types of fine clay that are used with the indigo resist paste. The printed application of the paste in her bandanas results in an even discharge and the printed patterns become pure white.
Use enough clay to achieve a suitable thickness for painting or printing with a screen. Varying the amount clay, as well as the application method, will result in hard lines or soft edges. When painted on, rather than printed, an uneven layer of the paste and the discharge can result.
Mix the paste in small batches, making only the amount that you think you will need. The paste is most effective when used fresh, but if kept tightly covered it can last for a couple days.
Painted discharge pastePainted discharge paste for”permanganate brown”“Permanganate brown” discharge on tannin treated clothIndigo discharge, using a painted application, by Amanda Thatch. taking advantage of the uneven thickness of paste that results from the brushed on application.
During this week of the United States holiday of Thanksgiving, I am grateful for the community of dyers and experimenters out there, who are willing to share and make our knowledge base stronger. Thank you. Happy Holidays!