Fermented Indigo Vat: Blog Post #2: Fermented Indigo Vats vs. Quick Reduction Vats vs. Chemical Vats 

© Catharine Ellis, as posted to the blog: Natural Dye: Experiments and Results

Fermentation vats are the oldest method of reducing indigo. These vats rely on the effect of bacteria present in an alkaline environment to cause the reduction that will allow the indigo molecule to become soluble. The bacteria existing in an oxygen-free environment is referred to as anaerobic. An indigo vat is reduced in anaerobic conditions. 

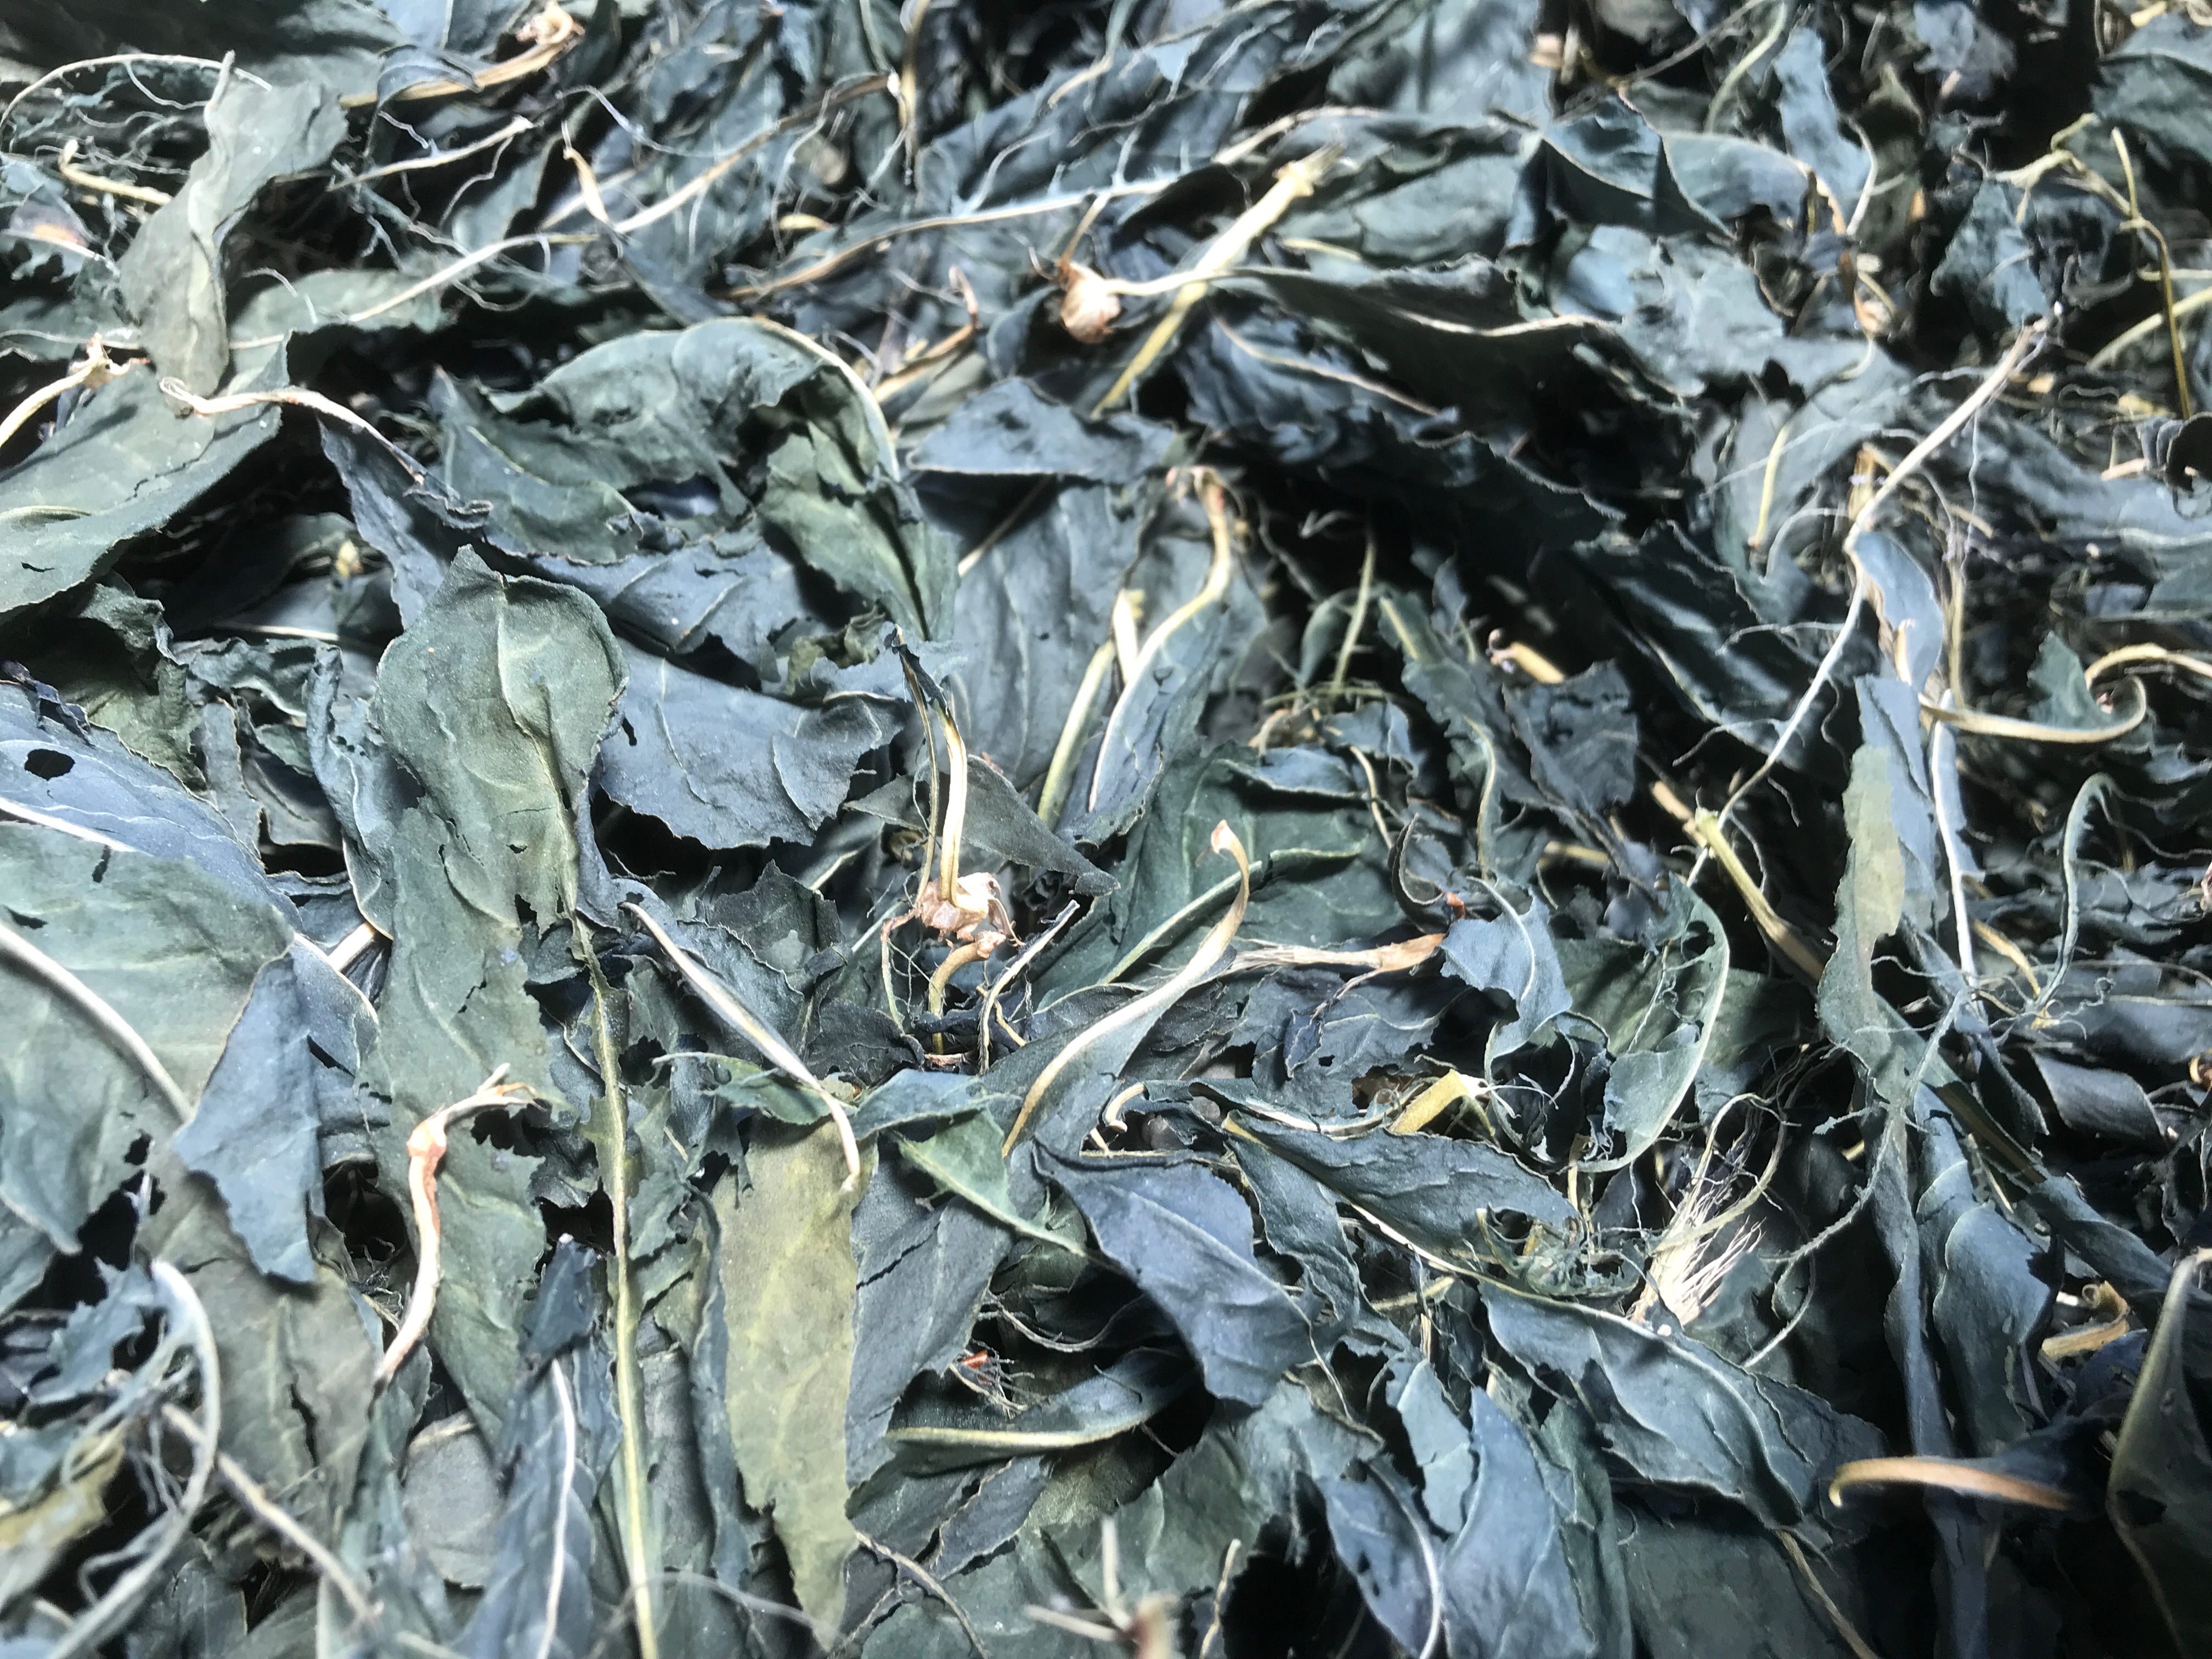
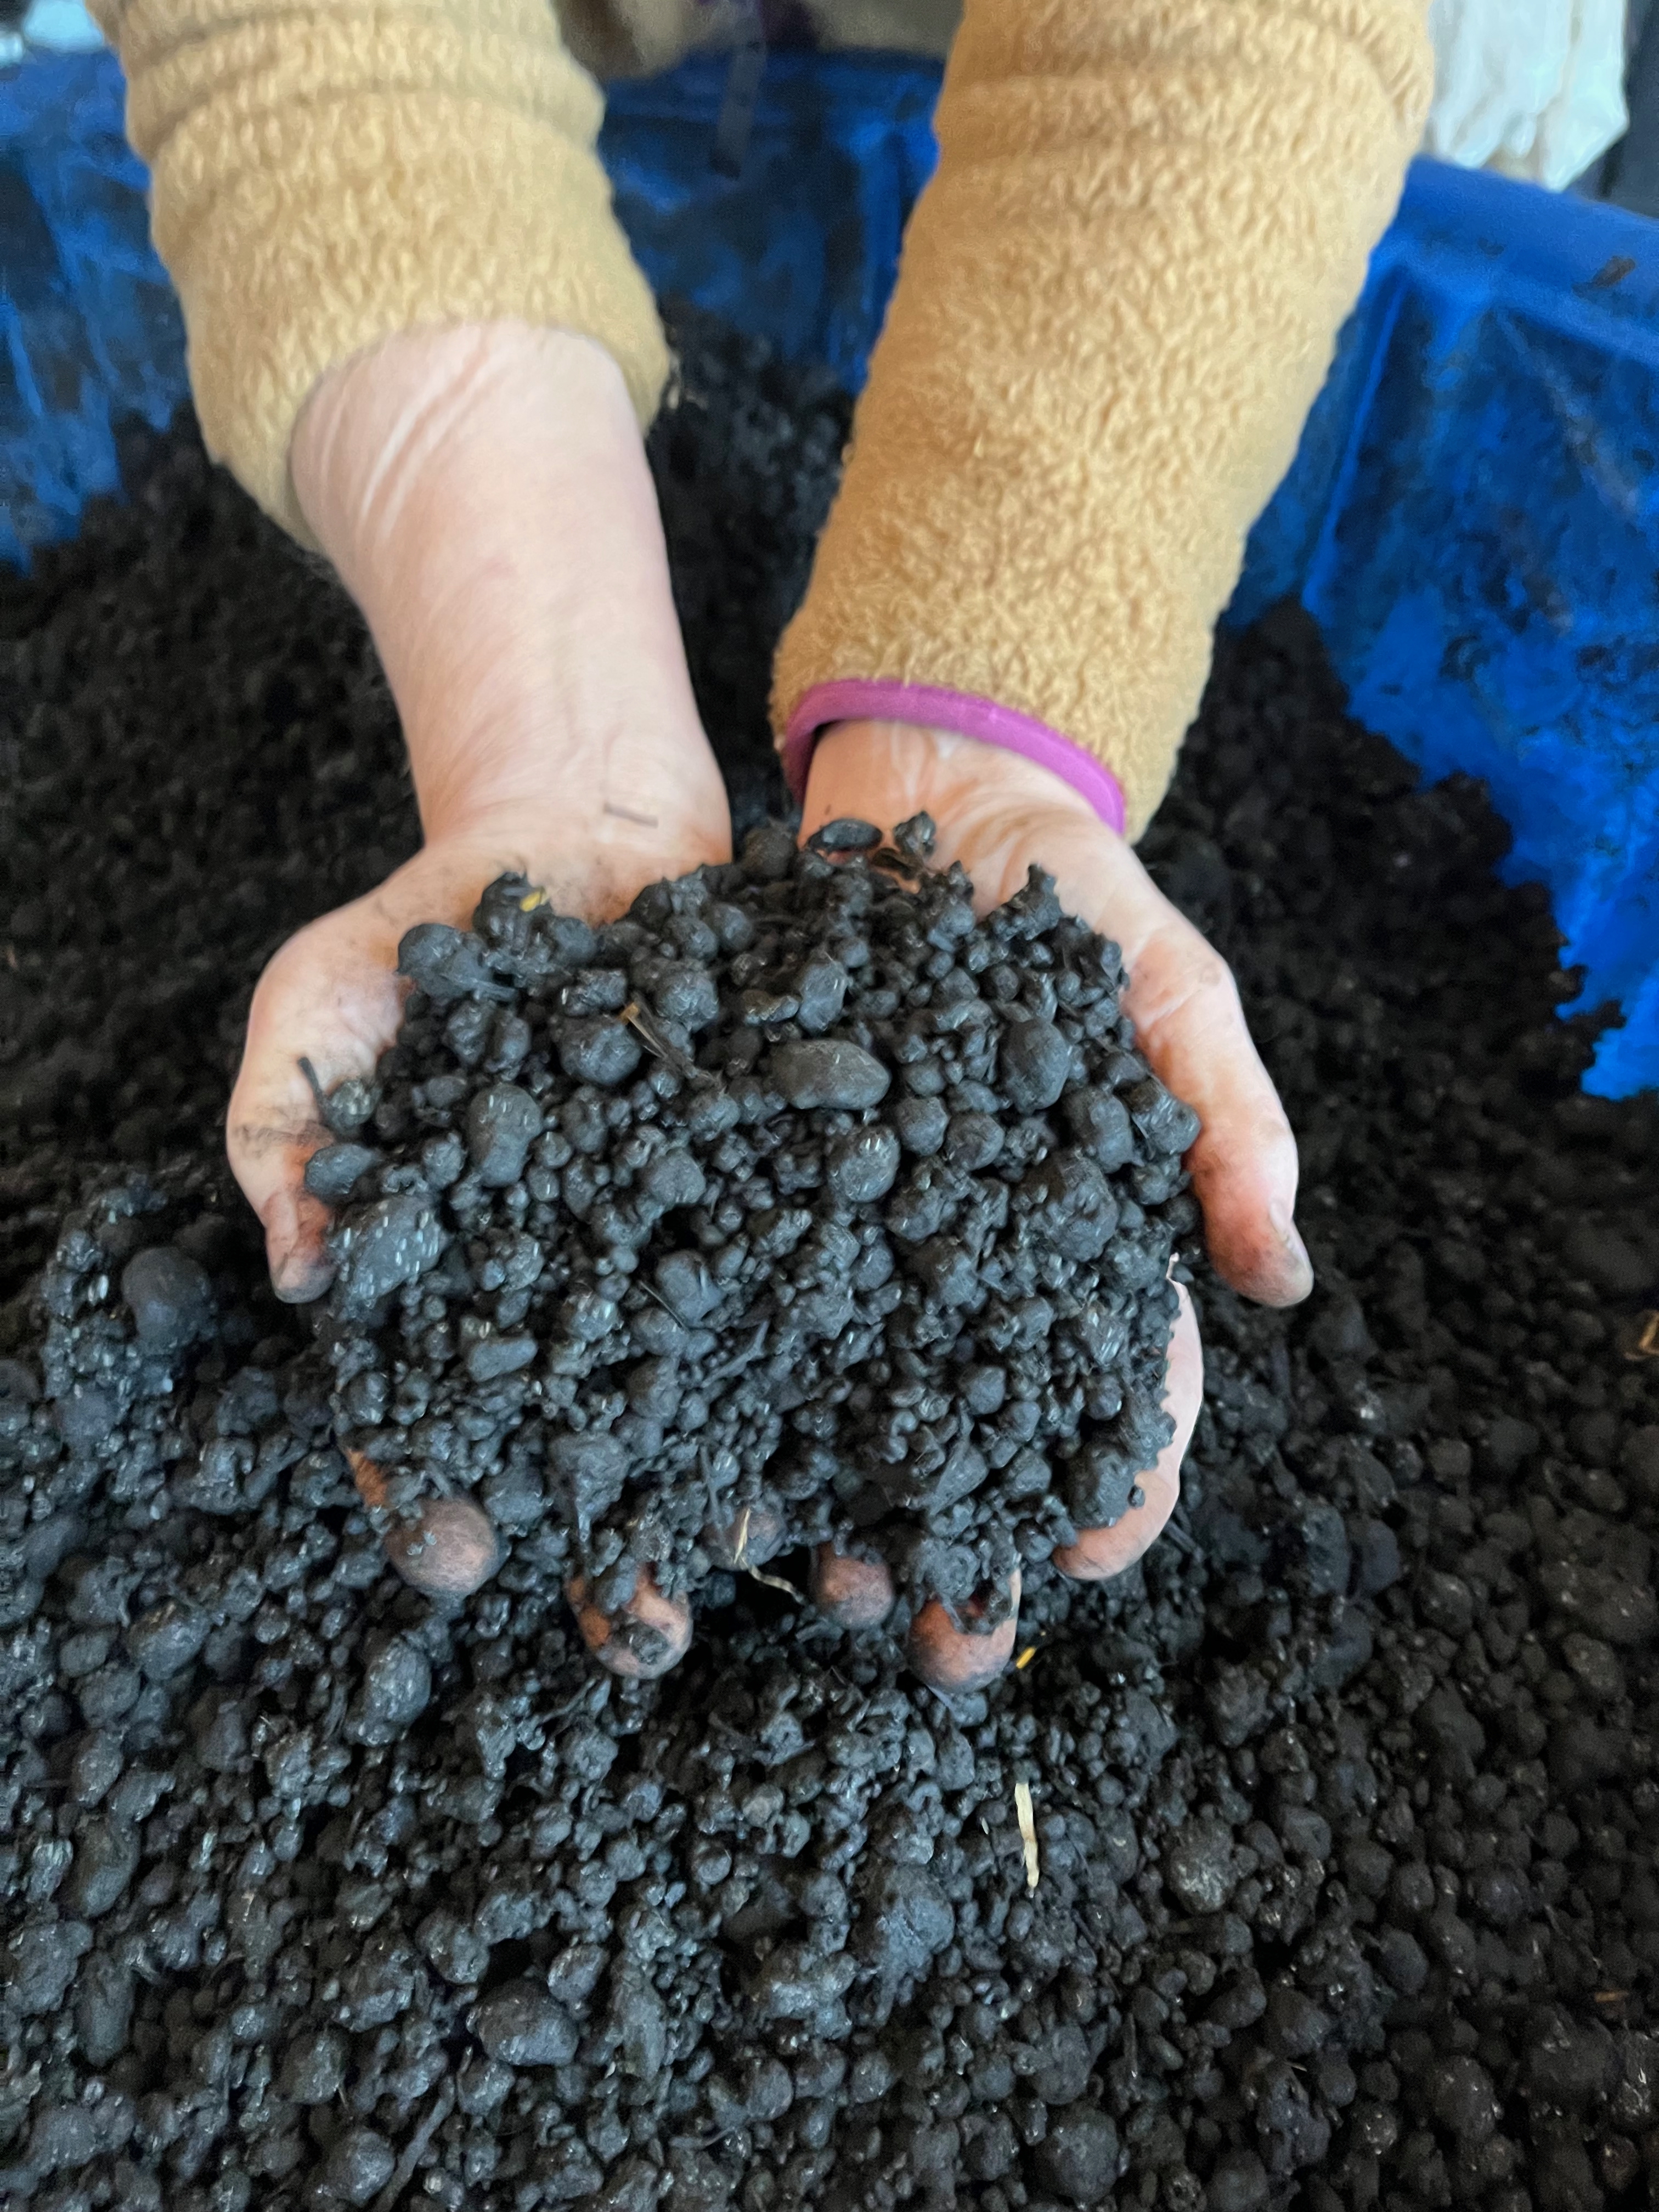
A “sukumo” vat, traditional in Japan, is a fermented vat that uses composted indigo leaves from the polygonum tinctorium plant as a source of the dye plus cellulose plant material that will help feed the vat. A sukumo vat contains no added indigo pigment. The preparation of sukumo is a lengthy process requiring the composting of indigo leaves after they have been harvested and carefully air dried.  

For those of us who do not have access to sukumo, it is important to know that a fermented vat can also be made using indigo pigment. This is the approach that was often used by 18th century commercial dye workshops in Europe.  Since the pigment is inert, suitable sources of bacteria and “food” for that bacteria must be added to the vat. 

•       Advantages of the fermented vat: A fermented vat uses a lower pH (9.5-11) versus the quick reduction vats, which makes it suitable for both protein and cellulose fibers. The correct pH of a fermentation vat can be obtained using wood ash lye, soda ash, or potash. Only small amounts of lime are used throughout the life of the vat to maintain a correct pH. These vats are suitable for long-term use, provided they are maintained correctly. That is something that will be covered.

•       Challenges of the fermented vat: Typically, the vat requires 7 -14 days to reach full reduction, but I have seen it take as long as 30 days. The vats must be carefully monitored and maintained by making regular additions of lime and organic material to maintain appropriate pH levels and insure a continuous source of bacteria.

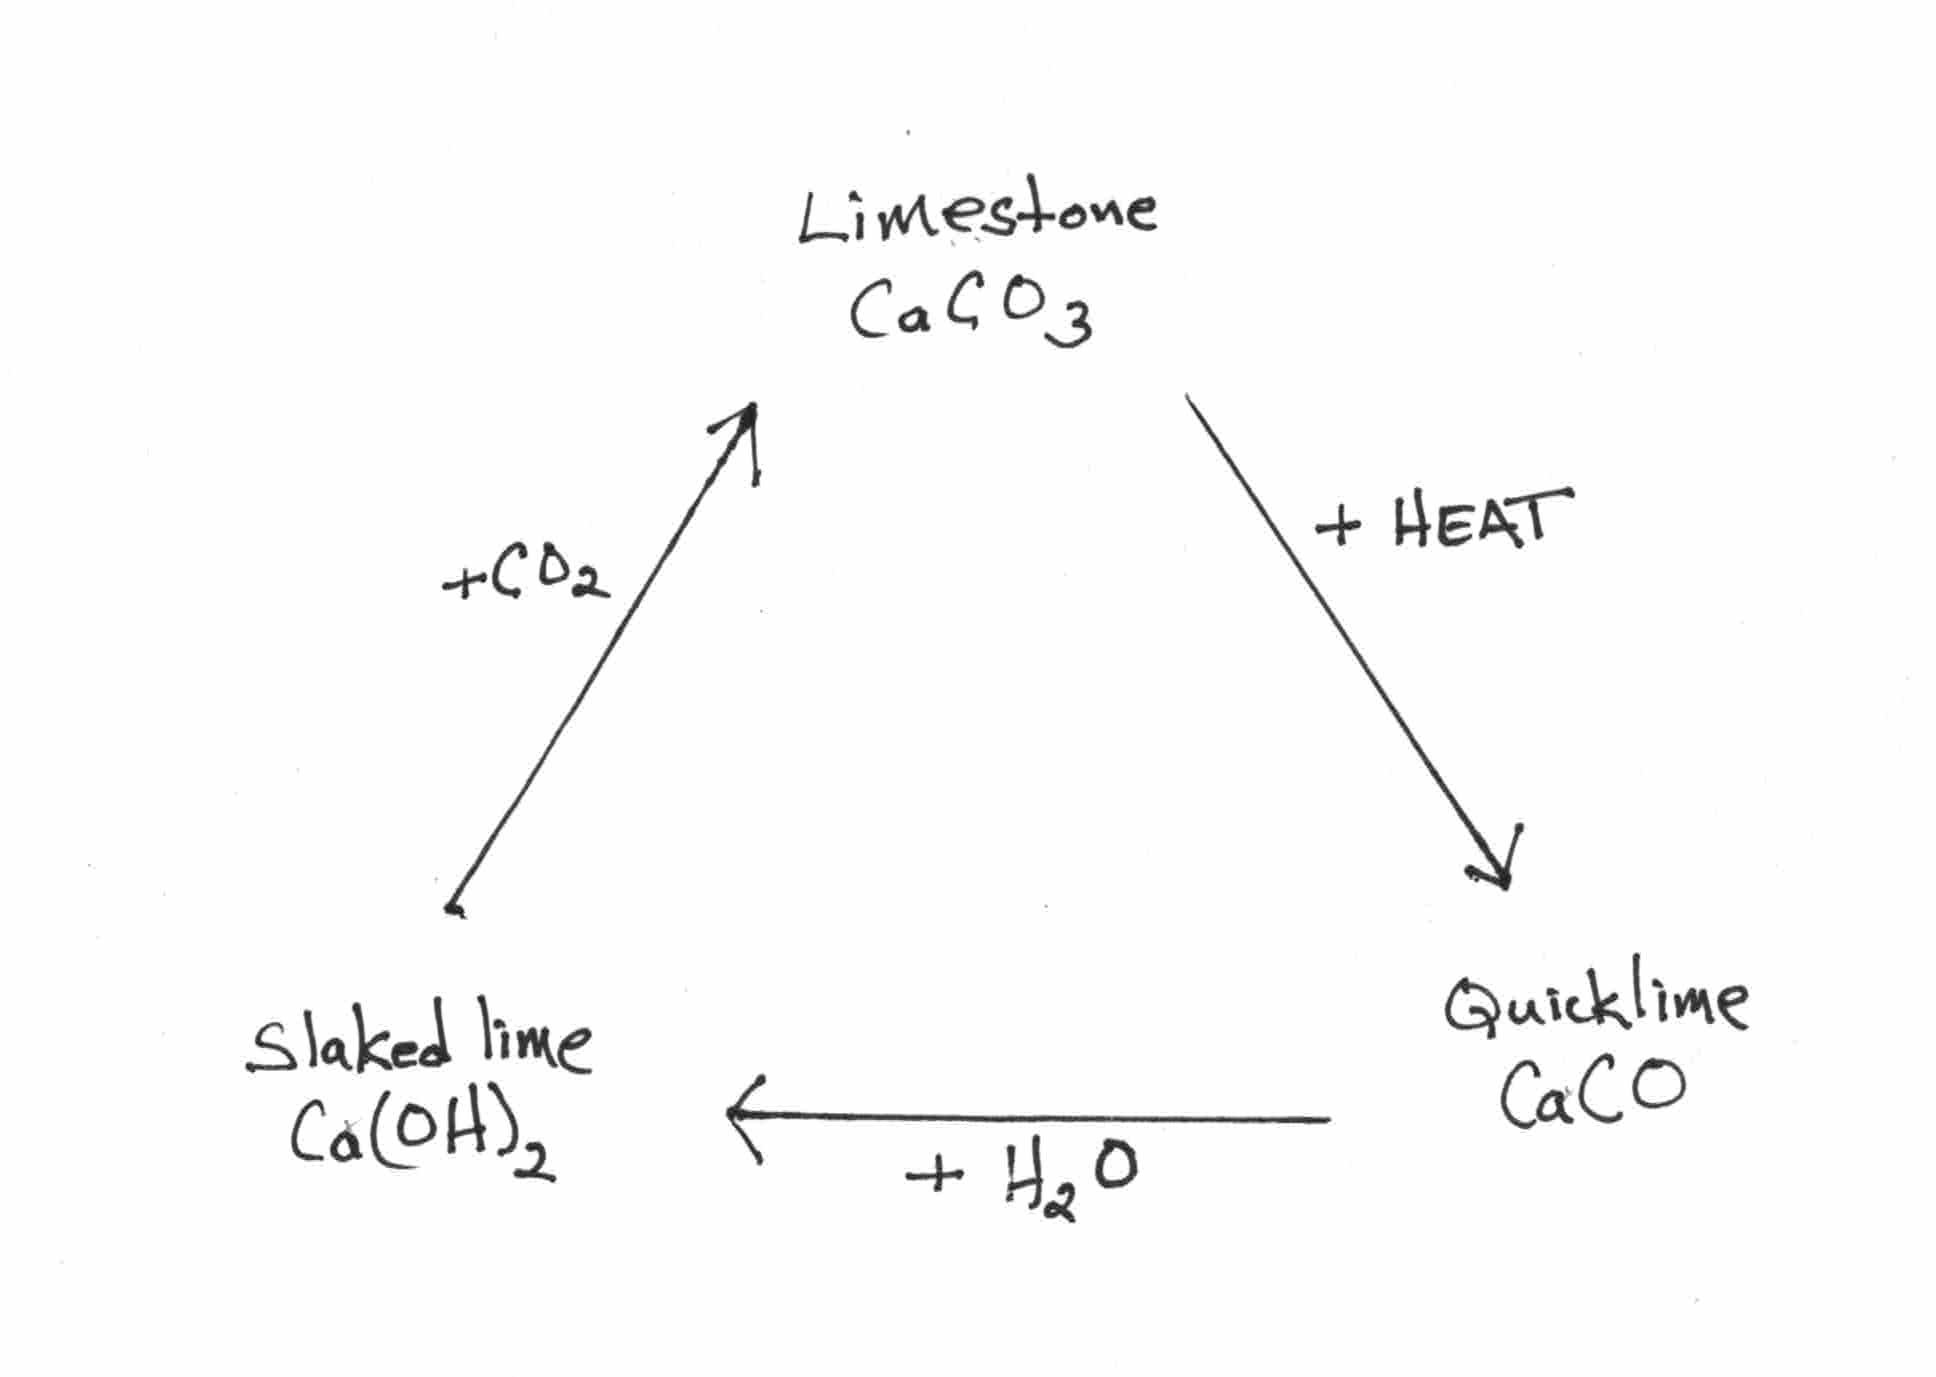
Quick Reduction vats, though used historically, were re-introduced to contemporary  dyers by Michel Garcia and have gained great popularity amongst contemporary practitioners. These are the vats that we presented in The Art and Science of Natural Dyeing. They are easy to make. They rely on the use of sugars, fruits, plants, or minerals and require a very alkaline environment (pH 11-13) to achieve reduction. This high pH necessitates the use of significant amounts of lime (calcium hydroxide) as an alkali.

•       Advantages: These vats reduce quickly – usually in a day (or less). They use no harmful chemicals, though they do require working with a very alkaline substance and solution. Vats made with reducing sugars can be kept for several weeks and, with careful and regular maintenance, can be used for several months.

•     Challenges: The high pH is not suitable for all fibers (a high pH will damage protein). The large quantity of lime (calcium hydroxide) used to achieve the pH builds up quickly in the vat. The lime is also very difficult to remove from the finished textile and can compromise the dye and color, possibly resulting in “unexplained” fading of the blue. 

Chemical Vats use either sodium hydrosulfite or thiourea dioxide to reduce the indigo molecule. This process is used extensively in industry, and I know that some hand dyers also use this process, as it is very predictable. 

•      Advantages: Complete reduction takes place very quickly – usually within minutes. The pH of the vat is 10-11. 

•     Challenges: Reduction chemicals can potentially have a very detrimental effect on the lungs and health of the dyer. When used in combination with a high pH, they can also damage the tactile qualities of wool fibers. Personally, I do not like the smell of the chemicals. 

Because reduction is so complete using reduction chemicals, it can be challenging to achieve pale colors when using chemical reduction.  It is also difficult to use multiple immersions in the vat to increase the depth of shade, as repeated immersions will re-dissolve the indigo already incorporated in the textile.    

Fermented Indigo Vat #1:  A Journey from Quick Reduction to Slow Fermentation

© Catharine Ellis, as posted to the blog: Natural Dye: Experiments and Results

On this blog site, I have previously written about the indigo fermentation vats in very general terms. I have been using these fermentation vats exclusively for over 5 years now and I feel strongly that it is the best approach to use for indigo dyeing. So, I have made the decision that I would like to share much more specific information regarding how to make and maintain these vats through a series of posts in coming weeks. I hope to roll a new one out every few days days or so.  

Since I began the transition to using ONLY natural dyes in 2008, I have continued to learn and to refine my practice. Dyeing with indigo has been one of the most rewarding, yet challenging adventures. Striving for, and practicing a level of mastery related to indigo dyeing, is necessary to achieve a full palette of color using natural dyes and having the ability to control shades of indigo blue is a necessary skill. 

In the 1970s, I did my first indigo dyeing using sodium hydrosulfite as a reduction agent for my vat. I never liked dealing with the reducing chemicals, such as sodium hydrosulfite or thiourea dioxide. The smell was off-putting and, more importantly, I had concerns regarding the safety of such chemicals.  I abandoned their use (and indigo dyeing) until many years later.

I was thrilled when I learned from Michel Garcia that indigo vats could be made using benign substances such as  sugars, plants, ferrous sulfate, and lime (calcium hydroxide) which I was able to purchase in the grocery store as “pickling lime”. Vats made this way are considered to be, or described as,  “quick reduction” vats. They reduce and are ready for dyeing within hours and can be maintained for an extended period with proper attention. I was very happy. These are the vats that Joy and I included in our book “The Art and Science of Natural Dyes”.  I believe that these are still the best vats for short term dyeing workshops and other situations where a working vat is required quickly.

Over time, though, I observed that there are issues and challenges with these vats.

Crocking (the rubbing off of color) was a problem, despite proper finishing and  washing, and especially when dealing with knitting or weaving yarns, which are handled a great deal.  All indigo dye seems to exhibit poor resistance to rubbing to some extent, but the quick reduction vats seems to crock more. What I understand is that excess calcium may react with the reduced indigo and makes it into insoluble compound. These vats depend on the use of large quantities of calcium (calcium hydroxide). I am now thinking that it is possibly the reason for the bad rubbing fastness or crocking.  

This shows the “fading” which occurred on the folded cotton cloth that was stored in a dark place for a number of months. The indigo blue has nearly disappeared in some places. The fading mirrors the actual folds that were in the cloth. It is NOT an intentional design element.

The color often faded inexplicably, turning pale and displaying washed out areas, or just completely disappearing.  I have observed this occurred where cloth was folded and put away on the shelf.  Even when a textile was rolled up and stored in the dark, I would find that the blue had literally disappeared in some parts of a textile despite careful finishing and neutralization. I’ve had discussions with other dyers who have also experienced this same phenomenon, so I know I am not the only one who took note. I always do lightfast test on the dyes that I choose to use for my work but this was something else entirely

The “lime cycle” illustrates how limestone is heated to create quicklime. Water is added to make slaked lime. Does exposure to air/carbon dioxide turn the lime back into limestone again?

In 2017 I began my journey using indigo vats that reduce by the activity of fermentation  after meeting Hisako Sumi, Japanese indigo dyer and researcher. Hisako encouraged me, guided me, and even put together and gifted me a small “kit” which she mailed from  Japan, so that I could start my first fermented vat.  I began experimenting, testing, dyeing, observing, and never looked back. Hisako generously ‘coached” and mentored me from from her home in in Hokkaido and provided me with a much deeper understanding of my vats.

The COVID pandemic kept many of us home for long stretches of time, and during that period many of us learned new skills or honed old ones. That time provided me the opportunity and focus to tend indigo vats and to develop and refine an understanding of the fermentation process. My indigo dyed textiles have never been better! I no longer fret over potential “unexplained” fading. The quick fermentation vats require high alkalinity (pH 12). The fermented vats are able to be maintained at a lower pH than the quick reduction vats (pH 9.5-11). This is accomplished by the use of wood ash lye, soda ash, OR potash to achieve the correct pH. I have used all of these alkaline sources  successfully. Lime (calcium hydroxide) is used in very small amounts and only to “tweak” the pH maintain desired levels. The lower alkalinity of the fermented vats is more suitable for all fibers.  I will likely never return to quick reduction vats, unless specific circumstances require their use.        

In some of my previous blog posts, I have written about this process in general terms and also have given credit to Cheryl Kolander, whose online recipe was a good starting point for me, but until this time, I was not ready to publish anything definitive of my own. In fact, I have never published an “actual” recipe on my blog: Natural Dye: Experiments and Results

I am not a trained scientist/chemist, but through experimenting and multiple observations I have done my best to understand what happens in the fermented indigo vat so that I can use and maintain the vat. And now it is time to share that specific information and information about the process I have used. Over the coming weeks (and about a dozen blog posts) I hope to “walk through” the planning/making/maintaining of a fermented vat and to encourage and guide dyers to explore on their own. And, as we approach summer in the northern hemisphere, it is a good time to try these vats. But do keep in mind, fermentation vats may not be the best for a beginning dyer or for someone who does not have the time and focus for it.

One does not do this alone. I owe much to Hisako Sumi, Michel Garcia, Joy Boutrup, Dr. Kim Borges of Warren Wilson College, and to all my colleagues and students who have been willing to experiment with me. 

As a dyeing community, perhaps we can all help each other to learn, understand, and to work through the process of indigo fermentation. Your comments are most welcome. My goal is to start that process with a series of blog posts that might help you begin your own journey. By all means, if you have a “dye mentor”, do consult them! I don’t have all the answers but maybe we can get there together.

The Fermented Indigo Vat: an Introduction

Last year, I made the decision to stop travel/teaching. It’s been a long journey since my first weaving in 1970, my first dyeing in 1972, my first teaching in 1976 and my committment to natural dye in 2008. This year I will turn 74 years old. I am also a grandmother for the first time and am actively involved in the unfolding life of a 18 month old little boy (who makes us smile every day).

What I have not done, is to stop learning, exploring, or asking questions about natural dye, dyeing,  weaving, and/or how they might combine. Slowing some things down in my life is giving me to time to think more deeply about others, particularly indigo fermentation.  

“Lessons”, a queen size quilt by Catharine Ellis using early woven shibori samples. Border fabric has been dyed with indigo using a fermentation vat.

Some time ago, Joy Boutrup and I discussed the possibility of another dye book that would expand what we presented in The Art and Science of Natural Dyes (Schiffer, 2019). While contemplating this dilemma, I came across the following quote from Annie Dillard:

“One of the things I know about writing is this: spend it all, shoot it, play it, lose it, all, right away, every time. Do not hoard what seems good for a later place in the book or for another book; give it, give it all, give it now. The impulse to save something good for a better place later is the signal to spend it now.
Something more will arise for later, something better. These things fill from behind, from beneath, like well water. Similarly, the impulse to keep to yourself what you have learned is not only shameful, it is destructive.
Anything you do not give freely and abundantly becomes lost to you. You open your safe and find ashes.”

Annie Dillard

So now, Joy and I have together made the decision that I would share the information I have learned using blogposts, instead of writing another book.  
Through a number of upcoming posts, I will discuss the process of indigo fermentation vats, the experiments I have done, and what I have learned about making, maintaining, and dyeing in those vats. I will explain, to the best of my ability, what is happening in those vats and why.  Hopefully, this will encourage more of you to try fermented indigo vats and will provide enough information for a high likelihood of success.  Each post will contain a link to a downloadable pdf version, which you are welcome to print and kept for studio reference.  I would ask that you be respectful of this information though you are most welcome to share the link to my blog for reference.